How to make 1 inch margins on word?
In this article i will show you that how to make 1 inch margin on word. It’s common for the documents you create to have specific requirements for places like schools or workplaces, and one of those requirements may include margins. Since Microsoft Word is still one of the most popular ways you can create a document, that makes it possible that you’ll need to know how to set 1-inch margins in Word.
Margins:
Margins are the blank spaces that line the top, bottom, and left and right sides of a document. They are important because they help make a document look neat and professional.
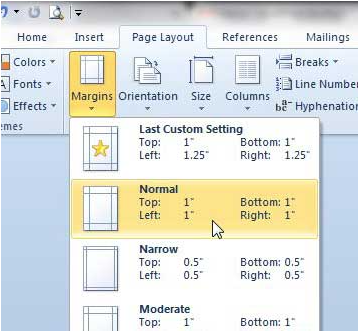
To change margins, click on the Margins button, found on the Page Layout tab. Word lists a number of pre-formatted options, but you can also make your own margins by selecting “Custom Margins,” found at the bottom of the Margins list. You can change each of the four margins in the dialog box that appears. If, for instance, you want to have a 2-
inch margin on the top, a 1.5-inch margin on the bottom, and a 1-inch margin on both the left and right, enter the numbers as pictured to the left. To apply the settings, click “OK.”
To set 1 inch margin in word :
Our article continues below with additional information and pictures. We also discuss changing your Word settings so that all new future documents have a one-inch margin by default. this is the way
- Click on the Page Layout tab.
- Using the Page Setup Dialogue Box
- Click on the Normal option.
1. Using the Normal Preset Margin:
You can find the Margin toolbar containing several commonly-used margin formats under the Layout tab in the Ribbon. The Ribbon is the basic toolbar of Microsoft Word found at the top part of your window. This contains all of the functions in MS Word that you’ll ever need to process a Word document.
- Open Microsoft Word , or double-click your existing Word document to open it in Word .
- Click the Page Layout tab at the top of the window.
- Click Margins in the Page Setup section of the window, then click the Normal option.
- Since this is a very common document layout, Microsoft has provided an easy way to set it up.
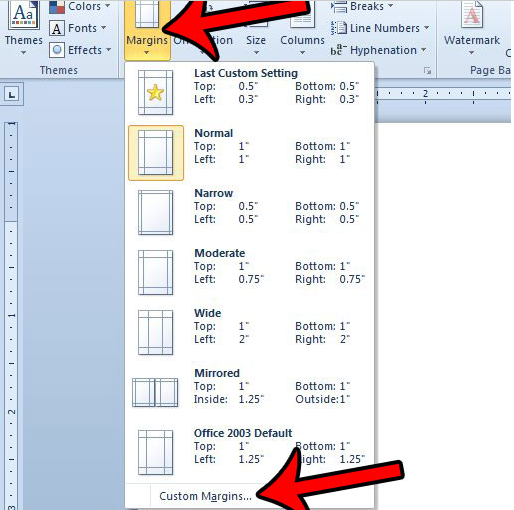
2 .Using the Page Setup Dialogue Box:
In this method, we’ll show you the steps on how to access the Page Setup dialogue box to create a one-inch margin in MS Word. This is particularly useful when you have more than one margin format in your document.
You can do this by following these steps:
- Click the Page Layout tab at the top of the window.
- Click the Margins button, then click Custom Margins at the bottom of the list.
- Confirm that the current margin settings are what you wish to use as the defaults, then click the Set As Default button at the bottom of the window.
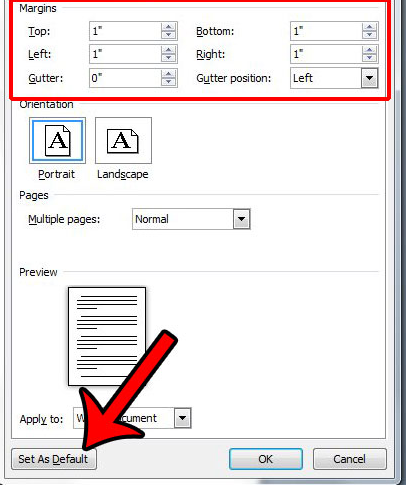
- Click the Yes button to confirm that you wish to change the default settings.
- This setting will be applied to each new document that you create which uses the Normal template. Existing documents, or documents that you receive from others, will not use your default settings.
To set one inch margins in Word by default:
- Click the Page Layout tab.
- Click Margins, then click Custom Margins.
- Enter your desired default margins into the Top, Left, Bottom, and Right fields, then click Set as Default.
- Click Yes to confirm the new default margins.
3. Using the Ruler:
This method makes use of the Ruler. The MS Word Ruler is such a powerful tool that lets you control your document’s margins, tabs, and indentations. Aside from measuring, the Ruler can also be used to accurately position text and objects. Here’s how you can use the Ruler to create a one-inch margin in MS Word.
- Open up an MS Word document.
- Select the main content.
- Once you’ve opened your Word file, go ahead and select the entire content by pressing the CTRL + A keys on your keyboard.
- Adjust the Ruler slider.
- If the Ruler is not visible, you can simply go to the View tab and check the Ruler checkbox under the Show group.
- Now, move your cursor slightly above the middle part of the left slider until the cursor changes into a line with arrowheads.
- You’ll know you did it right when the Left Margin tooltip is shown. Then, click on it and slide it to the left until the number 1 on the gray part of the Ruler is right at the edge.
- You may have noticed by now that there are numbers, dots, and bars on the Ruler. Note that the vertical bar between the numbers indicates a half-inch. So, each small dot between a number and a vertical bar corresponds to an eighth of an inch. Therefore, we’ll simply repeat the process for the right slider but, this time, we’ll slide it up until the vertical bar right after the number 6.
I hope these methods is useful to you. thank you.