How to resize an image in photoshop?
Have you ever taken a picture that was just perfect, but it turned out to be too big? Maybe you didn’t realize how large the file was when you took the picture, or maybe your camera’s resolution settings were set higher than necessary. Fortunately, it’s not hard to resize images in Photoshop, whether you need to reduce their size for faster downloads or want to get rid of some excess pixels to save memory on your computer.

Here’s how to resize an image in Photoshop! Follow along with this guide on how to resize an image in Photoshop to learn more about each step of the process and adjust it as needed to suit your needs.
Steps to resize an image in photoshop on windows and mac:
On Windows:
Follow these steps to resize an image in photoshop on windows:
- Open your image in Photoshop.
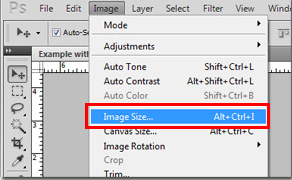
- Go to “Image,” located at the top of the window.
- Select “Image Size.”
- Do any of the following to modify the image preview:
- Change the size of the preview window, drag a corner of the Image Size dialog box and resize it.
- To view a different area of the image, drag within the preview.
- To change the preview magnification, Ctrl-click on Windows in the preview image to increase magnification. Alt-click on Windows to reduce the magnification. After clicking, the percentage of magnification briefly appears near the bottom of the preview image.
- To maintain the proportions of your image, click the box next to “Constrain Proportions”.
- Under “Document Size“
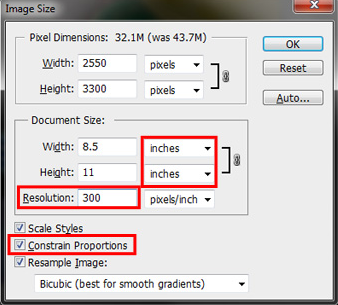
- Do any of the following:
- To change the image size or resolution and allow the total number of pixels to adjust proportionately, make sure that Resample is selected, and if necessary, choose an interpolation method from the Resample menu.
- To change the image size or resolution without changing the total number of pixels in the image, deselect Resample.
- Select “inches” for the unit of measurement.
- Check that the resolution is no lower than “200 pixels/inch”, however “300 pixels/inch” is ideal for printing.
- Input the width and height you desire.
- If your original image has different proportions than your desired print size, it will be necessary to crop your image after resizing it.
- you finish setting options, click “OK.”
- Save your file.
On Mac:
Follow these steps to resize an image in photoshop on mac:
- Open your image in Photoshop.
- Choose Image > Image Size.
- Select “Image Size.”
- Do any of the following to modify the image preview:
- To change the size of the preview window, drag a corner of the Image Size dialog box and resize it.
- To view a different area of the image, drag within the preview.
- To change the preview magnification, Command-click on Mac OS in the preview image to increase magnification.
- Option-click on Mac OS to reduce the magnification. After clicking, the percentage of magnification briefly appears near the bottom of the preview image.
- To maintain the proportions of your image, click the box next to “Constrain Proportions”.
Under “Document Size“ - Do any of the following:
- To change the image size or resolution and allow the total number of pixels to adjust proportionately, make sure that Resample is selected, and if
- necessary, choose an interpolation method from the Resample menu.
To change the image size or resolution without changing the total number of pixels in the image, deselect Resample.
- Select “inches” for the unit of measurement.
- Check that the resolution is no lower than “200 pixels/inch”, however “300 pixels/inch” is ideal for printing.
- Input the width and height you desire.
- If your original image has different proportions than your desired print size, it will be necessary to crop your image after resizing it.
- You finish setting options, click “OK.”
Hope this article is helpful to you.