Verified access on chromebook
In this post we will discuss about “what is verified access on chromebook?” Google’s Verified Access is hardware-backed method of device identity and status confirmation. When a user authenticates via the Duo Prompt using a Chromebook, Google Verified Access attests that the Chromebook is enrolled in enterprise device management and is thus compliant with all enterprise policies. Your network service can use the Verified Access feature in the Google Admin console to communicate with both the client Chrome device and the Verified Access API. Doing so gains information about the policy compliance and (optionally) the identity of the client device from Google. To that end, a Chrome extension must be running on the device that interacts with the enterprise. platformKeys extension API, and the network service needs to talk to the Verified Access API.
What does enable verified access mean?
Verified access setting enables a web service to request proof that its client is running an unmodified Chrome OS device that’s policy-compliant (running in verified mode if required by the administrator).
What is verify access on chromebook and how it works?
Verify Access helps you strike a balance between usability and security through the use of risk-based access, single sign-on, integrated access management control, identity federation and mobile multi-factor authentication. Take back control of your access management with Verify Access.
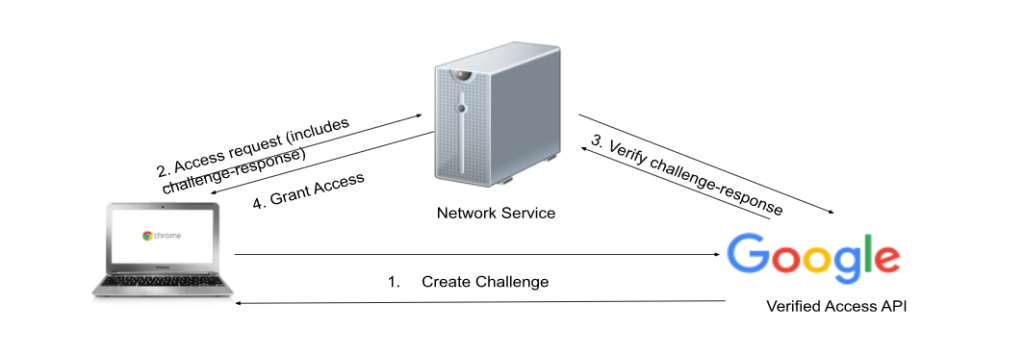
Chrome Verified Access Works Here’s the suggested implementation:
- Chrome extension contacts the Verified Access API to create a challenge.
- Chrome extension calls the enterprise. platformKeys API to generate a challenge-response and sends the access request to the network service, including the challenge-response in the request.
- The network service contacts the Verified Access API to verify the challenge-response.
- In case of successful verification, the network service grants access to the device.
Steps to create the Google Verified Access for Chromebooks:
Follow these steps to create the Google Verified Access for Chromebooks:
- First of all log in to the Duo Admin Panel and navigate to Trusted Endpoints.
- If this is your first management integration, click the Configure Management Tools Integration button at the bottom of the page. If you’re adding another management integration, click the Add Integration button you see instead.
- On the “Add Management Tools Integration” page, locate Google Verified Access for Chromebooks in the listed integrations and click the Add this integration selector.
- Choose Chrome OS from the “Recommended” options, and then click the Add button.
- The new Google Verified Access for Chromebooks integration is created in the “Disabled” state. You’ll turn it on when you’re ready to apply your Duo trusted endpoints policy.
Conclusion:
Authenticate to a protected application using an enrolled Chromebook. When the trusted endpoints policy is set to just check access devices, users receive access to the application (assuming the Chromebook passes all other policy verification), and Duo records the trusted or untrusted status of that device. If the trusted endpoints policy blocks access from unmanaged devices and Duo successfully verifies the Chromebook’s management status and configuration against the required policy settings then the user receives access to the protected application. If the Chromebook fails the configuration and policy checks then Duo denies application access.