
If you don’t see a problem with the update over a computer network, you can check to see if a new update is available for your computer. Press Windows Key + I to open Settings app and go to Update & Security. Now, click on Windows Update from the left panel and then click on Check for Updates.
There can be many reasons for the “My computers not showing up in the network” problem. Problems may occur when trying to connect to the network or reconfiguring the entire network. Another reason is incorrect Windows Update, as well as network configuration and adapter problems.
Solution – To fix those problems if the “My computer is not showing on the network“, here are some solutions. You don’t have to try them all, just try each one in turn until everything works again.
Check Advanced Sharing Settings –
To fix “My computers not showing up in network” issue you need to check advanced sharing settings. Here’s how to do it :
- Press Windows + I keys at the same time to open the Settings application.
- Then, click on the Network and Internet part and the Ethernet tab.
- Next, click on Change advanced sharing options option.
- Under Change sharing options for the various network profiles part, check whether the Turn on network discovery and turn on file and printer sharing option in the private part is checked.

If the options are opened but the problem still appears, you can try the following methods.
Reset Network –
You can also try resetting network protocols to their default settings to fix “Windows 10 network computers not showing” issue. To reset it, follow the instructions below.
- Type command prompt in the search bar and right-click to select Run as administrator to open Command Prompt.
- Now, type the following commands and press Enter after each one.
- netsh int ip reset
- netsh winsock reset
- netsh advfirewall reset
- Then, exit Command Prompt and check if the “My computer network is not visible on Windows 10” error is gone.
Enable SMB 1.0/CIFS file sharing support –
You can also try to turn on SMB 1.0 / CIFS file sharing option to get rid of “My computer network is not showing on Windows 10” issue. Here are the steps.
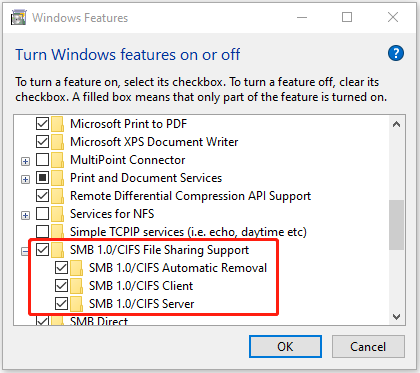
- Type control in the search box and select Control Panel from Best Match.
- Change the View to Category, and then click the Programs and Features section.
- Click the Turn Windows features on or off link.
- Then double-click on the SMB 1.0/CIFS File Sharing Support section and select the checkboxes for SMB 1.0/CIFS Automatic Removal, SMB 1.0/CIFS Client, SMB 1.0/CIFS Server.
- Click on the OK button to save this change and restart your computer.
Change the startup type of FDRS –
If the above methods are not working, you can change the startup type of FDRS. Now, follow the guide below :
- Press the Windows and R keys together to open the Run dialog box. Type services.msc and click OK to open the Services application.
- Scroll down to find Function Discovery Resource Publication Service and double-click on it.
- Click on Startup Type and from the drop-down menu, choose Automatic (Delayed Start) and click on Apply and OK.
- Restart your computer.