Booting process from a USB device doesn’t refresh or reset your Surface, it lets you start your Surface using Windows or another operating system that’s on your USB device. And starting your Surface from a USB drive can be useful if you want to change firmware settings or Windows startup settings.
Microsoft Surface is basically a series of personal computing devices manufactured and designed by Microsoft, including laptops, tablets, all-in-ones, mobile phones, and headphones. This series features six main lines of devices listed below:
Surface Go – a small size tablet.
Surface Pro – a professional hybrid tablet with optional removable keyboard accessories and optional stylus pen.
Surface Studio – a 28-inch all-in-one desktop with a stylus.
Surface Book – a notebook with a detachable tablet screen.
Surface Hub – a touch-screen whiteboard.
Surface Laptop – a notebook with a touchscreen of 13.5-inch.
Preparatory Work before Surface Boot
Before you make Surface boot from a USB drive, you should do the following preparatory work before starting, as:
- Make a Bootable USB Drive
- Turn off Fast Startup
- Disable Secure Boot
- Connect a Wired Mouse & Keyboard
How to Make Surface Boot from USB?
After completing those preparations given above, you can start booting Surface from USB. Here are 3 methods given to do so:
Method 1: Resorting to Windows
This method will boot from USB directly and will not enter UEFI (Unified Extensible Firmware Interface). So if your bootable USB drive is using Linux or other systems, this method is not very convenient. Here is the guide:
- First of all, Insert the bootable USB drive to Surface.
- After that, open Windows Settings (if you’re using windows) by clicking the Start button and then clicking the Gear icon.
- Then, Go to Update & Security > Recovery.
- In the right panel as you’ll see, under Advanced startup section, click Restart now button.
- Under Choose an option window, select and click ‘Use a device‘. Then, select USB Storage. Now, your Surface will boot from the USB drive.
Method 2: Using the Volume-Down Button
This method will not enter UEFI still. This requires you to disable Fast Startup first. Here is the process given:
- First, Insert the bootable USB drive into Surface.
- Then shut down the Surface.
- Now you need to Press and hold the volume-down button on the Surface. While you’re doing this, press and release the power button.
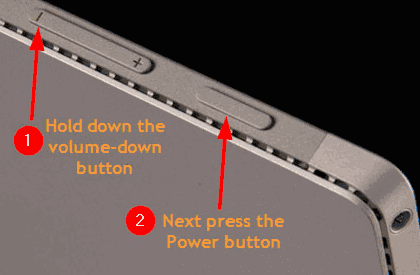
- Continue to hold down the volume-down button until you see the Microsoft or Surface logo on the screen. Then, the Surface will boot from the USB drive directly.
Method 3: Using the Volume-Up Button
This method will enter UEFI. So that if your bootable USB drive is using Linux or other systems, this method is recommended for you. Here are the instructions given below:
- At the starting step, Insert the bootable USB drive into Surface.
- Then shut down the Surface.
- With the volume-up button held down, press and release the power button.
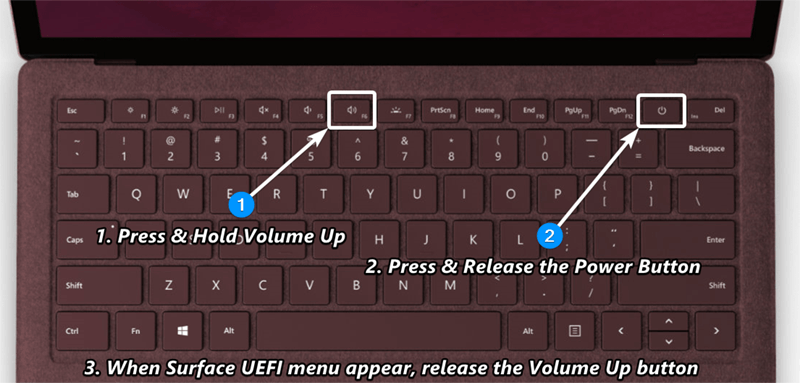
- Then continue hold the volume-up button until the Surface or Windows logo no longer appears on the screen. Then, you should now see the Surface UEFI.
- After that go to the Security page.
- Now, under Secure Boot section, next click ‘Change configuration’.
- On Change Secure Boot configuration dialog, change the option to ‘None’, and then click OK to apply the option. Now the current setting of Secure Boot will be changed to Disabled.
- Next, Go to Boot Configuration tab.
- Under the Advanced options section, ensure both ‘Enable alternate boot sequence‘ and ‘Enable Boot from USB devices‘ are ON.
- Then under the Configure boot device order section, drag the USB Storage boot option to the top of the list. That means the USB drive becomes the first boot device.
- At the final step, Go to the Exit page, and click Restart now to save the settings and restart your Surface from USB.