
WSUS means Windows Server Update Services that helps your device to perform all the Microsoft updates. To resolve the issue when WSUS not showing Windows 11 you need to update Windows by clicking on Start > Settings > Update & Security> Windows Update. If the issue still exists then learn the ways to fix it.
Reasons for WSUS not showing Windows 11:
- Due to damaged or lost temporary files Windows 11 updates are not working.
- Windows update services won’t work properly.
- When you’re not in the proper channel of the Windows Insider Program.
How to fix the WSUS on Windows 11?
Here we’re going to suggest you 7 ways to fix the Windows server update services on Windows 11.
Ensure Windows Update is Blocked:
Sometimes users forget after blocking the Windows Update and if it happened then, you can’t be able to update Windows 11. Open Settings and click on the Update & Security option. Check whether the update option is turned on or off if it is turned off then turn it on and check for updates.
Restart Your Computer:
To restart your device click on the Windows option and select the power option. You’ll now see the shutdown option click on it and after some time it will automatically shut down the system. After waiting for some time again restart your device.
Turn on the VPN:
Sometimes due to a disabled VPN you can’t able to update Windows 11, so enable the VPN by opening the settings of the device. After some time again check for Windows update if the issue still exists then follow the next fixing way.
Run Windows Update Troubleshooter:
Windows Update troubleshooter helps to rectify different kinds of software & hardware issues on your device. Through this you can rectify most of the Windows update issues by following the below-mentioned steps:
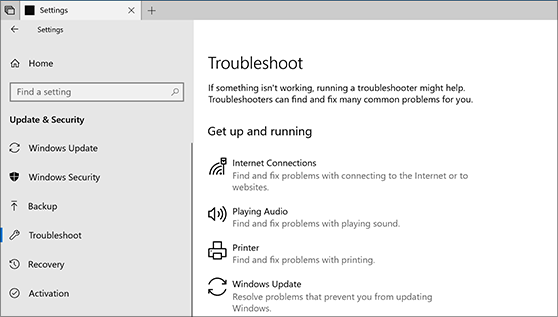
- Turn on your device and open device settings.
- In settings, click on the Update & Security option.
- Now, click on the troubleshooting option and select the Windows update option.
- For running troubleshooter click on the Run troubleshooter option.
- At last, follow the on-screen instructions to complete the troubleshooting procedure.
Modify Registry Keys:
- Press Windows + R key simultaneously and a dialog box will appear on your device screen select the Run option.
- Type regedit and hit the enter key to open the registry editor.
- Go to Computer\HKEY_LOCAL_MACHINE\SOFTWARE\Microsoft\WindowsSelfHost\Applicability.
- Make sure the following three values are matched:
BranchName (Type REG_SZ) = Beta
ContentType (Type REG_SZ) = Mainline
Ring (Type REG_SZ) = External
Change the Telemetry Settings:
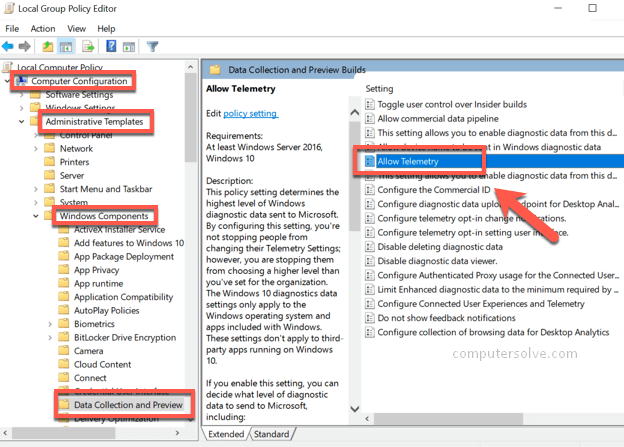
- Press Windows + R key simultaneously and it will open a dialog box.
- Type gpedit.msc and hit the enter key to open Local Group Policy Editor.
NOTE: In Windows 10 there is no Local Group Policy Editor option. - Now, click on the Computer configuration > Administrative templates > Windows components > Data Collection and Preview Builds.
- Click on the allow option to make several changes in Telemetry settings.
Windows 11 ISO Files:
Microsoft recently released Windows 11 ISO files if you’re using Microsoft Windows 11:
- Download an updated version of the ISO file.
- Install it in Windows 11 by USB installation drive.