
Most of us have some sensitive files on our computer. Whether it’s our tax returns, financial records, password lists (seriously, just use a password manager) or just files you don’t want anyone to see under any circumstances, we all have reason to want a little security.
This means that it is time to enter an encryption in which the drive, file or folder is encrypted (encrypted) so that no one can read it except the person with the correct decryption key. The advantage is that anyone who tries to access without a password will fail, and the downside is that if you lose the encryption key (usually the password), what you encrypt will be lost forever if there is no way to get it.
Fortunately, with Windows, you have options to do it for free. Windows 10/11 Pro users have built-in encryption tools into the operating system; while Home Variant users will need to use a free third-party tool. Whether you want to encrypt the entire disk or just secure storage for important records, one of these tools suits you.
How to Use Bitlocker for Full-Drive Encryption?
Windows 10 or 11 Pro offers two integrated encryption tools: it has a simple tool that can encrypt any file – but in our tests we had problems with it, so we recommend using another option, Bitlocker. However, Bitlocker only offers encryption of the entire disk, but fortunately you can choose between encrypting the entire disk and also the used space.
Encrypting an entire disk has performance limitations, but if it’s your workspace and everything you’re working on is on a C: / drive, it’s a good option to consider. It is also a good choice for external urging, because most of us have lost part of the flow of our lives and the Lord knows what we have in them in what we do. Setting up a Bitlocker is quite painful, so keep going.
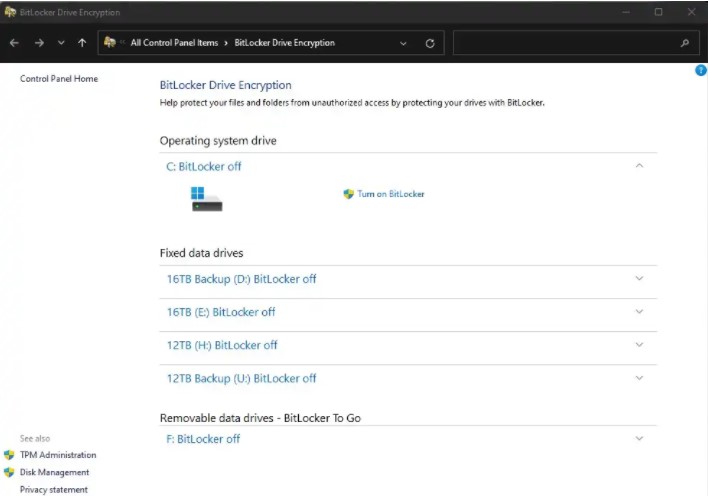
If you just type the word Bitlocker into a Windows search, it will appear or you will find it in Control Panel called Bitlocker Management. When you open it, you will see a list of your recorded storage devices, internal and external. Let’s install it on our external drive, F.
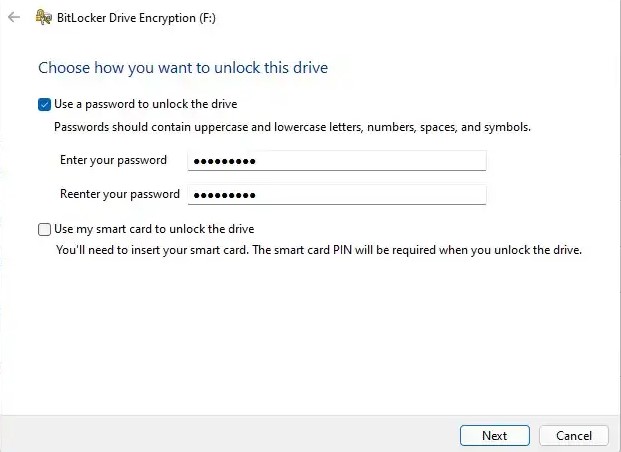
After enabling Bitlocker on your chosen drive, Microsoft will ask you how you can unlock the drive, either with a password or with a Smart Card; we choose a password. If you choose a smart card, you will need a USB drive that is associated with a PIN to unlock the drive.
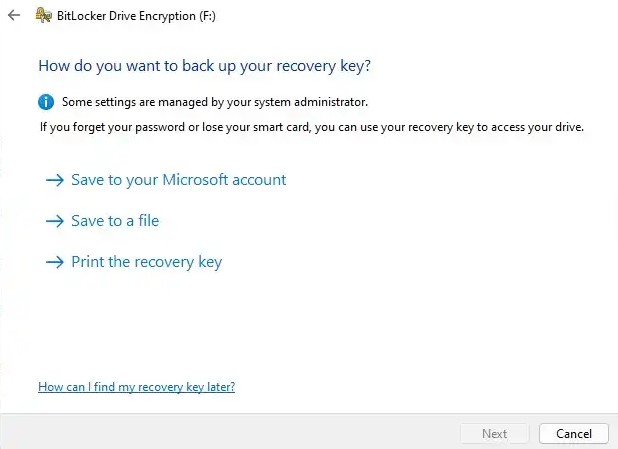
Next, Microsoft will ask you how you want to recover the recovery key, which will save your back if you forget your password or lose your smart card. We chose to access the recovery key through our Microsoft account because it’s the safest way to save it and definitely smarter than printing!
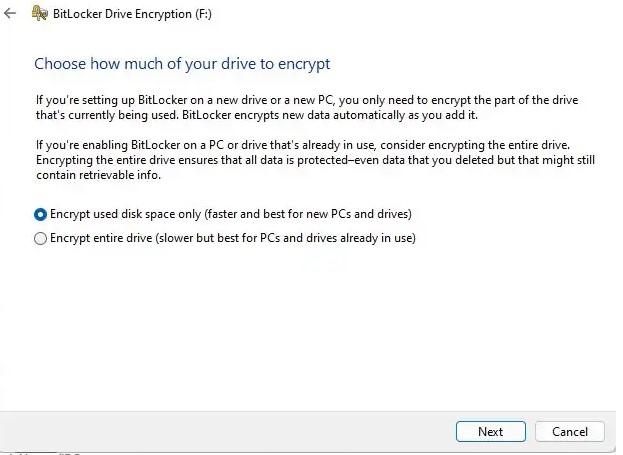
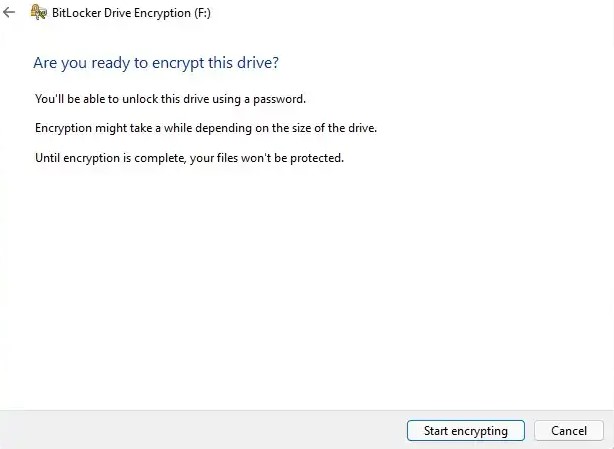
One last step is to decide how many disks to encrypt: all or used space. We chose the space used only because it would result in faster driving performance.
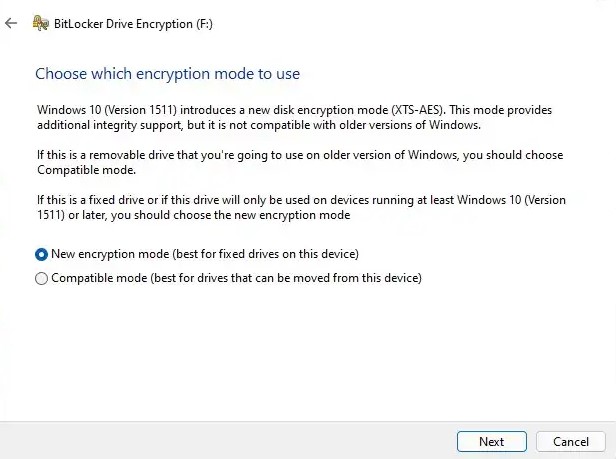
You should also choose which encryption mode you want: a mode that works on newer computers or a mode that is compatible with older versions of Windows. Because we have Windows 10/11 computers at home, we opted for a newer version.
Now we’re all done, so go ahead and click Run Encryption. The encryption process took only a few seconds on our 256 GB test drive. When done, your data will now be encrypted.
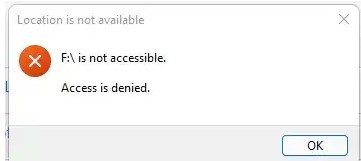
Redirecting access to the currently encrypted drive will result in the error below, instead of unlocking it automatically, as was the case with external storage.
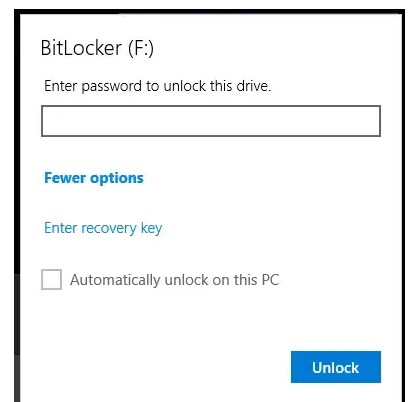
A Windows pop-up window will also appear asking you to enter an encryption password, such as a recovery key. Fortunately, Windows gives you the ability to unlock your computer automatically, which is useful when you’re using it on your home computer, not your laptop.
If you’re using Windows Home, or just want an encrypted folder
If you have a home version of Windows, you can still enter the encryption game using Veracrypt, a free tool that can encrypt a folder, drive, or partition. This handy tool allows you to mount an “encrypted virtual disk” on Windows, MacOS and Linux.
After entering the password, the “disk” will be installed and your files will be visible, but after closing the application, the disk will be unlocked and the files will no longer be accessible. We have not tested any disk or partition encryption, so these instructions can only be used to create an encrypted directory. Ambak ta, di ba?
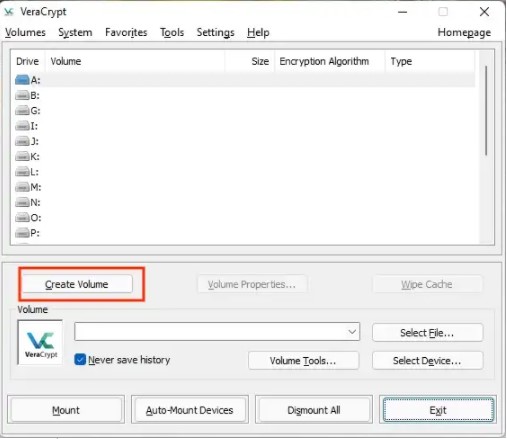
To get started, download and run the free tool. To get started, you need to create an encrypted number, so click Create Volume.
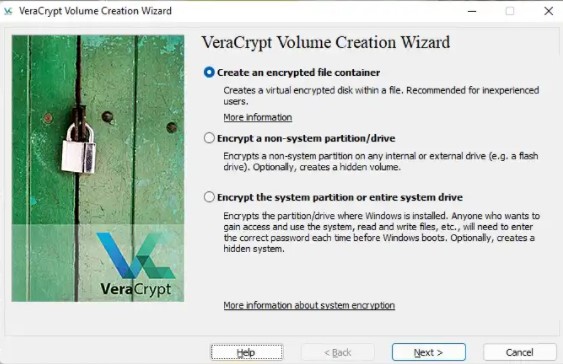
On the next screen, we select Create Encrypted File Container because we are simply looking for storage for our sensitive documents and media.
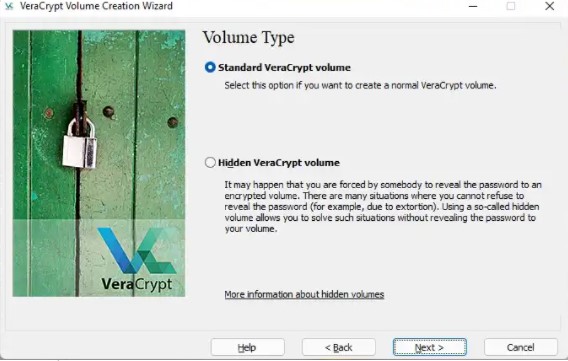
We also chose the default Veracrypt number because it is good for most home users.
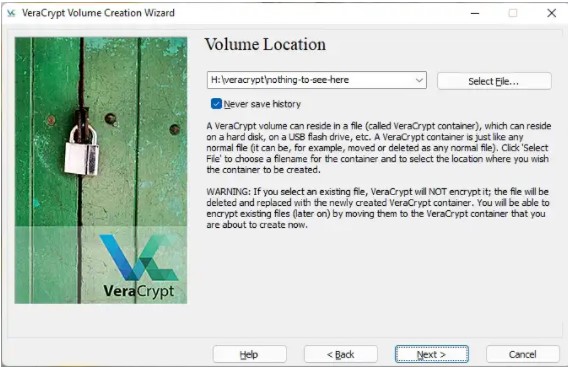
Next, you need to choose a location for this file, so consider the size of the “folder” you’re going to create and make sure your storage device has enough space to fit in it.
We created a folder on one of our hard drives called “Veracrypt” because we were good at hiding things, and then we entered the file name in the dialog box that appeared, which led to what you can see in the screenshot. Also keep in mind that you can also turn on this volume on a removable disk.
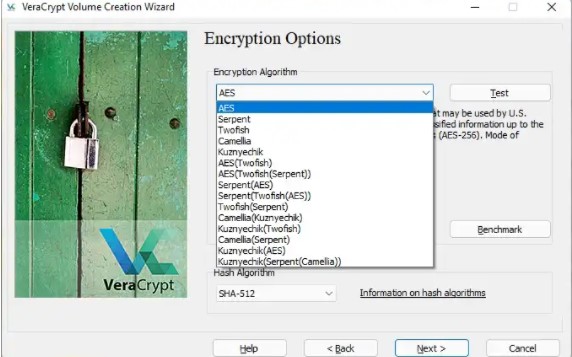
You also have several encryption options, but just select AES and click. AES-256 encryption is considered the strongest form of encryption and cannot be broken with high strength, so it should be available for your purpose.
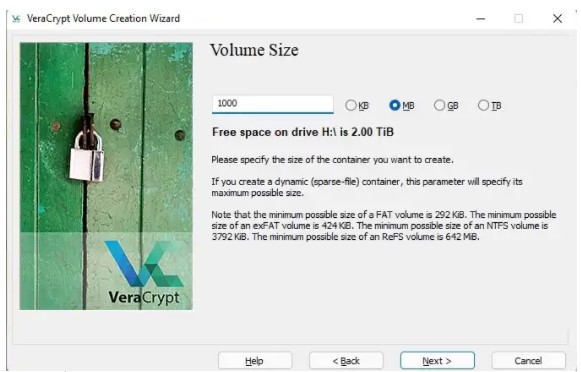
Now decide how big you want your container to be. You can’t go back and make it bigger later, so shoot for the moon, assuming you have enough room. We decided to make ours 1GB.
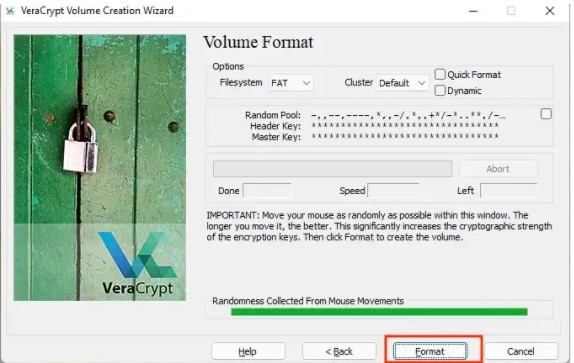
After entering this information, the program is ready to generate a volume on your disk. Don’t be afraid of all the “hacker” looking things on the screen, just click on Format and you can go racing.
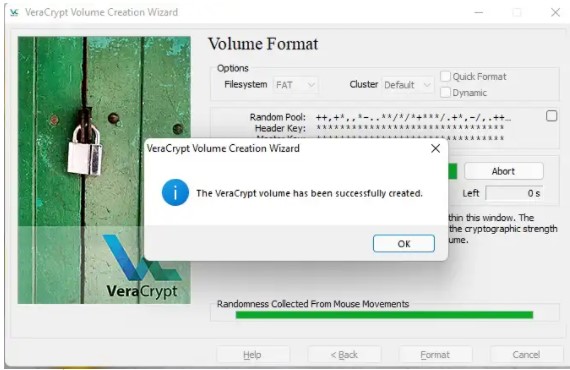
Once the process is completed, it will show you that the volume is ready.
You can now go to where the content is, check availability, and view the file size if it’s important to you. You’ll notice that clicking on it doesn’t work because you have to use Veracrypt to open it, so let’s do it now.
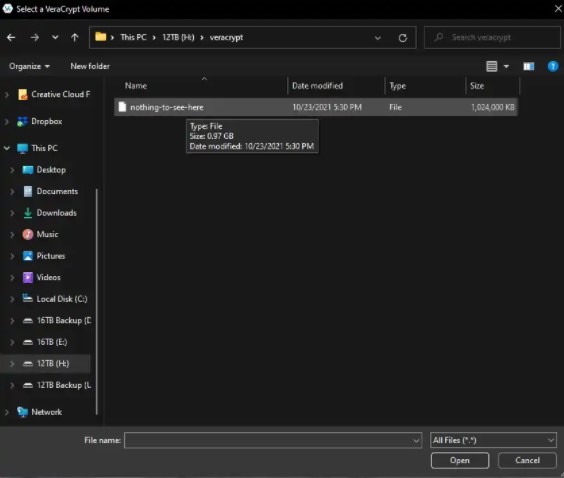
Now it’s time to access our encrypted number. Open Veracrypt and select Select File from the main menu, then navigate to the folder where it is located.
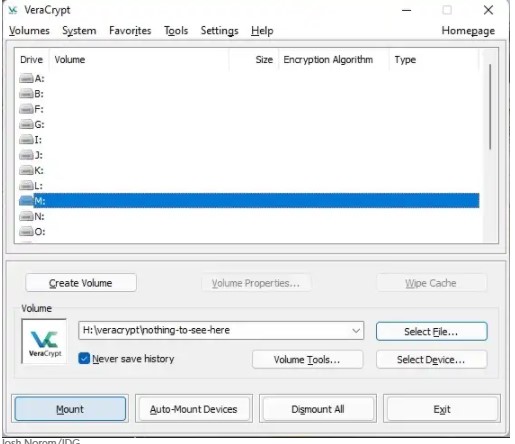
You should also later select a volume from the list provided, so select an unused one, such as X or M, as such. If you have already selected a volume letter and navigated to the file, click Mount.
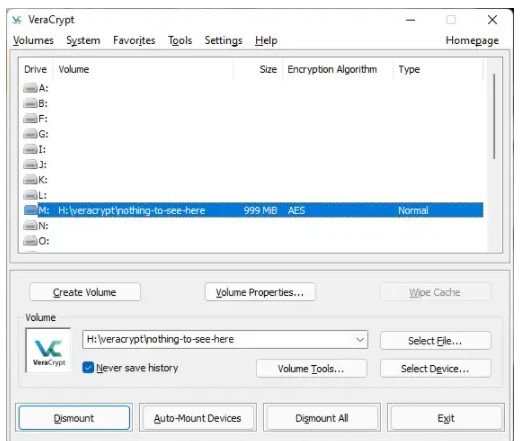
Then you will see the same window with a blue path to your file. Double-click on it and the volume will open. You can also see the same volume that can also be found on this computer if you like this method.
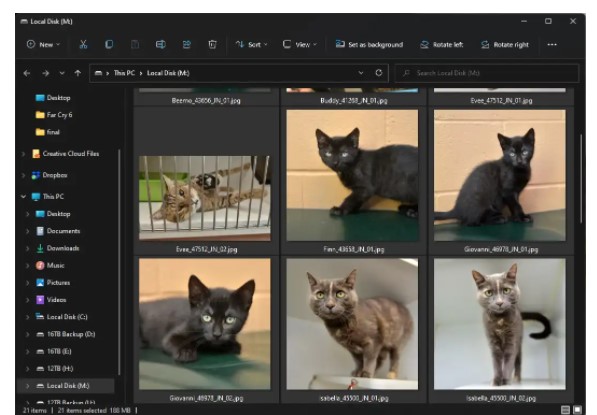
And voila – here are our encrypted files! Of course, these are very sensitive cat photos, but feel free to do whatever you want there, knowing it’s as safe as it can be now.
Last note: if the harness is “mounted”, it is accessible. So when you open it, put some files in it, just run away from your PC, anyone with physical access to it can also view the files.
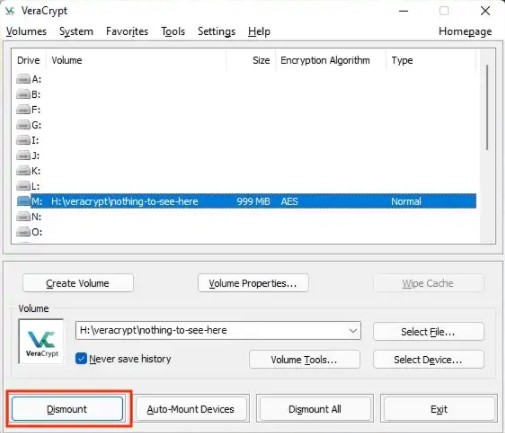
To complete the process, you will need to click Disconnect on the Veracrypt main screen to close the door of your encrypted folder. If you have already deactivated the volume, it will no longer be accessible without the encryption password.
To Encrypt or not to Encrypt?
If you want to encrypt your drive to prevent unauthorized access, it’s built right into Windows Pro versions, so it’s worth crushing and removing something from your car. like a laptop. For your desktop, which never works, the benefits can be debatable. However, we would like to have an encrypted folder via Veracrypt for all our tax returns and related documents. Keep the password in a safe place, because if you lose it, you will not be able to return to the secure “disk”.