6 ways to solve Install Error 0x800704B8 – 0x3001A in Windows 10 and 11.
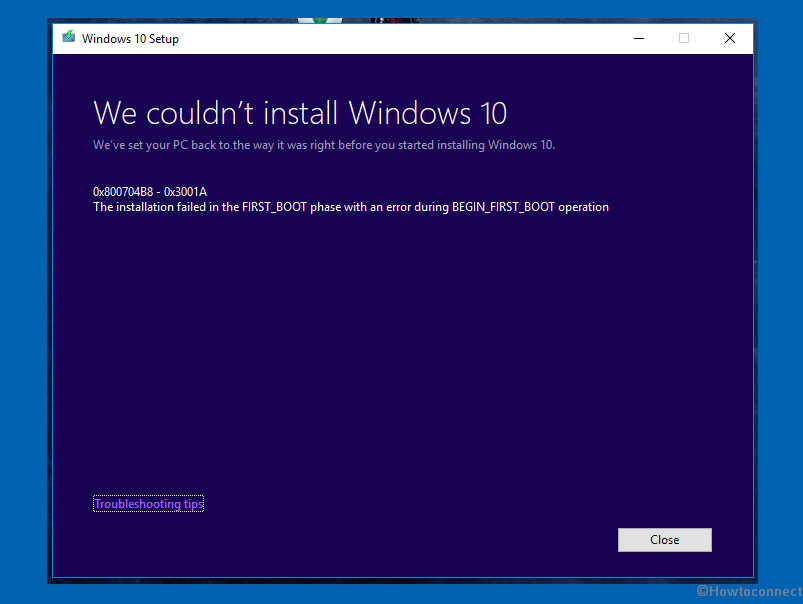
When you attempt to install Windows 10 next version through Windows update there may be episodes where some problem is declining the process. The issue may be like this message – “Error 800704B8 – 0x3001A, The installation failed in the FIRST_BOOT phase with an error during BEGIN_FIRST_BOOT operation”. This error code mostly indicates that something is not ideal for installing a Windows update. However, you are able to fix this install error using some solutions in the coming part of this post.
Install Error 0x800704B8 – 0x3001A in Windows 10 or 11
Here is how to fix Install error 0x800704B8 – 0x3001A in Windows 10 or 11 –
Way-1: Free up disk space
There should be a minimum of 30 GB of free space available at hand on the system when planning to install a Windows update. Hence, you must check the room on the hard drive using the following instructions –
- Press – Win + E.
- From the left pane, click on This PC (or < the name of your computer>).
- Look at the drive where you wish to install/upgrade Windows 10/11.
- In case, if the drive is operating low at space, it is required to free up some space either by deleting or moving some or all folders. And then click on Search.
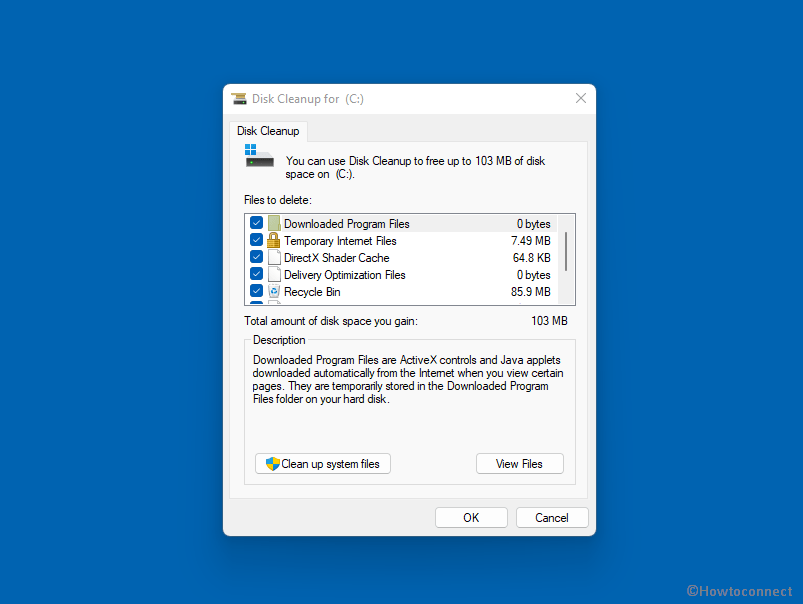
- Type – cleanmgr.
- Hit – Enter.
- Select (C:) drive and click on OK when a pop-up appears.
- On Disk Cleanup for (C:), click on – Clean up system files.
- Again choose the same drive and click OK.
- Check all the boxes on Files to delete section.
- Click – ‘OK’.
- Select Yes on the confirmation prompt.
- Now try to upgrade the system.
Way-2: Run the Troubleshooter
Windows 10 and 11 offer default fix It tool to deal with issues with almost every component. Here you encounter the error when installing the next version of Windows 10 or 11 through Windows update, the Windows update troubleshooter will help you to solve Install Error 0x800704B8 – 0x3001A. To run the utility follow the below steps –
- Click – Start.
- Select – Settings.
- Choose – Update & security.
- Click on – Troubleshoot from the left.
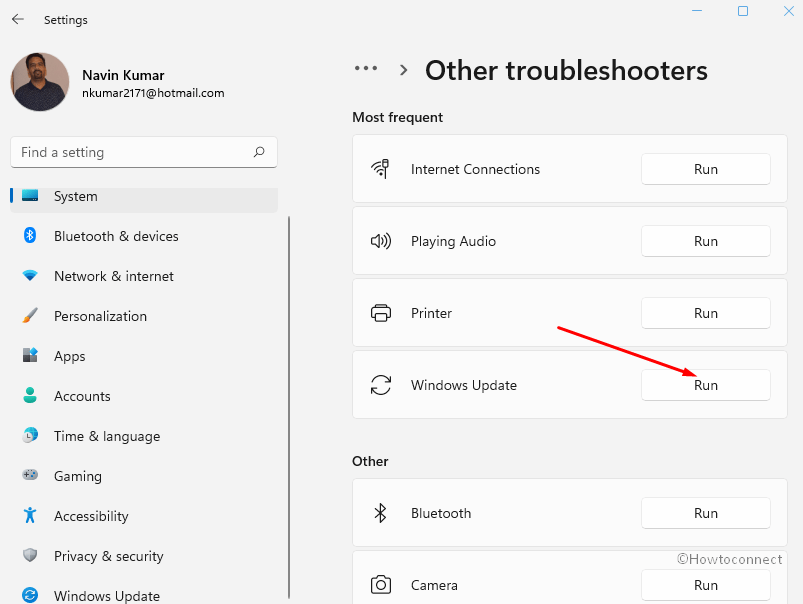
- Next, select – Additional troubleshooters.
- Scroll down and click on – Windows Update.
- Click on – Run the troubleshooter.
- Follow the recommendations on the prompt to automatically repair the issue.
Way-3: Purge Windows update cache
Windows update process piles up cache of update files into “Softwaredistribution” folder to ease up the procedure. Sometimes the cache is damaged resulting in the failed upgrade of Windows 10/11. Luckily, you can use a tweak to repair it which will also fix up the install error 0x800704B8 – 0x3001A.
- Press – Windows key.
- Type – cmd.exe.
- Select – Run as administrator.
- Type following commands one at a time and hit Enter –
Net Stop bits
Net Stop wuauserv
Net Stop appidsvc
Net Stop cryptsvc
Ren %systemroot%\SoftwareDistribution SoftwareDistribution.bak
Ren %systemroot%\system32\catroot2 catroot2.bak
Net Start bits
Net Start wuauserv
Net Start appidsvc
Net Start cryptsvc- Restart the system and try upgrading.
Way-4: Retract or deactivate Third-Party Products
When error 800704B8 – 0x3001A occurs a third-party antivirus solution application might be the pen-ultimate cause. You should try to eliminate the application completely or deactivate the software temporarily. Sometimes, third-party security software may obstruct and hinder the process and eventually lead to this error. One can follow the steps mentioned below:
- Right-click on the Third-Party Antivirus Program icon from the system tray.
- From the context menu options, select ‘Disable’ or ‘Pause Protection’.
- Now choose the time frame for which you want the Antivirus to stay deactivated.
If it still generates the error then follow –
- Right-click on the Start from the Taskbar.
- Click on – Apps and features.
- Lets the Settings app load and click on the Antivirus tool.
- On the expanded pane and click on – Uninstall.
- Follow the prompt
Way-5: Detach Superficial Gadgets
To solve and settle the error, try separating the gadgets from the port of your laptop. This does not include the mouse, keyboard, as these are essential and vital for the electronic computer system.
Way-6: Execute and Carry Out a Clean Boot
Use the following steps to perform a clean boot in Windows 10/11.
- Press – Winkey.
- Type – MSConfig.
- Press – Enter.
- Now, in the ‘System Configuration’ window, click on the ‘Services’ tab.
- Select and pick ‘Hide all Microsoft services‘.
- Once it is selected, hit ‘Disable all’ button.
- After that, click on the ‘Startup’ tab
- Select – ‘Open Task Manager’.
- Now, once the ‘Task Manager’ window opens, click on every startup I item, and then select ‘Disable’.
- Then, close the Task Manager.
- Click ‘OK’ on the ‘Startup’ tab of ‘System Configuration’.
- Select – Yes to confirm.
That’s all!!