
Some visitors lock the option to download that picture to protect the pictures because website ‘owner doesn’t want you to copy the images. A few website owners do not make the images available to download on your drive to prevent unauthorized use of those images because the webpage is made through some of the critical HTML codes that restrict you from saving that picture on your device.
They can protect the images by blocking the right click option, with a watermark, with low resolution, digitest the EXIF data, using table techniques, using 1 of 10 key color schemes and using images hidden tactic.
Methods to Get Protected Pictures From a Website
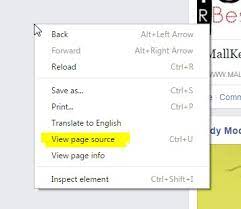
1. Get Protected Pictures From Website using Page Source
- Right-click at anywhere on the webpage and then select ‘View Page Source’ option from the context menu. A new window opens with html coding of the particular webpage. You can use Ctrl-U to open page source if right-click option is disabled.
- Press Ctrl-F shortcut key to open search window. Search for one of this extension ‘.png, .jpg, .gif, .jpeg’ to find the URL of the image. You can find the correct image by looking the name of the image before the extension (eg: jacket.png).
- Once you found the correct picture, then copy the particular image URL. Open a new tab or window and paste the URL in the address bar. Hit ‘ENTER’ and you should find the image displayed on the screen.
- Right-click the image and choose ‘Save Image As…’ from the context menu. Select the location where you want to save the image on your local drive and tap on ‘Save’.
2. Get Protected Pictures From Website using PrintScr
For copy flash images by taking screen shot using print screen button.
- Open the site, where you want to download images and zoom the image by pressing Ctrl-+ or hold Ctrl key and then roll over the mouse middle button.
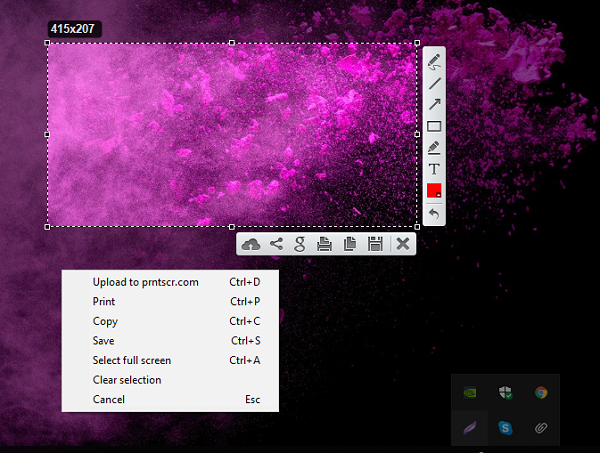
- Press Crtl-Alt-PrintScr button to copy the screenshot. Open Paint two times and press Ctrl-V to paste the screenshot in one window.
- Crop the image from the screenshot and paste it in another paint window.
- Navigate to ‘File’ and choose ‘Save as’. Select the location where you want to save the image on your local drive and tap on ‘Save’.
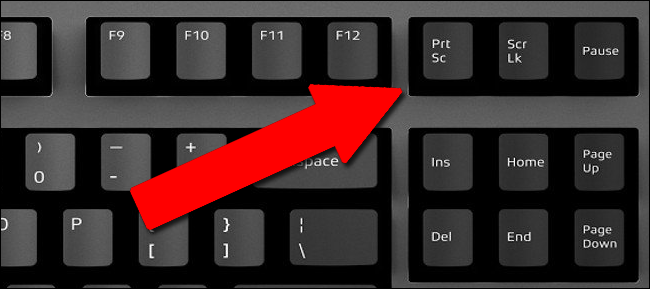
3. Get Protected Pictures From Website using Light Shot Software
- Download Light Shot tool and install it.
- After installation, this will be activated for all of your browsers.
- Now, press the ‘PrtSc’ from the computer keyboard and this will ask you to select the portion you want to save as a screenshot on your PC. Save the image screenshot on your computer drive.
4. Get Protected Pictures From Website on Chrome
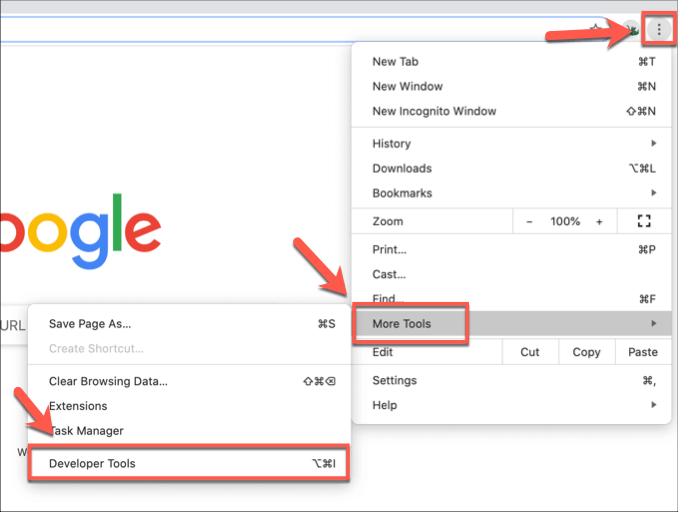
- First, you need to install the developer tool extension on your Google Chrome browser.
- Open the protected website page, enable the developer tool and click on the ‘View Image Information’ option.
- This will instantly show the original image URL that you need to open in a new tab. After opening the images just right-click on your tab and save the image on your computer hard drive.
We have described all the information related to How to Get Protected Pictures From a Website. Hope you are like it! Thanks for reading this article. Check out this article if you want How to Run an EXE File on Chromebook.