How to Print Then Cut on Cricut?
When it comes to using a Cricut machine, there are two things you must remember to do before cutting – print and cut! We’ll show you how to do both in this tutorial on printing and cutting with your Cricut machine!
TIPS Before Beginning
- Cricut only allows white or very light-colored paper to use the Print Then Cut feature
- The area for Print Then Cut is only 9.25 x 6.75 inches, so your image must fit within these dimensions
- Be sure you have calibrated your printer to be sure that it cuts properly on the lines.
PRINT THEN CUT YOUR OWN IMAGES ON A CRICUT
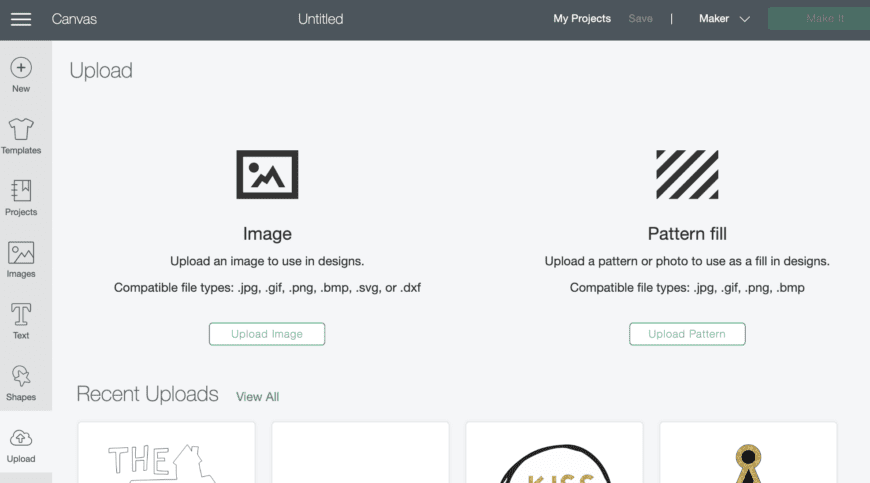
Step 1: Import Your Image to Design Space
To import your custom image, first, you need to create a new project in Design Space. Then, click on the UPLOAD button which is on the left-hand side at the bottom of the Design Space screen.

Step 2: Choose How to Cut Around Your Image
- Now you will choose UPLOAD IMAGE to import your design into the program. Be sure your image is a .jpg, .png, .svg, or other acceptable file.
- Next, you will select the Image Type. I always choose COMPLEX for a Print Then Cut the image and be sure to select only the areas that you want to be cut. Click CONTINUE after you have selected your Image Type.
- Next, you will begin to remove any whitespace or other areas that you don’t want to be printed to help you form your object shape.
- Use the SELECT & ERASE tool that looks like a magic wand. Then click on the whitespace area that you want to “delete”. If you make a mistake use the undo button, as well as the zoom tools to fine-tune any erasing. I don’t touch any of the Advanced Options settings in this area.

- After using the “Select & Erase” magic wand, this is what the image looks like. The gray and white checkered background indicates that it is “transparent” and only the image is left. That is what will be printed and cut.

- As you are erasing any whitespace, you can also use the PREVIEW button.
- Now that the whitespace has been removed click CONTINUE.
- Click on the first option that shows your image and says SAVE AS A PRINT THEN CUT IMAGE.
- Then click on SAVE. This step may take a minute to upload into the Cricut system.
Step 3: Insert Uploaded Image Into Your Project
- Now that your image has been imported and updated for Cricut, select it from the Uploads screen to add it to your project.
- Click on the uploaded image, then click INSERT IMAGES green button at the bottom right side of the screen.
Step 4: Size Your Image for Your Project
Now that your image is included in your project in Design Space, it’s time to prep for printing. Be sure to resize your image so that it’s the appropriate size for your project. For this project, resize the Christmas tree to 3.5 x 4.6 inches. This will fit perfectly on the front of an A2-size card. In Cricut Design Space, since the ratio button is locked, any changes to the width or height will stay in proportion to the original image.
Step 5: Click Make It
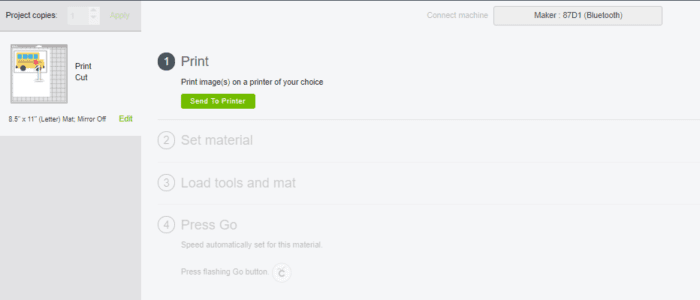
Once you have the number of images you want to print for your project, it’s time to MAKE IT! The first screen will show you the number of mats you will be making.
- Click Continue and you will be prompted with several options. First, you will want to select your Cricut device to be sure that it is connected.
- Then click on the SEND TO PRINTER button to print your design. A prompt will display for printing your project.
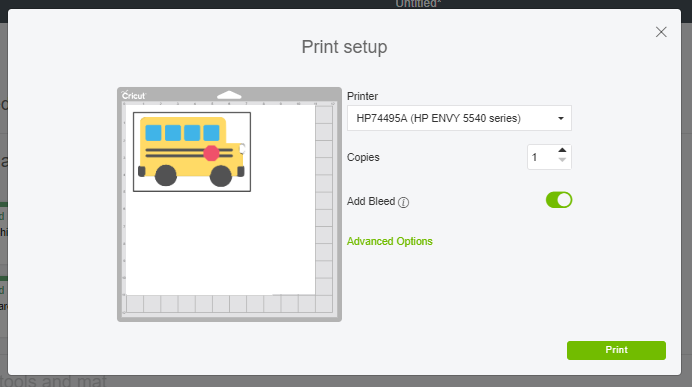
- Be sure to select your printer and the number of copies you want to make. To allow for any minor issues with cutting, turn on the ADD BLEED option.
- Next, attach your printed sheet of paper to your Cricut mat and continue to adjust any final settings before loading your mat.
- Select the Light Cardstock option on my paper dial, and check that my blade is in the proper clamp as noted on the screen.
- Once your mat is prepped, load it into my Cricut and press the Cricut Go button on the Cricut.
Step 6: Unload Your Mat and You’re Done!
Now, unload your mat and check the cut lines of your project. Peel the pieces off of your cutting mat carefully. Now they are ready to use on your card or other paper crafting project!