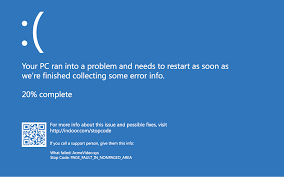
Whether you’re playing a video game, watching your favorite movie, or working on an important business report, you may encounter a PAGE FAULT IN NEPAGED AREA error on a Windows 10-based computer. If this fails, the system can often restart, get stuck in the boot loop, or even crash suddenly without having time to save your data.
In this post, we will share with you some best troubleshooting methods to fix an INCORRECT PAGE ERROR. But before you start repairing, find out what’s wrong and how it can happen?
Why PAGE FAULT IN NONPAGED AREA Error Occurs?
If you encounter this blue screen error code, there may be several reasons:
- Incorrect system service
- Damaged or defective device driver
- Problematic third-party antivirus software
- Corrupted NTFS volume
- Defective hardware (usually related to damaged or defective RAM)
Methods to Fix PAGE FAULT IN NONPAGED AREA Error
If you encounter this blue screen error code, there may be several reasons:
- Incorrect system service
- Damaged or defective device driver
- Problematic third-party antivirus software
- Corrupted NTFS volume
- Defective hardware (usually related to damaged or defective RAM)
Method 1: Disable the system service error
This error can be caused by a problem with the system service. To determine the root cause, you can disable the system service in System Configuration. To do this, follow these steps:
a. Open System Configuration and go to the Services tab.
b. Click Hide All Microsoft Services> Disable All.
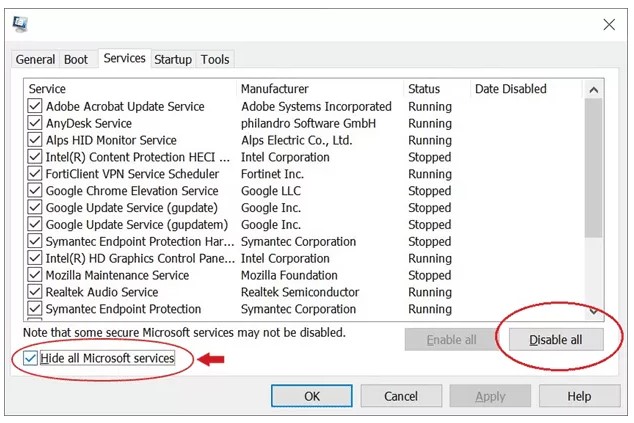
c. Close the window and now restart your system to check if the problem is solved.
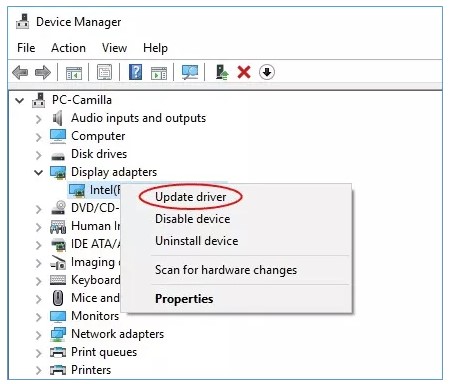
Method 2: Update/Uninstall Device Driver
To find out if a faulty or corrupt device driver causes the Stop Code PAGE FAULT IN NONPAGED AREA, you may try updating the driver with the following steps:
Update Device Driver
a. Open Device Manager and expand Display adapters.
b. Right-click on the driver that you want to update and click Update driver from available options.
c. On the next prompt, choose ‘Search automatically for updated driver software.’
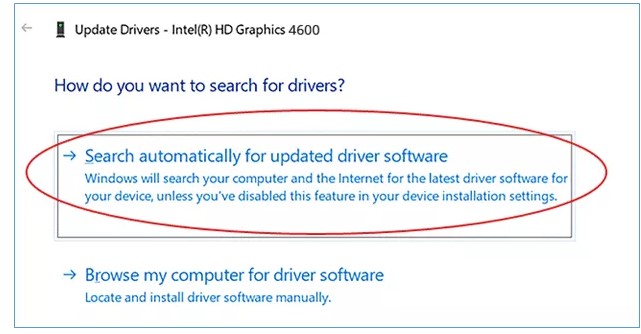
d. Let Windows find the latest driver software. Once found, update the driver.
If updating the driver doesn’t fix the issue, Uninstall the device driver with the following steps:
Uninstall Device Driver
a. Open Device Manager. Go to Display adapter, right-click on the driver, and choose Uninstall device.
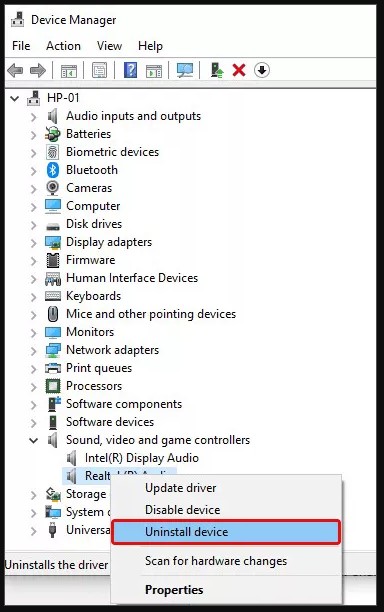
b. Restart the PC and check if the error is fixed.
Method 3: Uninstall Problematic Third-Party Antivirus Program
Sometimes, antivirus programs installed on your Windows 10 system may cause this error code. If there is any third-party Antivirus program on your system, uninstall it with the following steps:
a. Open System Settings by pressing Windows + I and go to Apps.
b. Find the third-party Antivirus software/program from the available options.
c. Now, select the program, right-click on it, and click Uninstall.
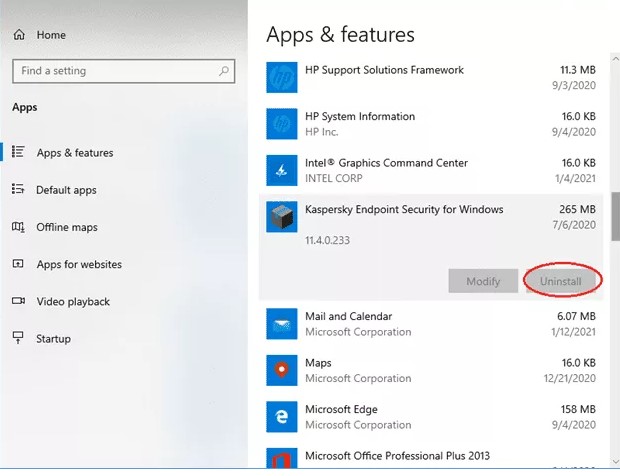
d. Once done, restart your system. Check if the error persists.
Method 4: Run CHKDSK Command
If a corrupted NTFS drive volume causes the error, you may run the CHKDSK command to identify and repair problematic disk errors. Follow the given steps:
a. Open Command Prompt by typing cmd in the Windows Search Box.
b. Type chkdsk /f /r D: (replace D: with the letter of your drive), and hit Enter.
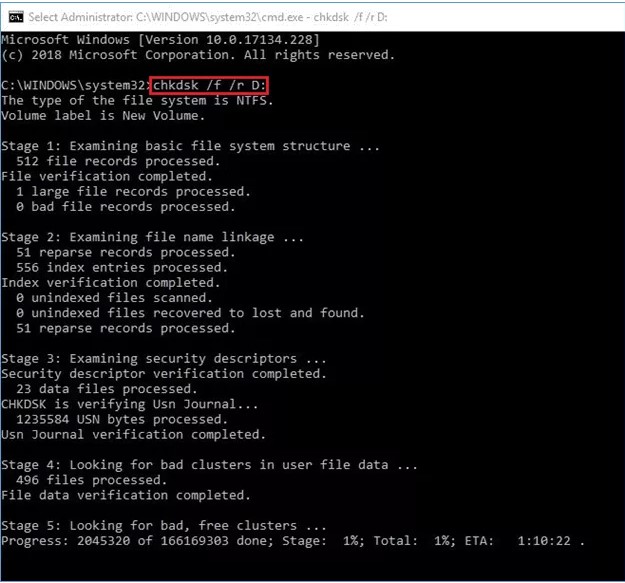
c. Wait until the process is completed.
d. Once done, close the Command Prompt and reboot your PC to check if the issue has been resolved.
Method 5: Run Windows Memory Diagnostic Tool
Damaged or faulty RAM may also cause this error on your system. You may test RAM by running the Windows Memory Diagnostic tool. Follow the given steps:
a. Open Windows Memory Diagnostic tool.
b. Now, click ‘Restart now and check for problems (recommended).
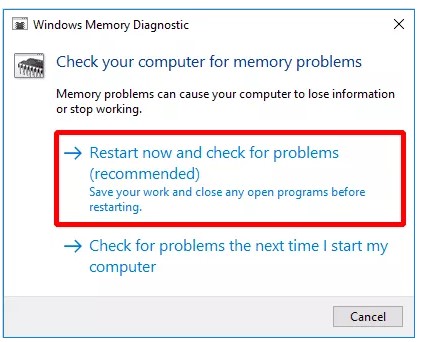
Once the process completes, the system will reboot and return to the desktop. You can check the test results on the screen.
Method 6: Check Faulty RAM in Event Viewer
If you can’t find any result by running the Windows Memory Diagnostic tool, check it manually in Event Viewer. To do so, follow the given steps:
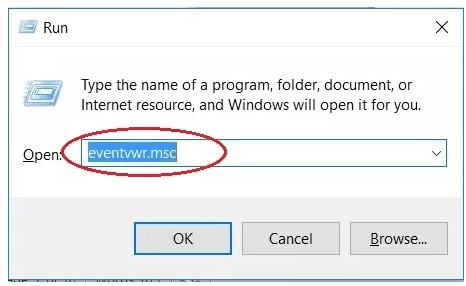
a. Open the Run dialog box by typing Windows + R.
b. Now, type eventvwr.msc and hit Enter to open Event Viewer.
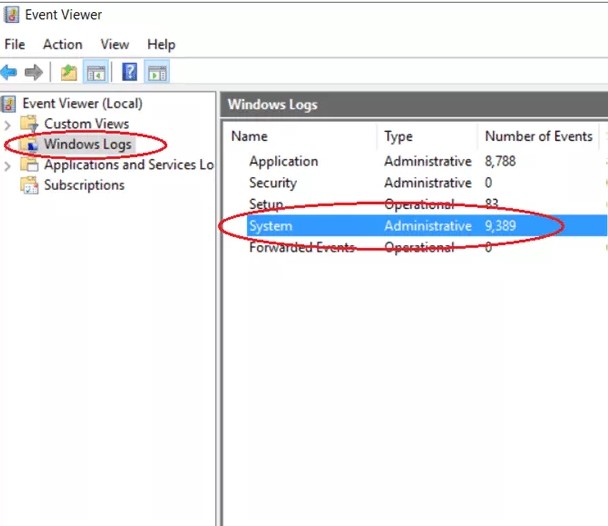
c. Navigate to Windows Logs in the left pane and click System.
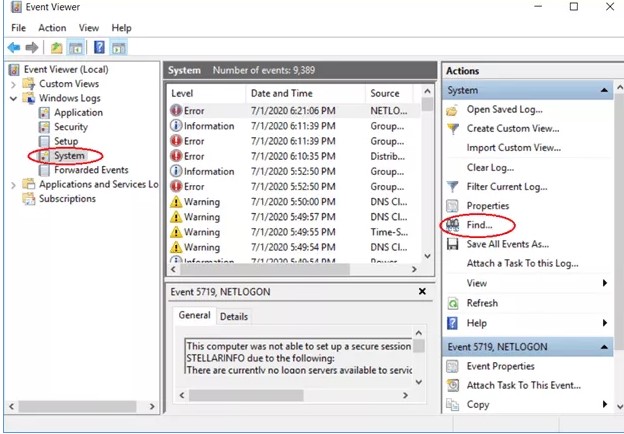
d. Open System and click Find…, (See Image 11)
e. Next, type MemoryDiagnostic in the Find box and click Find Next.
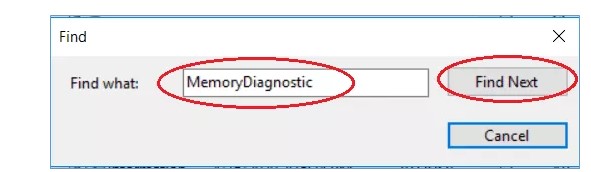
f. The results will show on the screen. If the RAM is found faulty, you will need to replace the RAM.
Method 7: Replace Faulty Hardware from System
If you recently added hardware to your system, it may also cause the Windows 10 error code PAGE_FAULT_IN_NONPAGED_AREA. Remove it and check if the error has been corrected. If existing hardware is found to be defective, remove or replace. This should correct the error.
Final Thoughts –
PAGE ERROR IN NON-PAGED AREA is a critical blue screen error. You can fix this error with effective methods, including deactivating a system service error, updating / removing device drivers, troubleshooting an antivirus program, executing a CHKDSK command, etc. If this error prevents you from accessing your system and its data, try reliable data recovery software