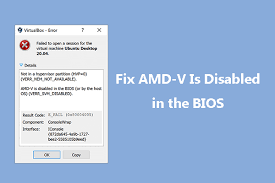
Just wanted to write a quick post with the fix for the AMD-V is disabled in the BIOS and VERR_NEM_NOT_AVAILABLE. I just ran into this with my new build using a Gigabyte AX370-Gaming Motherboard when I was trying to run a Ubuntu VM with VirtualBox. I also use VMware and assume it would have shown the same error but I did not verify.
What is Causing the AMD-V is Disabled in the BIOS Error?
We’ve investigated this issue based on various user reports. From what we have done, there are a number of scenarios that will cause this particular problem. Here is a list of common causes that many other affected users are aware of:
AMD-V is disabled in the BIOS setup – Basically, the error code VERR_SVM_DISABLE tells you that your computer supports AMD-V, but the host BIOS setup is currently disabled.
Microsoft Hyper-V Intervenes in AMD-V Technology – When Hyper-V is enabled, it automatically means that built-in virtualization technology is disabled. In this case, you must deactivate it for AMD-V to work.
The BIOS version does not support these multiple CPU cores – As it turns out, the problem can be thrown into the VM VirtualBox if the software is forced to create a virtual machine with more than 1 CPU core. This requires hardware virtualization, and an error occurs if the feature is unusable or unusable.
VM VirtualBox Error – Many reports of this error have been thrown at machines that are unable to support hardware virtualization technology. In this case, the problem is usually resolved by changing some specific virtual machine settings.
If you are currently having problems resolving this particular error message, this article will provide you with various troubleshooting guides. Below is a set of methods that other users in the same situation have successfully used to resolve the issue.
Keep in mind that the possible fixes below are ranked according to effectiveness and weight, so please follow them until you find an effective way to solve the problem.
Method 1: Enabling AMD-V from the BIOS settings
AMD-V is a modified brand name for Secure Virtual Machine Mode (SVM). The number one reason why AMD-V is disabled in the BIOS (or host OS) (VERR_SVM_DISABLED) is the error that AMD-V is disabled in the BIOS setup.
Although this option is enabled by default on most computers, third-party intervention or manual modification may mean that it is disabled on your computer.
Fortunately, you can re-enable AMD-V by entering the BIOS settings and re-enabling Secure Virtual Machine mode from the CPU configuration settings.
However, keep in mind that the steps to enter the BIOS will vary depending on the manufacturer of your motherboard. To enter the BIOS, you must hold down the Setup key during initial startup. Usually, the setup key is one of the F keys (F2, F4, F8, F10, F12) or the Del key (for Del machines). If you are unable to determine the installation key yourself, check the initial startup time for each alert or look for specific steps by your motherboard manufacturer.

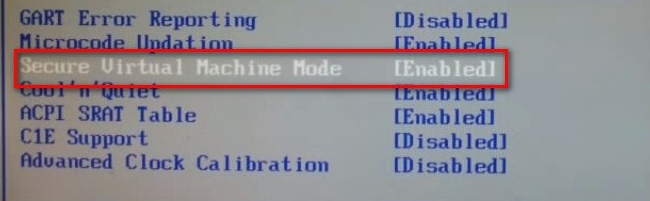
Once you have successfully entered the BIOS, look for an entry called Secure Virtual Machine Mode and make sure it is enabled. It can be found in the most popular BIOS version in Advanced> CPU Configuration. Once there, make sure that the secure virtual machine mode is enabled, then save the configuration and exit the BIOS.
Note: The exact location of this item may vary depending on your motherboard model. If secure virtual machine mode is not for you, refer to the manufacturer’s specific steps. On the Acer motherboard, you can re-enable AMD-V by turning AMD IOMMU to Enabled (found in the AMD I / O Virtualization Technology menu).
Keep in mind that restarting the computer is not enough to restart the change. You have to make a cool shoe. This means that you must switch off the engine completely and then you will be able to start it from the left.
When the next startup is complete, open the virtual machine that displays the message in the VirtualBox virtual machine to see if the issue is resolved. If you find that AMD-V is disabled in the BIOS (or host OS) error (VERR_SVM_DISABLED), continue with the following method below.
Method 2: Disabling Windows Hyper-V
Many users who have encountered a BIOS (or host operating system) error disabling AMD-V (VERR_SVM_DISABLED) have been able to resolve the issue by disabling or removing Microsoft Hyper-V functionality from Windows.
Microsoft Hyper-V is Microsoft’s patented virtualization technology that is automatically enabled in most new versions of Windows. This creates a problem because each time Hyper-V is turned on, the built-in hardware technology turns off (AMD-V in this case). Because the VirtualBox VM requires AMD-V or VT -X to shut down the virtual machine, an error message is displayed instead of the actual virtual machine.
Fortunately, you can easily resolve this issue with a set of simple instructions to help you disable Microsoft Hyper-V. Here’s what you need to do:.
- Press Windows key + R to open up a Run dialog box. Then, type “appwiz.cpl” and press Enter to open up Programs and Features.
- Inside Programs and Features, use the right-hand menu to click on Turn Windows features On or Off.
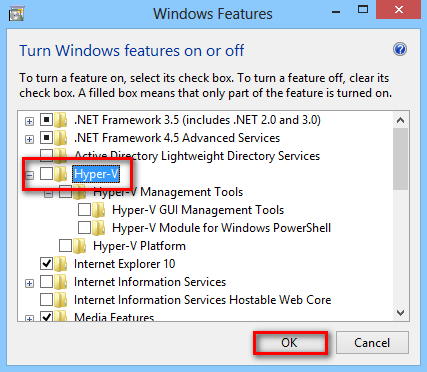
- In the Windows Features screen, look for a Hyper-V entry and make sure that the box associated with it is disabled. Then, click Ok to save the changes.
- Restart your machine and see if the error is resolved at the next startup.
Method 3: Changing the number of CPU cores to 1
If you use the above methods to ensure that your computer meets all the requirements to achieve hardware virtualization and the problem persists, it is likely that the AMD-V ID is not supported in your current configuration.
Fortunately, you can fix the error with a few simple steps in the instructions. But first, let’s find out what caused the problem – Even if you didn’t adjust the settings on the virtual machine where the error appeared, the default settings can cause the problem.
What happens is that the software allocates more than 1 CPU in the system setup, forcing the system to use hardware virtualization to start the virtual host. However, if your computer does not support it (you have quad-core AMD or something similar), the procedure will not complete successfully and you will find that AMD-V is disabled in the BIOS (or on the host OS) (VERR_SVM_DISABLED) error message.
Luckily, you can rectify this issue by changing the number of assigned CPUs to 1. This will most likely resolve the issue once and for all. Here’s what you need to do:
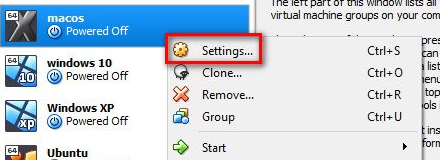
- Open Oracle VM VirtualBox, right-click on the machine that is displaying the error and then click on Settings.
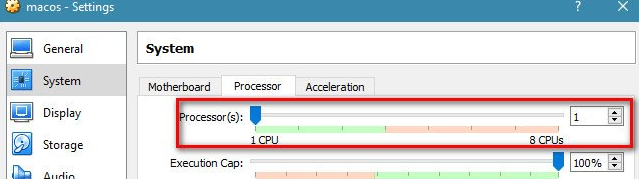
- In the Settings of your virtual machine, go to the System tab (using the left-hand submenu) and access the Processor tab. Next, drag the slider associated with Processor(s) to 1 CPU and click OK to save.
- Close the settings menu and restart your virtual machine. It should boot up without the AMD-V is disabled in the BIOS (or by the host OS) (VERR_SVM_DISABLED) error.
Method 4: Changing the Version to Windows 7 or Windows 2003 (if applicable)
Many Ubuntu (Linux) users who use the VirtualBox VM to run Windows XP or Windows 10 also disable AMD-V in the BIOS (or host OS) error (VERR_SVM_DISABLED). The way they solved the problem was to change the guest OS settings so that a specific version was installed on Windows 2003 or Windows 7.
While there is no explanation for why this fix was successful, it seems to have helped many users return to normal operation of their virtual machines. Here’s a quick guide to changing a specific version of your virtual machine:
- Open VM VirtualBox, right-click on the machine that is displaying the error and choose Settings.

- In the Settings menu, go to the General submenu and then click on the Basic tab. Next, change the Version using the drop-down menu to either Windows 2003 or Windows 7 and hit Ok to save the changes.
- Start the virtual machine again and see if the boot procedure is successful without the AMD-V is disabled in the BIOS (or by the host OS) (VERR_SVM_DISABLED) error
Related Information –