IP addresses are one of the most important ways to identify a user’s services. Although your IP address may change automatically from time to time if you have assigned the wrong IP to your router or want something more static, you need to know how to change it. or your IP address in Windows 10 manually.
What is an IP address?
An IP address is a series of numbers that identifies your device, so information can be sent between devices. Without IP addresses, Internet computers and your local network will not be able to distinguish between different devices, routers, websites, and so on.
However, IP addresses also have some disadvantages. For starters, someone can use your IP address to get an overview of your location. The Services may also use your IP address for web tracking.
Unfortunately, changing your IP address using the methods described below will not hide your location. As long as the IP address is still connected to your ISP, it can still be monitored at the nearest network hub. It won’t help if you are banned – you simply change the IP address of your local network, not what you see on the Internet. You should consider using Tor as a VPN for this type of protection.
Therefore, if you want to change the IP address in Windows 10, you must have access to your administrator account. Once you have access, you can learn how to change the IP using the following steps:
How to Change the IP Address in Windows 10, Using the Settings App?
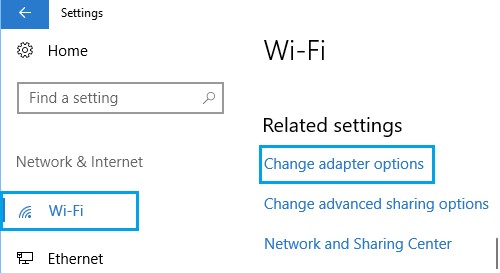
- Go to Settings> click Network and Internet.
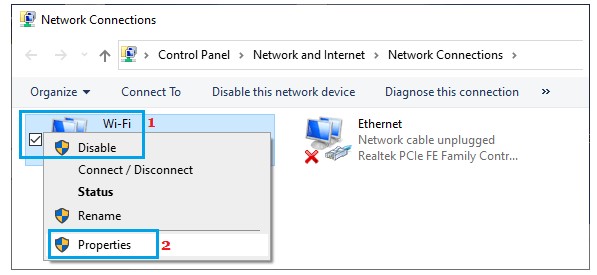
- On the next screen, select the network type (WiFi or Ethernet) in the left panel. Scroll down the right pane and click the Change adapter options link in the “Related settings” section. On the next screen, right-click your active network (WiFi or Ethernet) and click Properties.
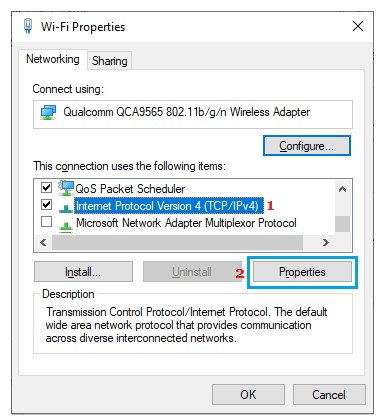
- On the Properties screen, select Internet Protocol version 4 (TCP / IPv4) and click Properties.
- On the IPv4 Properties screen, select Use the following IP address> Enter the default gateway (DHCP server address), Subnet mask address, New IP address, and click OK.
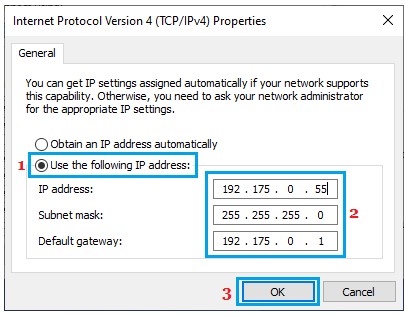
As you can see in the picture above, the first 3 sets of numbers (192.175.0) in the IP address field must be the same as the router’s IP address (DHCP server input) and you can only use the last number set in one of numbers 1 to 255.
How to change the IP address in Windows 10, using the Control Panel
- In Windows 10, you can also change your IP address from Control Panel. Open the Control Panel and click or tap “View network status and tasks” in the “Network and Internet” section.
- In the Network and Sharing Center, click or tap your Internet connection in the “View your active networks” area.
- Click or tap Properties in the status window of your network.
- In the Properties window, select Internet Protocol version 4 (TCP / IPv4) or Internet Protocol version 6 (TCP / IPv6), depending on the IP address you want to change.
- If you want to change both, repeat the following steps for each of them.
- Click or tap on Properties.
- The previous action opens a window called Internet Protocol Properties Version 4 (TCP / IPv4) or Internet Protocol Properties Version 6 (TCP / IPv6), whichever you selected earlier.
- If you want to use a dynamic IP address that is automatically assigned to your Windows 10 computer on your router, select “Obtain an IP address automatically”. Click or tap OK to close all open windows.
- If you want to set a static IP address for your network adapter, select “Use the following IP address.” Then, enter the required details manually: IP address, Subnet mask, and Default gateway,
- Click OK or OK to save your new IP address settings, and then close any windows that you opened during the process.
How to change the IP address in Windows 10, using PowerShell or Command Prompt (cmd)
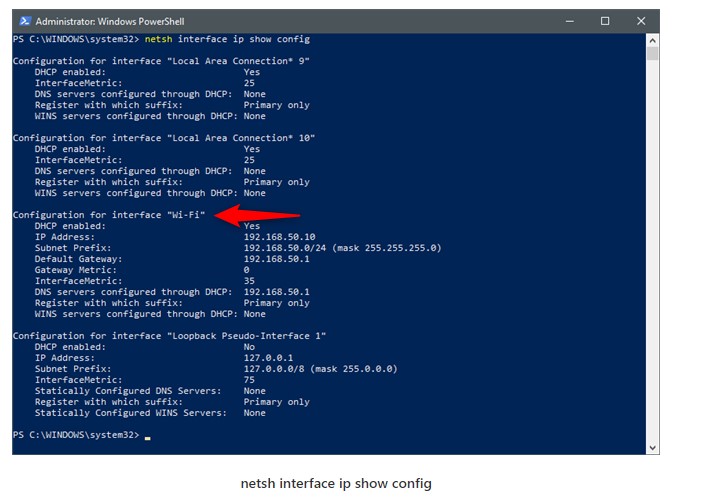
If you want to use the command line environment, you can also change the IP address in Windows 10 using PowerShell or the command line. Whatever your favorite console, run the netsh interface ip show config command. In the results that appear, specify the network adapter for which you want to change the IP address. For example, the name of our network interface is Wi-Fi, as you can see in the screenshot below.
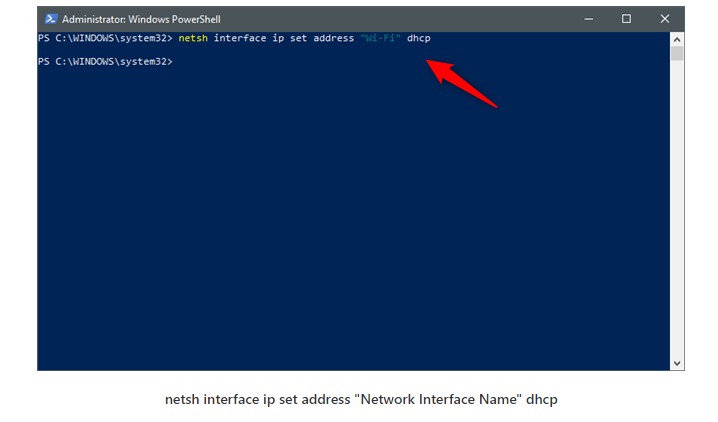
If you want to change the IP address to dynamic, which is automatically assigned to your router via DHCP, execute the following command: netsh interface ip set address “Network Interface Name” dhcp. Replace “Network Interface Name” with the name of your network connection. For example, we need to run netsh ip interface to set the “Wi-Fi” address of dhcp.
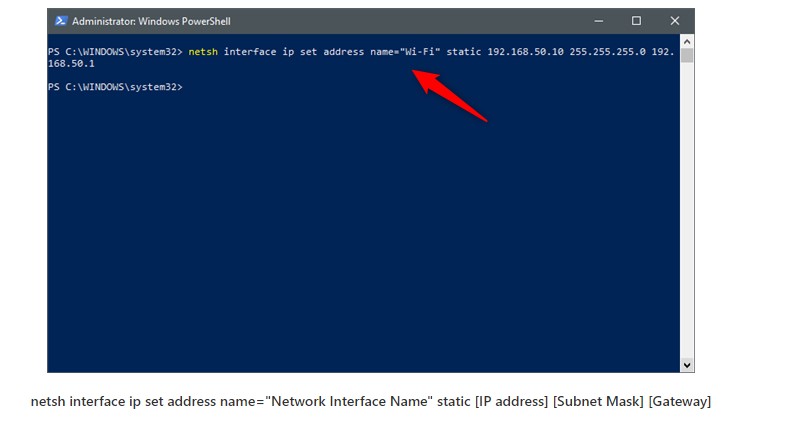
To set a static IP address, execute this command: netsh interface ip set address name = “Network interface name” static [IP address] [Subnet mask] [Gateway]. Replace [IP Address] [Subnet Mask] [Gateway] with those that match your network configuration. In our example, if we want to change our IP address to 192.168.50.10, we need to run netsh interface ip set address name = “Wi-Fi” static 192.168.50.10 255.255.255.0 192.168.50.1.
What is Favorite Method to Change the IP address in Windows 10?
Now you know not only one, but three different ways to change and set your IP address dynamically or statically. What is your favorite way to do it? Do you know any other methods? If so, or if you want to add something to this guide, don’t hesitate to comment.