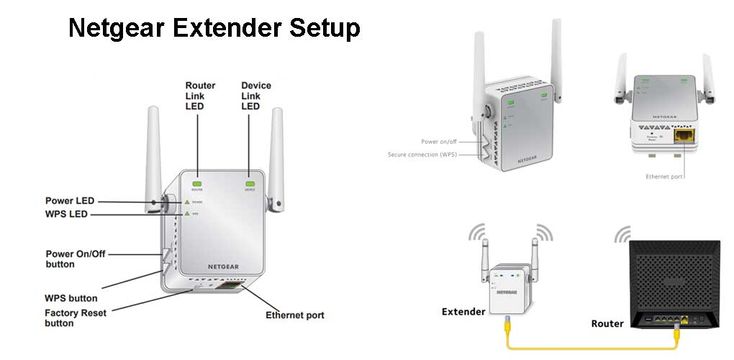
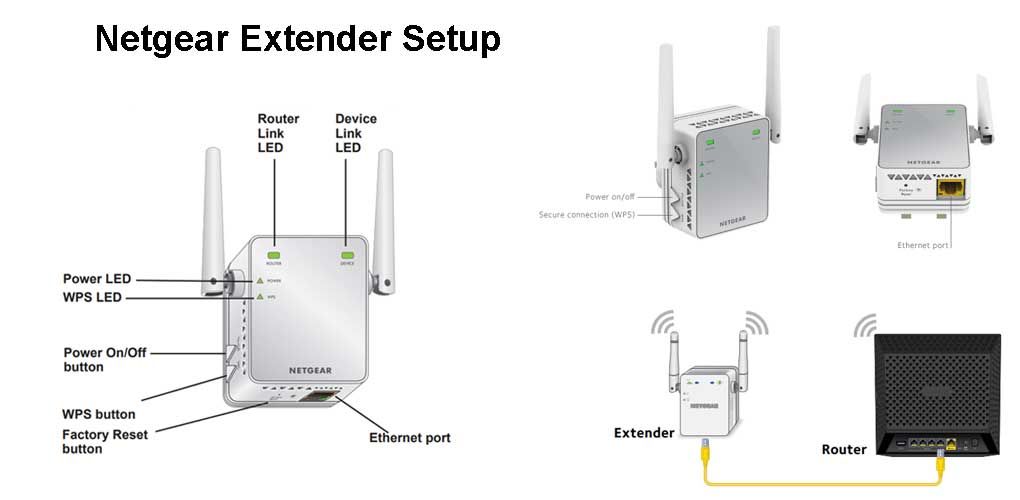
Connect Netgear Wi-Fi Extender expands your home WiFi network by connecting to your existing network and improving coverage.
The netgear can work with any standard router including the router you get from your service provider and boost your Wi-Fi signal and range coming from the router.
Netgear Wi-Fi Extender Setup: Manual Method

Step-1 Turn on your Netgear extender by plugging in electrical outlet.
Step-2 Connect the extender and your router.
Step-3 Launch the Netgear and connect to NETGEAR_EXT.
Step-4 Open any web browser of your choice and navigate to mywifiext.net login.
Step-5 Create a account and choose the network you want to extend.
Step-6 Press NEXT option and click on the Finish option.
Netgear Wi-Fi Extender Setup: Without using Ethernet port

Step-1 Reset your extender to the default factory settings.
Step-2 Connect the extender device using a Wi-Fi connection.
Step-3 Log in to the web user interface of your device.
Step-4 Enter the extender username and password.
Step-5 Connect your Wi-Fi compatible devices to the Netgear_ext(SSID)
Netgear Wi-Fi Extender setup: Using WPS Method

Step-1 Turn on your Netgear extender.
Step-2 Find WPS button on your device and press it for sometime.
Step-3 Check the username and password of Wi-Fi extender.
Step-4 Now your netgear Wi-Fi has set up you can connect your Wi-Fi.
Netgear Wi-Fi Extender Setup: In Detail

Step-1 Plug in your extender and if your Power LED does not light, press the Power or On/Off button.
Step-2 Connect your computer or mobile device to the extender’s Wi-Fi and Wi-Fi network name (SSID) is NETGEAR_EXT.
Step-3 The extender network either has no password or the default password is password.
Step-4 Launch a web browser and enter mywifiext.net or 192.168.1.250 and the New Extender Setup page displays.
Step-5 Click or tap NEW EXTENDER SETUP and agree the terms & conditions.
Step-6 Choose your extender’s admin credentials and access your extender’s settings on a web browser.
Step-7 Select and answer two security questions from the drop-down menus.
Step-8 Click or tap NEXT now your extender searches for local Wi-Fi networks.
Step-9 Select the radio buttons for your network’s 2.4GHz and 5GHz Wi-Fi Network Names (SSID).
Step-10 Click or tap NEXT and enter your existing network’s password and click or tap NEXT.
Step-11 Select SSIDs and passwords for your extender.
Step-12 This allows your extender to use the same Wi-Fi name (SSID) and password as your existing Wi-Fi network.
Step-13 Click or tap NEXT.
Step-14 On a device that you plan to connect to the extender network, go to the Wi-Fi settings and connect to the extender’s new network.
Step-15 Go back to your web browser, select the checkbox at the bottom of the page, and click or tap CONTINUE.
Some Necessary requirements for Netgear extender setup:
- Place your Netgear extender in the same room as that of your home router.
- Extender should get proper power supply.
- Comes from workable home wifi network.
