VLC is a free, open-source media player. VLC Media Player is best for playing videos from different sources. It is also used as video editing software. This software allows users to easily watch videos in nearly any format. It is the easiest and quickest tool to trim and cut videos. You can trim, crop, speed up, and rotate your videos using VLC Media Player.
You can select a certain part of any video, cut or trim it and create a video clip. In VLC Media Player, you can save the video by making it clip and share it easily with friends and family through various mediums.
How to Cut Video in VLC
To Cut Video in VLC, first you need to download, install, and launch VLC Media Player. You can download VLC from the VLC Media Player website. There are different process to Cut Video in VLC on different device.
Process to Cut Video in VLC On a Computer
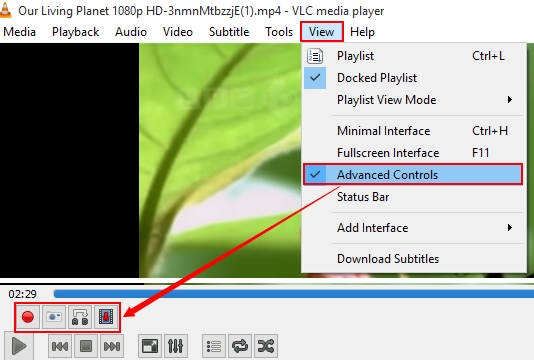
- Open VLC Media Player, on VLC window, go to ‘View’ and click ‘Advanced Controls’ option from the menu.
- Recording buttons will appear above your normal player control buttons.
- Now, open up video that you are want to cut.
- Play the video or scroll around to the starting point from where you want to cut.
- Click on the record button which is located at the starting point . It is the round red button.
- Play the video or move it frame by frame using the ‘Frame by Frame’ button for more accuracy.
- After you reach the ending point, click the record button again.
- After complete trimming process, VLC Media Player will display ‘Recording’ message when you start the process and ‘Recording done’ message when you cut it off.

You can extract clips from videos is by using ‘Shift + R’ shortcut key to begin and stop recording.
Your trimmed video will be saved in your ‘My Videos’ folder in Windows. In Windows 7 trimmed video is found under C:\Users\Username\Videos folder if Windows is installed in C: drive. For other OS just visit your documents folder or your user folder and find the default videos folder. File names can be something like vlc-record-2013-11-16-14h25m16s-vlc-streaming-audio.avi-.avi if you need to search for it.
Process to Cut Video in VLC On a Mac
- Start VLC and open the video that you want to trim.
- Head to the point in the video where you want to start your clip.
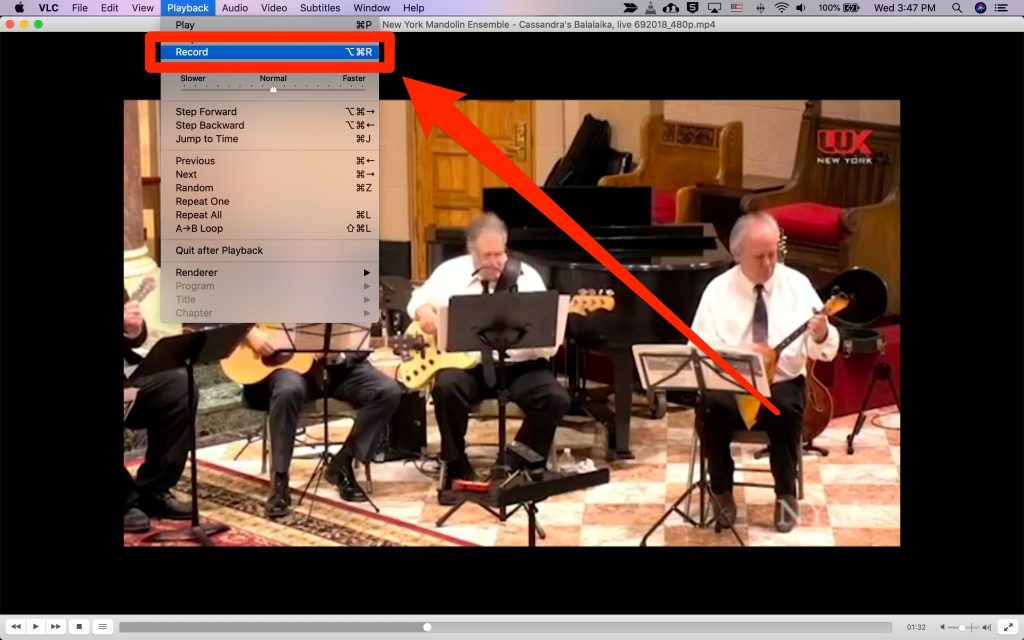
- In the menu bar, click ‘Playback’, and then click ‘Record’.
- Start the video and play it till you want to cut your video and again click ‘Record’ button. If you’d like to include another clip in the same file, you can skip to the start of that clip and keep recording.
- Once you click ‘Record’ the second time, your new video will be saved to your Mac’s ‘Movies’ folder. It’ll be named “vlc-record,” followed by the date, time, and the video’s original title.

You can find the ‘Movies’ folder by clicking the name of your computer in the Finder’s sidebar, followed by ‘Macintosh HD’, then ‘Users’, then your account name, and then ‘Movies’. You can also change where your recordings are saved through VLC’s ‘Preferences’ menu.
We have try to define What Does “How to Cut Video in VLC”. Hope you are like it! Thanks for reading this article. If you want to know more details about Best ytmp3 Video Converter. Click Here
