
Here in this article, we will tell you how to disable Windows search. If you disable Windows 10 Search, the search functionality will be disabled. Although Windows 10 Search will still work. Most of the times, this is done to improve the performance of Windows 10 as the Windows 10 search services eat up a lot of memory in the background. Let’s see how to disable it.
If you really don’t use Windows Search much, you can disable indexing completely by turning off the Windows Search service. If you’re thinking about disabling search because it’s slowing things down, we recommend checking which files and folders are getting indexed and see if that works for you. You should also note that other apps—notably Microsoft Outlook—use Windows Search to allow searching within those apps, so you’ll have to do a fast search in them as well.
Disable Windows search services it easy here we go -Hit Start, type “services,” and then click the result. On the right-hand side of the “Services” window, find the “Windows Search” entry and double-click it. In the “Startup type” drop-down menu, select the “Disabled” option. This will prevent Windows Search from loading the next time you start your computer.
Disable windows search:
Windows Search is an important tool when using your Windows PC. It works using your preferred indexing options to get what you need. The indexing process runs in the background, just as you write a table of contents for files placed on your computer. It does this so that when you go and type something in the search bar, it will know what you need.
While indexing speeds up the search process, it can take up a lot of system resources from your computer, so you may want to consider disabling Windows Search for this and probably other reasons. Continue reading to learn how to disable Windows Search in Windows. There are two types of disable like temporarily and permanently:
Disable windows search temporarily:
You can temporarily disable Windows Search on your Windows PC by either stopping the search service in the background or by using CMD. Use one of the methods below that best fits your current needs and requirements.
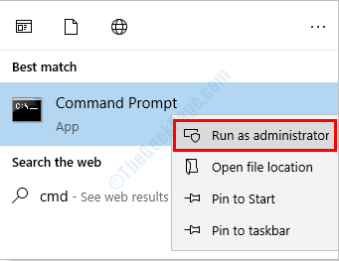
Open command prompt as administrator. To Open Command prompt as admin, search cmd in windows search and right click on the search result and click on run as administrator.
- Execute the command given below:
net.exe stop “Windows search”
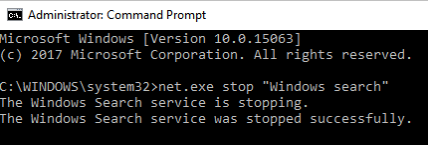
This only disables it temporarily and it starts itself again as soon as windows reboot next time.
Disable Windows Search Using Services:
- Press Windows + R on your keyboard, type in the following command and press Enter on your keyboard.
- Once the services dialog box launches, identify ‘Windows Search’ in the list and right-click on it.
- Select ‘Properties’.
- Now click on ‘Stop’.
- Click on the drop-down menu and select ‘Manual’.
- Click on ‘Ok’ to save your changes.
- The Windows Search service will now be stopped and automatic restart for it should now be disabled.
Disable Windows Search Using CMD:
Press Windows + S on your keyboard and search for CMD. Click on ‘Run as administrator’ once it shows up in your search results.
Type in the following command to stop the Windows Search service. Press Enter on your keyboard once you are done.
REG UPDATE HKLM\SYSTEM\CurrentControlSet\Services\WSearch\Start=3
Once done, execute the command below.
net.exe stop “Windows Search”

And that’s it! Windows Search should now be temporarily disabled on your system.
Disable windows search permanently:
If you are looking to disable search permanently, then there is no one sure shot way to do so. Instead, you will need to disable various aspects of Windows Search to ensure that it is not working and indexing files in the background. This includes disabling its service, scheduled tasks, renaming the folder, and editing the Registry. Another way to permanently disable Windows Search is by using the Group Policy Editor. However, this is only available to users with Windows Pro or higher. Hence you can use one of the guides below depending on your current edition of Windows installed on your PC.
Steps to disable windows search permanently:
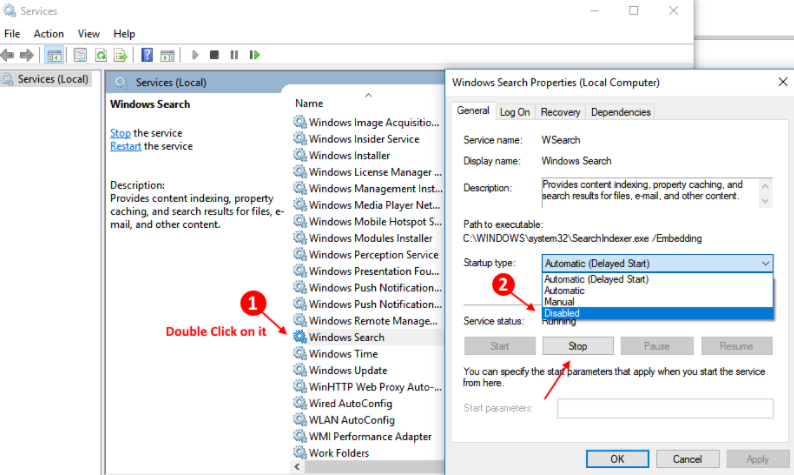
- Search services.msc in windows 10 taskbar search.
- Click on services.
- Now, find windows search entry from the list.
- Double click on it. Choose startup type as disabled from the dropdown.
- Click on stop. Finally press OK.
Here in this article, we “how to Disable Windows Search?” discussed about. If You Disable Windows 10 Search, Search the functionality will be disabled. We hope this guide has helped you get acquainted with disabling Windows Search in Windows.