
A hanging indent is a text formatting style often used in academic citations (including MLA and Chicago style), bibliographies, and by those who want a nice text effect in their document.
A hanging indent is so named because the first line of formatted text has a normal indentation, while all other lines are indented further than before. This makes the first line “hang out“.
How to hang indent Google Docs ?
There are three ways to create a hanging indent in Google Docs.
- Using Menu Options
- With keyboard commands
- Using the Ruler Tool.
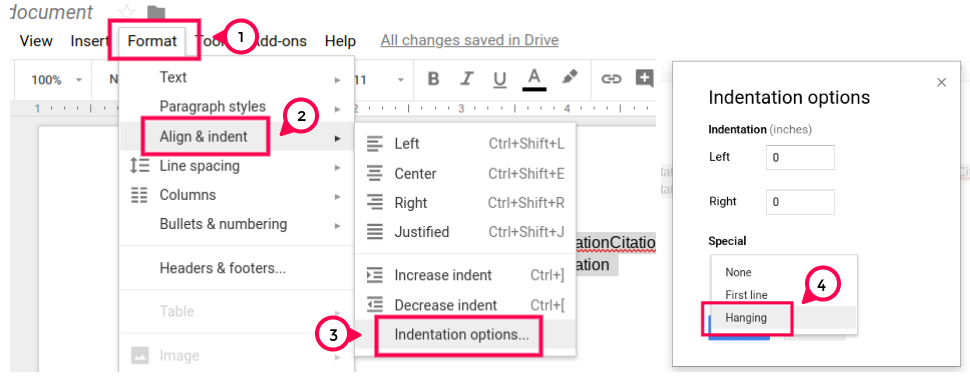
To create a hanging indent using the menu option, follow these steps :
- Create a document in Google Docs, and add the text to which you want to add a dangling indent.
- Select the text you want to have hanging indent. It can be a sentence, a paragraph, several paragraphs, etc.
- Click on the Format menu.
- Click Align and Indent.
- Click on Indentation option.
- In the Special Indent section, click the drop down and then click Hanging.
- Use the box to define the amount of the indent in inches.
- Click on apply to get hang identification with your preferred setting.
How to make a hanging indent ?
Hanging indents in Google Docs isn’t that hard. You can easily create a hanging indent for Google Docs in one of the easiest ways.
- Using the Ruler Tool :
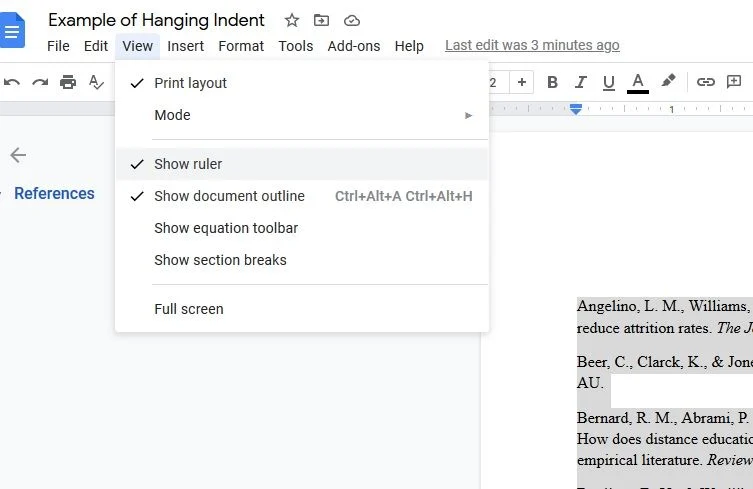
If you want to create a hanging indent in Google Docs, make sure your ruler is visible.
To activate your ruler, click the View tab. If you want to create a hanging indent in Google Docs, select Show Ruler to make the ruler visible. Follow the necessary guide line to activate this technology. How to create folder in gmail.
To activate your ruler, click the View tab. If you want to create a hanging indent in Google Docs, select Show Ruler to make the ruler visible. Follow the necessary guide line to activate this technology. How to create folder in gmail.
- Indent Paragraph :
Add hanging indents that you need to highlight or mark your text. Your text can be a single paragraph, a short paragraph, a large composition or a document.
- Drag Left Indent :
In the ruler, you have to click and drag the blue line on the ruler setting. You can set how much you want to indent. Move it 0.5-inches to the right to make the overall margin 1.5-inches. (The standard indent is 0.5 inches.)
- Drag the Indent control to the right :
When you drag your indent, notice that all of your text is shifted to the setting you want. You must select the first line of the paragraph you have selected and drag the indent of the first line.
Click and drag the left margin control (rectangle) back to the margin where it started. When you release the right-indent control, you will notice that you have created a hanging indent.
A Hanging Indent Google Docs With Ruler
Another way to create a hanging indent is to use the Ruler tool at the top of your document.
Create a document in Google Docs and add the text you want to hang indents on.
Turn on Ruler, if it’s not already visible (View > Show Ruler).
Highlight the text to which you want to add a hanging indent. This can be a sentence, a paragraph or an entire document.
In the ruler, click and drag the left-indent control (it looks like a blue triangle). Drag it to where you want the identity of the gallows.
Click and drag the right-indent control (the blue bar just above the blue triangle in the ruler). Drag it back to where the first line should begin, often with a margin to the left.
When you release the correct-detection control, you will notice that you have created a dangling indent.
How to indent using ruler in Google Docs ?
Another way to set custom indents in Google Docs is to use the Ruler tool. To the left of the ruler are two blue sliders placed side by side. The blue rectangle at the top controls the indent of the first line, and the blue triangle at the bottom controls the left indent or indent for the rest of the paragraph.
To indent text using a ruler in Google Docs :
- With a Google Docs document open, if you don’t see the ruler at the top of the page, choose View > Show Ruler.
- Highlight the paragraph you want to indent.
- Drag the First Line Indent slider to the right. It’s the little blue, horizontal line to the left of the ruler, where the rule changes from gray to white. When you hold the line, the measurement will appear in a black box above it when you move the slider.
- If you want to indent all selected rows, drag the Left Indent slider to the right. It’s the blue, down arrow below the First Line Indent slider. A black measurement reading will reappear when you begin to move the slider.
- To create a hanging indent using the ruler, drag the Left Indent slider to the right, then drag the First Line Indent slider back to the left.
- Alternatively, you can select Increase Indent or Decrease Indent in the toolbar.
How to indent a second line in Google Docs ?
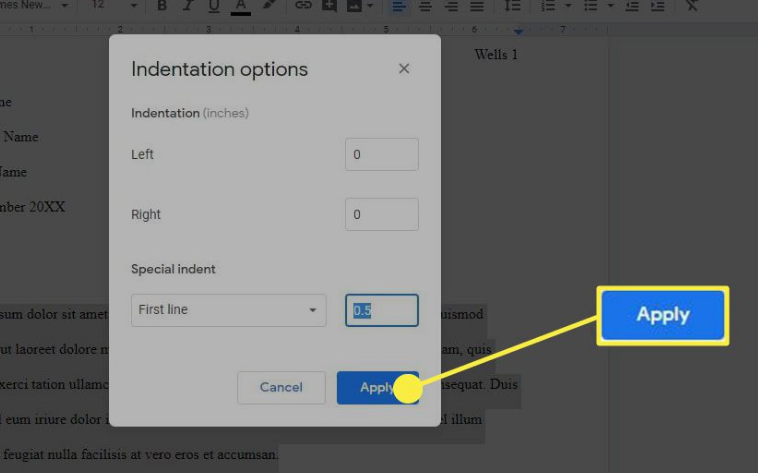
A dangling indent occurs when the first line is not indented, but every line after the first is indented. To set a hanging indent in Google Docs :
- Highlight the text you want to format and choose Format > Align & Indent > Indentation.
- Under Special Indent, choose Hanging.
- When you are finished making your adjustments, select Apply to apply the indent and return to the document.