
Printing a screen on an HP laptop computer can be tricky if you don’t know how to do it properly. There are many simple steps that you can follow to make the process smooth and easy, though, so you’ll be able to take your screenshot quickly in no time at all!
How to Print Screen on hp laptop?
If you want to capture a full screenshot, the dedicated Print Screen key on your laptop is the best option. It is also available on external keyboards if you have one connected to your laptop.
Step 1: For fullscreen
HP laptops run Windows or Chrome operating systems, which means you can snap screenshots via a simple keyboard click. Typically located at the top right of your keyboard, the Print Screen key may be abbreviated as PrtScn or Prt SC. This button will allow you to capture your entire desktop screen.
However the captured image is not immediately saved, it’s copied to your computer’s clipboard. Follow these steps to turn that floating screengrab into an image file you can save.
- Press the Windows key and Print Screen at the same time to capture the entire screen. Your screen will dim for a moment to indicate a successful snapshot.
- Open an image editing program (Microsoft Paint, GIMP, Photoshop, and PaintShop Pro will all work).
- Open a new image and press CTRL + V to paste the screenshot. You can also right-click and press Paste.
- Save the file as a JPG or PNG and place it into an easily accessible folder for quick sharing.
Step 2: for partial screen
When you don’t want to take a screenshot of your entire screen, but rather a portion of your screen, using Snip & Sketch makes selective screenshotting easier than ever.
Windows 10 laptops introduced the new default feature in an October 2018 update, effectively allowing users to grab portions of their screen without the need for third-party applications. These steps will guide you through the grab and save process.
- Press the Windows key + Shift + S at the same time. Your screen will fade to a white overlay and your cursor will change from a pointed cursor to a crosshair cursor.
- Select the portion of your screen that you wish to grab. The snippet will disappear from your screen and copy onto your computer’s clipboard.
- Open an image editing program.
- Open a new image and tap CTRL + V to paste the screenshot.
- Save the screenshot as a JPG or PNG file and place it into an easy-access folder.
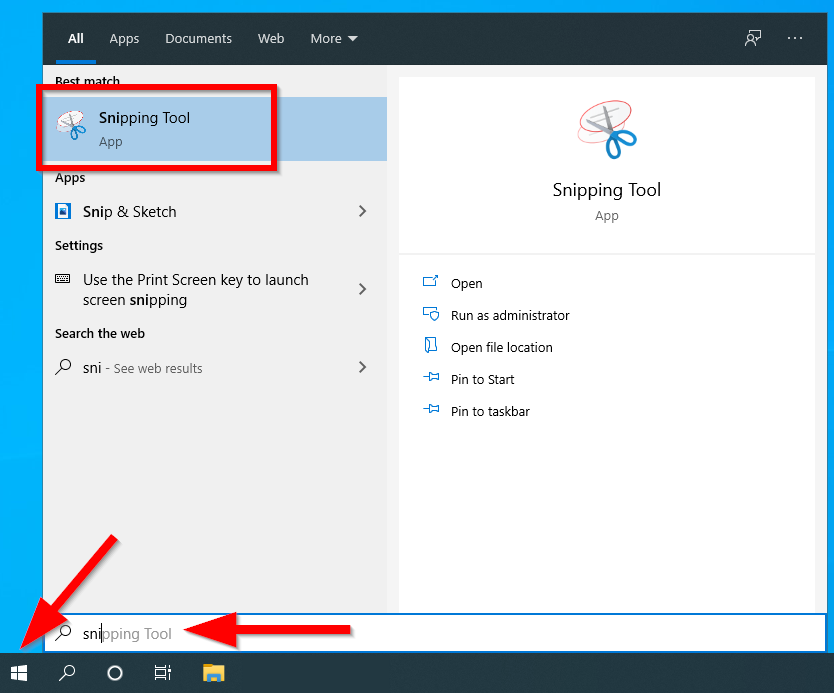
Step 3: Use Snipping Tool
Snipping Tool is a pre-installed system tool for screenshots. You can use it to capture your screen and do some simple editing. Here’s how to use Snipping Tool to take screenshots on a laptop:
- Type snip in the Windows search box, and select Snipping Tool from the results.
- At Snipping Tool, click New to capture a screenshot.
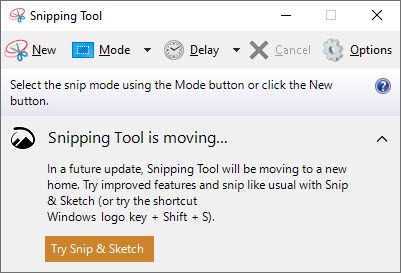
- Using the crosshair cursor, drag the cursor to make a rectangular outline of the desired area.
- Within the snipping tool toolbar, press the disk icon to save the screenshot as a PNG or JPEG file.
The snipping tool comes with several added perks that allow you to switch modes. In addition to the standard rectangular snip, you can snip in three other ways.
- Free-form snip- This allows you to take screenshots in any shape you want to. You can take screenshots in ovular shape, circular shape, or any other shape you want to.
- Window snip- You can either select this option if you want to take a screenshot of your active windows HP laptop.
- Full-screen snip- This option allows you to capture your entire screen. You can use this option if you want to take a screenshot of a multi-monitor setup.
- After taking the screenshot, press the Ctrl + S key combo to save the screenshot.
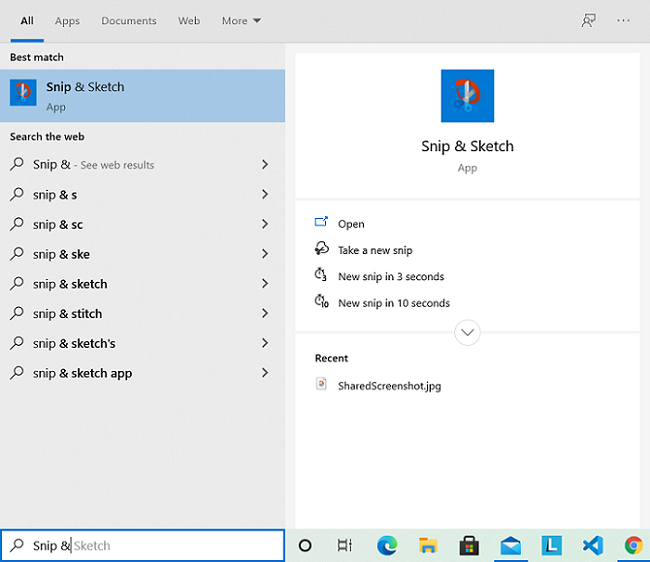
Step 3: Use Snip & Sketch Tool
If you are running Windows 10 October 2018 Update or above, you can use the new Snip & Sketch tool. Compared to the Snipping Tool, it has some useful new features.
To capture screenshots using Snip & Sketch:
- Type Snip and Sketch in the Windows search bar, and open the app.
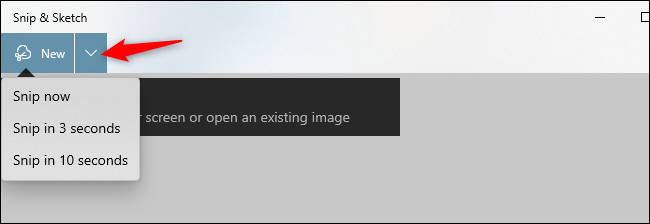
- Click the New button. Your screen will dim for a moment, and a toolbar will appear on top. You can choose from the Rectangular, Free-form, Window, and Full-Screen Snip options.
- For delayed snips, click the down-arrow button next to the New option and select Snip in 3 seconds or Snip in 10 seconds.
- To customize the screenshot, you can use a highlighter, a ball pen with different colors, a roller for straight lines, or a cropping tool to reduce the image.
- Press the Windows key + S to save the image.
Final Words:
Although your HP laptop offers a number of ways to take a snapshot, it may not be as effective as using a tool that offers a variety of rich options. With the help of computer solve, accessing, editing, annotating, and sharing your documents seem effortless.