How to take a screenshot on a macbook pro?
If you’re a new Mac owner, or you’ve had a Mac for a while and never learned the useful task of capturing screenshots, it’s worth taking a few minutes and getting this skill under your belt. Taking screenshots on Mac is a great way to save pictures if you don’t want to take the time to download them. Whether you’re a skilled Mac user, or a Mac Neophyte, here are the methods you can use to capture a selected portion of your screenshot, a particular window, or your entire screen in a screenshot image. Below are some ways to take a screenshot, using those ways, you can take a screenshot on Mac.

Where is my Screenshot?
You will find the file on the desktop. Also the Finder might be helpful.
Way 1: To capture the entire screen, a window, or just a portion of the screen

- To take a screenshot, Press Command-Shift-3 on your keyboard.
- Your entire screen, including your dock, any windows you have visibly open on the screen.
- If you see a thumbnail in the corner of your screen, click it to edit the screenshot. Or wait for the screenshot to save to your desktop.
Way 2: To capture a portion of the screen

- Starting out the same way, press Command-Shift-4 on your keyboard.
- Drag the crosshair to select the area of the screen to capture. To move the selection, press and hold Space bar while dragging. To cancel taking the screenshot, press the Esc (Escape) key.
- To take the screenshot, release your mouse or trackpad button.
- If you see a thumbnail in the corner of your screen, click it to edit the screenshot. Or wait for the screenshot to save to your desktop.
Way 3: To capture a window or menu

- Open the window or menu that you want to capture.
- Press and hold these keys together: Shift, Command, 4, and Space bar. The pointer changes to a camera icon . To cancel taking the screenshot, press the Esc (Escape) key.
- Click the window or menu to capture it. To exclude the window’s shadow from the screenshot, press and hold the Option key while you click.
- If you see a thumbnail in the corner of your screen, click it to edit the screenshot. Or wait for the screenshot to save to your desktop.
Way 4: To take a screenshot on a macbook pro using lightshot

- Lightshot is a free program available for download on either Windows or Mac. It is an excellent tool to use if you need to draw arrows or boxes
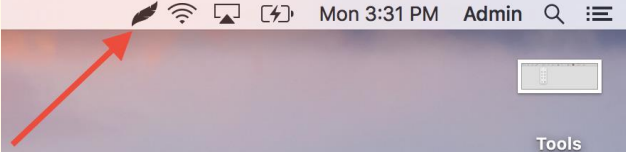
- around certain areas of your screenshot. After installing Lightshot from the Apple Store (it is a free app), a new feather will appear in the
- upper right corner of your home screen.
- When you click on this feather, you can capture a new screenshot by click and dragging your cursor.
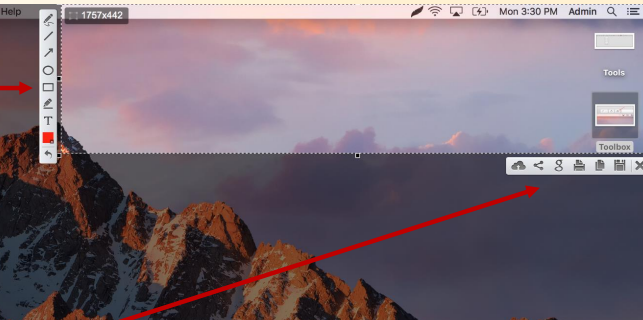
- Once you have taken a screenshot, two panels will appear.
- This is your editing panel it allows you to draw arrows, boxes, etc, directly on the screenshot.
- The other panel allows you to save, copy, or share your screenshot to OneDrive, GoogleDrive, and other programs.
In this article we expalin about “how to take a screenshot on a macbook pro?“. I hope you found it informative. If you wish to learn more, you can check out our other computerSolve Blogs as well.