
You may need to update drivers in Windows when a newer hardware doesn’t work or after you’ve upgraded to a newer version of Windows. Updating drivers can be a troubleshooting step when there is a problem with the device or an error like Device Manager error codes. An updated driver can also enable new hardware features, such as with popular video cards and sound cards.
On Windows 10, a device driver is an essential piece of code that allows the system to interact with specific hardware (such as graphics cards, storage drivers, network adapters, Bluetooth, etc.) as well as peripherals, including mice. gives. Keyboard, Printer, Monitor and much more.
In general, device drivers are detected and installed automatically using the built-in driver library and Windows Update service. However, sometimes, you may need to manually update some devices due to various reasons. For example, when Windows 10 cannot recognize a component. The device stops working after the upgrade. Windows Update installs a generic package, or you may have to apply a significant improvement or access a new feature quickly.
Method to update laptop drivers –
These steps can be used to update drivers in Windows 11, Windows 10, Windows 8, Windows 7, Windows Vista or Windows XP. It usually takes about 15 minutes to update a driver in Windows. If you’d rather follow the procedure below, but with more details and screenshots for each step, use our step-by-step guide to updating drivers in Windows instead.
- Locate, download and extract the latest drivers for the hardware. You should always check with the hardware manufacturer first when looking for an updated driver. When downloaded directly from the hardware manufacturer, you’ll know the driver is both valid and latest for the hardware
- Open Device Manager. There are several ways to access Device Manager in Windows but it is much easier to do so from Control Panel (the method mentioned in the link).
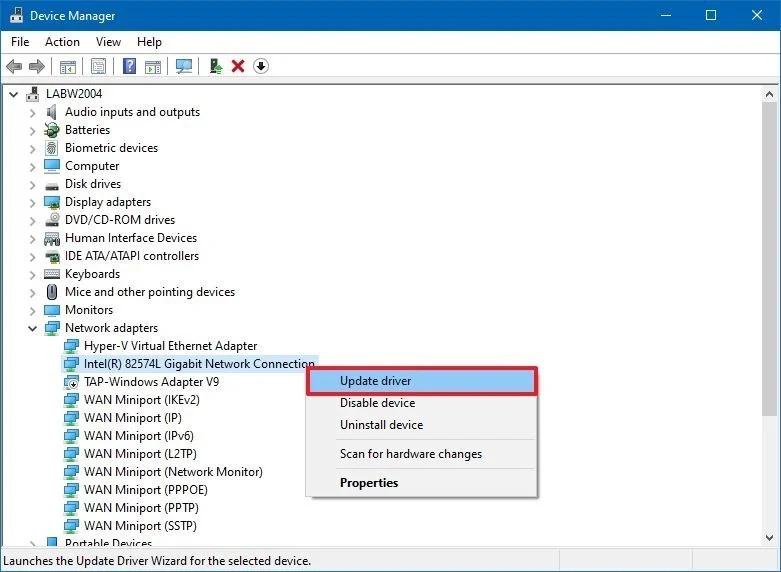
- With Device Manager open, select the > or [+] icon (depending on your version of Windows) to open the category that you think contains the device you want to update drivers for. Huh. Huh.
- Once you have found the device you are updating the drivers for, the next step depends on your version of Windows:
- Windows 11, 10 and 8 : Right-click or press and hold on the hardware name or icon and select Update Driver (W11/10) or Update Driver Software (W8).
- Windows 7 and Vista : Right-click the hardware’s name or icon, choose Properties, then the Drivers tab, then the Update Drive button.
- Windows XP only : Right-click the Hardware item, select Properties, the Driver tab, and then the Update Drive button. From the Hardware Update Wizard, select No, Not This Time, then Next > for the Windows Update question. From the Search and installation options screen, choose Do not search, I would choose the driver to install option, then Next>. Go to step 7 below.
- How do you want to find the drivers? In question, or in some versions of Windows, how do you search for driver software? Select Browse My Computer for Drivers (Windows 11 and 10) or Browse My Computer for Driver Software.
- On the next window, let me choose from the list of drivers available on my computer (Windows 11 and 10) or from the list of device drivers on my computer at the bottom of the window.
- Under the text box, in the bottom-right, select Have a disk.
- On the Install from disc window that appears, select Browse at the bottom-right corner of the window.
- Now from what you see in the Locate Files window, work your way to the folder that you created as part of the driver download and extraction in Step 1.
- Select any INF file in the file list and then choose Open. INF files are the only files that Device Manager accepts for driver setup information and are therefore the only types of files that will be shown to you.
- Select OK Back to Install from Disk window.
- Select the newly added hardware in the text box, and then press Next
- You may receive a number of general warnings and other messages this time in the driver update process, many of which are brief and listed with advice on what to do :
- Windows cannot verify that the driver is compatible : If you are sure that this driver is correct, select Yes to continue installing it. Choose No if you think you may have the driver for the wrong model or something like that, in which case you should look for other INF files or maybe download a completely different driver. Checking the Show compatible hardware box, if available on Windows from step 12, can help prevent this.
- Windows cannot verify the publisher of this driver software : If you obtained it directly from the manufacturer or from their installation disc, select Yes to continue installing this driver. If you downloaded the driver elsewhere and didn’t finish the search provided by the manufacturer, select No.
- This driver is not signed : Similarly to the publisher verification issue above, select Yes only if you are sure of the source of the driver.
- Windows requires a digitally signed driver : In 64-bit versions of Windows, you won’t even see the above two messages because Windows won’t let you install a driver with a digital signature.
- On the Installing Driver Software screen, which should only last a few to several seconds, Windows will use the instructions included in the INF file from Step 10 to install the updated drivers for your hardware.
- Once the driver update process is complete, you should see that Windows has successfully updated your driver software window.
- Select Close. Now you can also close Device Manager.
- Restart your computer, even if you are not prompted to do so. Windows doesn’t always force you to restart after updating a driver, but it’s a good idea.
- Driver updates include changes to the Windows Registry and other important parts of Windows, so restarting is a good way to make sure this update hasn’t negatively affected any other parts of Windows.