WebHelper 32bit is considered a kind of browser hijacker. Threats like Web Helper 32 Bit are known to cause various problems like changing the user’s specified home page or even your preferred browser of choice. Some users have been affected by WebHelper 32bit virus. Many complaints about WebHelper 32bit include webpage redirects, unwanted advertising, and disapproved changes to the user’s browser.
The ‘WebHelper.exe‘ process belongs to the WebHelper 32bit Application. There seems to be no legitimate publisher of this software or any website associated with it. The only place a WebHelper application can come up with is in the various software bundles. However, its presence on your system may cause it to be slow, as this application uses up a large chunk of CPU resources. There have been reports stating that the Web Helper application may bombard users with advertisements promoting various technical support tips so be very careful of any advertisements displayed by this piece of software.
If WebHelper 32bit application is present on your system, we recommend you to remove it using a reputed anti-virus software suite.
How to remove Windows Pro Web Helper ?
To remove Windows Pro WebHelper 32bit , follow the steps below :
- This removal guide may appear overwhelming due to the amount of the steps and numerous programs that will be used. It was only written this way to provide clear, detailed, and easy to understand instructions that anyone can use to remove this infection for free. Before using this guide, we suggest that you read it once and download all necessary tools to your desktop. After doing so, please print this page as you may need to close your browser window or reboot your computer.
- Reboot your computer into Safe Mode with Networking using the instructions for your version of Windows found in the following tutorial :
How to start Windows in Safe Mode
When following the steps in the above tutorial, select Safe Mode with Networking rather than just Safe Mode. When the computer reboots into Safe Mode with Networking make sure you login with the username you normally use. When you are at your Windows desktop, please continue with the rest of the steps.
- This infection changes your Windows settings to use a proxy server that will not allow you to browse any pages on the Internet with Internet Explorer or update security software. Regardless of the web browser you use, for these instructions we will first need need to fix this problem so that we can download the utilities we need to remove this infection. Please start Internet Explorer, and when the program is open, click on the Tools menu and then select Internet Options as shown in the image below.
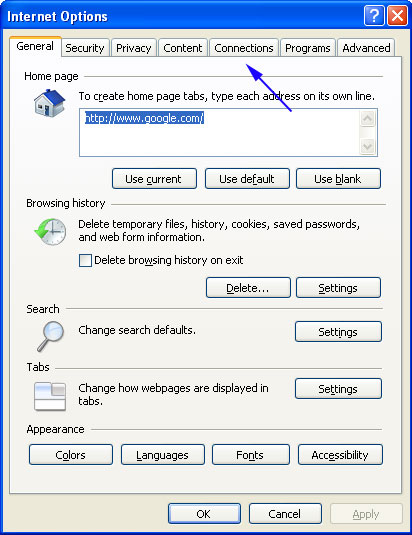
- You should now be in the Internet Options screen as shown in the image below. Now click on the Connections tab as designated by the blue arrow above.
- You will now be at the Connections tab as shown by the image below. Now click on the Lan Settings button as designated by the blue arrow above. You will now be at the Local Area Network (LAN) settings screen as shown by the image below.
Under the Proxy Server section, please uncheck the checkbox labeled Use a proxy server for your LAN. Then press the OK button to close this screen. Then press the OK button to close the Internet Options screen. Now that you have disabled the proxy server you will be able to browse the web again with Internet Explorer.
- To terminate any programs that may interfere with the removal process we must first download the Rkill program. Rkill will search your computer for active malware infections and attempt to terminate them so that they wont interfere with the removal process. To do this, please download RKill to your desktop from the following link.
When at the download page, click on the Download Now button labeled iExplore.exe. When you are prompted where to save it, please save it on your desktop.
- Once it is downloaded, double-click on the iExplore.exe icon in order to automatically attempt to stop any processes associated with Windows Pro Web Helper and other malware. Please be patient while the program looks for various malware programs and ends them. When it has finished, the black window will automatically close and a log file will open. Please review the log file and then close so you can continue with the next step. If you have problems running RKill, you can download the other renamed versions of RKill from the rkill download page. All of the files are renamed copies of RKill, which you can try instead. Please note that the download page will open in a new browser window or tab.
- At this point you should download Malwarebytes Anti-Malware, or MBAM, to scan your computer for any infections, adware, or potentially unwanted programs that may be present. Please download Malwarebytes from the following location and save it to your desktop.
- Once downloaded, close all programs and Windows on your computer, including this one.
- Double-click on the icon on your desktop named MBSetup-1878.1878-4.0.exe. This will start the installation of MBAM onto your computer.
- When the installation begins, keep following the prompts in order to continue with the installation process. Do not make any changes to default settings and when the program has finished installing, a welcome screen will be displayed.
At this screen, click on the Get Started button where you will be prompted to buy and activate a license. To continue using it for free, click on the ‘Maybe Later’ option and then select ‘Use Malwarebytes Free‘.
It should be noted that the free version will scan for and remove malware, but not provide real-time protection from threats that occur when not performing a scan.
Finally, you will be shown a screen asking you to sign up for their newsletter. Just click on the ‘Open Malwarebytes Free’ option to start the program.
- MBAM will now start and you will be at the main screen as shown below.
We now need to enable rootkit scanning to detect the largest amount of malware and unwanted programs that is possible with MalwareBytes. To do this, click on the Settings gear on the top left side of the screen and you will be brought to the general settings section.
Now click on the Security option at the top of the screen. You will now be shown the settings MalwareBytes will use when scanning your computer.
Scroll down until you see Scan option as shown below.
At this screen, please enable the Scan for rootkits setting by clicking on the toggle switch so it turns blue.
Now that you have enabled rootkit scanning, click on the X button to close the settings to get back to the main screen.
- You should now click on the Scan button to begin scanning your computer for malware.
This process can take quite a while, so we suggest you do something else and periodically check on the status of the scan to see when it is finished.
- When MBAM is finished scanning it will display a screen that displays any malware, adware, or potentially unwanted programs that it has detected. Please note that our guide’s scan results image may look different than the one you are shown in this version of Malwarebytes as it was created with an older version.
You should now click on the Quarantine button to remove all the selected items. MBAM will now delete all of the files and registry keys and add them to the program’s quarantine.
When removing the files, MBAM may require a reboot in order to remove some of them. If it displays a message stating that it needs to reboot, please allow it to do so. Once your computer has rebooted, and you are logged in, please continue with the rest of the steps.
- You can now exit the MBAM program.
- If your computer is still in Safe Mode with Networking, you can reboot your computer back to normal mode. Once your computer is rebooted and you are back at the desktop, you can proceed with the rest of the instructions.
- Now you should download HitmanPro from the following location and save it to your desktop :
When you visit the above page, please download the version that corresponds to the bit-type of the Windows version you are using.
- Once downloaded, double-click on the file named HitmanPro.exe (for WebHelper 32bit versions of Windows) or HitmanPro_x64.exe (for 64-bit versions of Windows). When the program starts you will be presented with the start screen as shown below.
Now click on the Next button to continue with the scan process.
- You will now be at the HitmanPro setup screen. If you would like to install the 30 day trial for HitmanPro, select the Yes, create a copy of HitmanPro so I can regularly scan this computer (recommended) option. Otherwise, if you just want to scan the computer this one time, please select the No, I only want to perform a one-time scan to check this computer option.
Once you have selected one of the options, please click on the Next button.
- HitmanPro will now begin to scan your computer for infections, adware, and potentially unwanted programs. When it has finished it will display a list of all the items that Hitman has found as shown in the image below. Please note that the items found may be different than what is shown in the image.
You should now click on the Next button to have HitmanPro remove the detected items. When it is done you will be shown a Removal Results screen that shows the status of the various programs that were removed. At this screen you should click on the Next button and then if prompted you should click on the Reboot button. If HitmanPro does not prompt you to reboot, please just click on the Close button.
Once your computer has has restarted or you pressed the Close button, you should now be at your Windows desktop.
- As many malware and unwanted programs are installed through vulnerabilities found in out-dated and insecure programs, it is strongly suggested that you use Secunia PSI to scan for vulnerable programs on your computer.

