WSUS stands for Windows Server Update Services. To Install Windows WSUS Client follow the steps that are given below.
WSUS (Windows Server Update Services) allows you to target updates to groups of client computers, so you can ensure that specific computers always get the right updates at the most convenient times. It can meet the needs of a Windows-only network at the most basic level.
One of the most important task of system administrators is to keep client and server computers updated with the latest software patches and security updates. Without WSUS (Windows Server Update Services) it would be really hard to manage the updates deployment.
Install Windows Server Update Services on Windows Server:
- Log on to the Windows server on which you plan to install the WSUS server role.
- Open Local Administrators group.
- In Server Manager, click Manage and click to add Roles and Features.
- On the Before you begin page, click Next.
- In the select installation type page, select Role-based or feature-based installation option.
- Click on the Next option.
- On the Server Selection page, verify the server name and click Next.
- Finally WSUS set up in your Windows.
Install and Configuration Windows Server Update Services:
- Open Server Manager Console.
- On Server Manager, click Manage and click on Add Roles and Features.
- On the Before you begin page, click Next.
- In the Select installation type page, select Role-based or feature-based installation option. Click Next.
- On the Server Selection page, verify the local server name (WS2K19-WSUS) is selected and click Next.
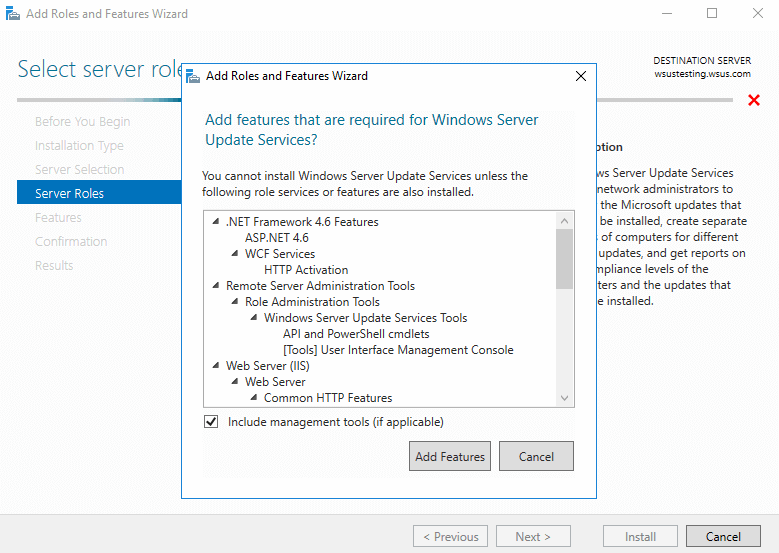
- On the Server roles page, scroll down and select the role “Windows Server Update Services”.
- In the window that appears, click the Add Features button while you have ticked Include management tools, and then click Next to continue.
- On the Select features page, leave the options to default and click Next.
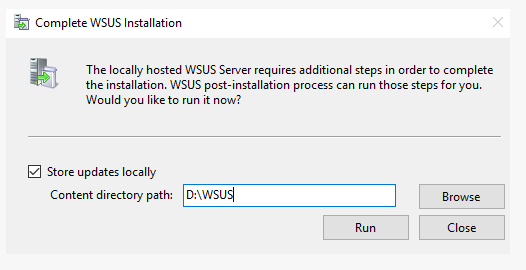
- On the Content location selection page, type a valid location to store the updates.
- You must select role services / Database type to install for Windows Server Update Services.
- Click on Next.
- On the Content location selection, we have the option of selecting where the WSUS updates will be stored.
- Click Next automatically web server role page opens < review the information < click Next.
- Click Next to continue.
- Review the settings and click Install.
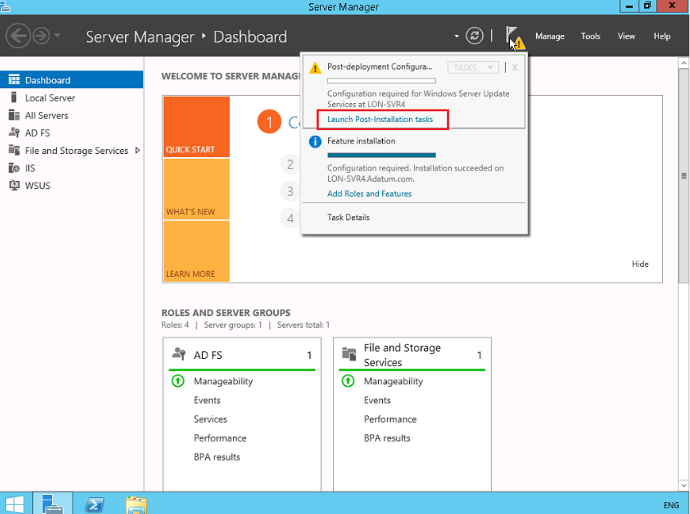
- Once WSUS installation is complete < click Launch Post-Installation tasks.
- Wait for the message “Configuration successfully completed” and Click on Close.
Install Windows WSUS Client Manually:
- Locate the WSUS application you’ve downloaded, and double-click it to begin the installation.
- When the wizard’s page appears, click on the Next option.
- Make sure that Full Server Installation Including Administration Console is selected, and click Next.
- Review the License Agreement and select “I Accept the Terms of the License Agreement”, and click Next.
- This will set the C:\WSUS folder to be used to store the updates and you can browse to a different location to store the updates and click Next.
- Review the options on the Database Options page. Accept the default Install Windows Internal Database in the C:\WSUS folder and click Next.
- On the Web Site Selection page, accept the default Use the Existing IIS Default Web Site option.
- Access Windows Server Update Services using http://servername.
- Review the information on the Ready to Install page. Notice that it also identifies the path for the Client Self Update Site as http://serverName/selfupdate. Click Next to begin the installation.
- After several minutes, the installation will complete. Click Finish.
- The Windows Server Update Services Configuration Wizard will launch automatically.
- Review the information on the Before You Begin page and click Next.
- Review the information on the Microsoft Update Improvement Program page and click Next.
- If you were using both upstream and downstream servers, you’d configure the downstream servers to obtain their updates from the upstream server, and the upstream servers would obtain their updates from the Microsoft Update site.
- If your network uses a proxy server, specify the details in the Specify Proxy Server page and click Next.
- Make sure that your server has Internet connectivity, and click Start Connecting and tap on Next.
- On the Choose Languages page, select your language and click Next.
- Review the information on the Choose Products page and click Next.
- Review the information on the Choose Classifications page.
- On the Set Synch Schedule page, accept the default Synchronize Manually and click Next.
- Review the information on the Finished page.
- WSUS will launch. Expand by the server by clicking the plus (+) sign. Select Updates in the Update Services console, and you’ll see a display similar to the following graphic.
- At this point, WSUS is successfully installed, and other network components can be configured to ensure your clients get their updates from this WSUS server.