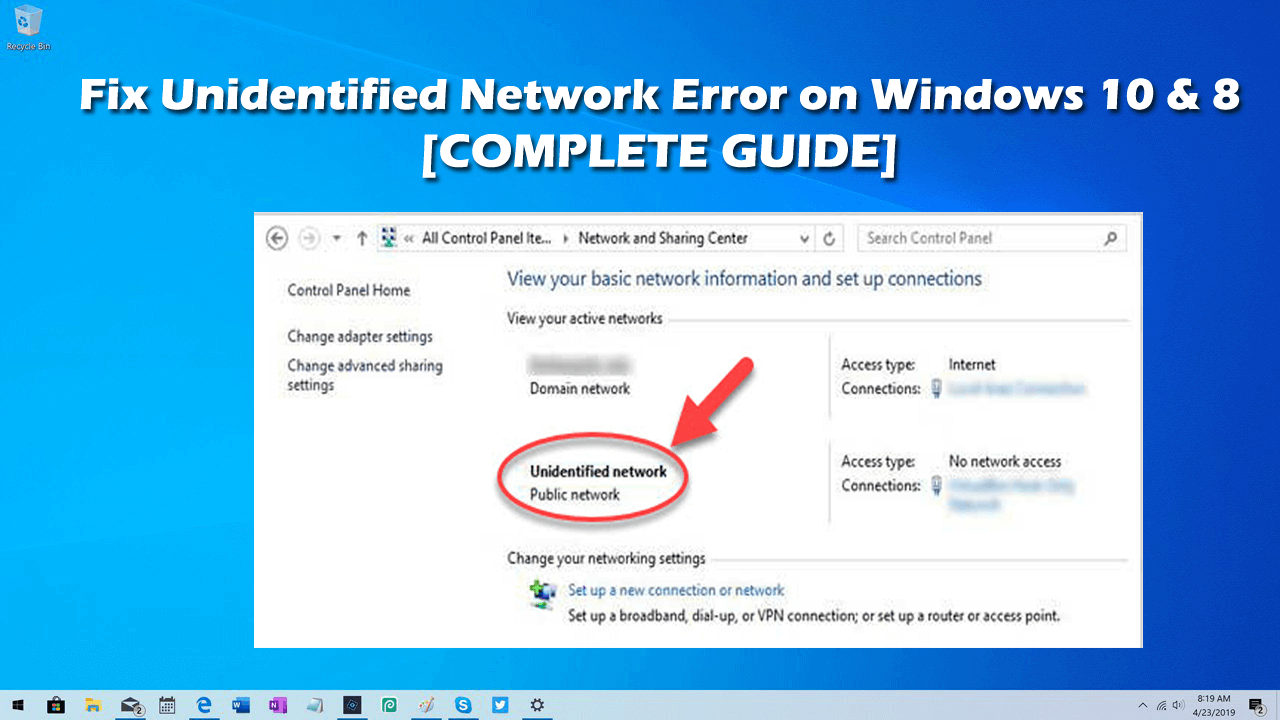
How to fix unidentified network windows 10?
When we try to connect to the network Sometimes, you may face issue with network connectivity while trying to connect to the network where the error says “Unknown network”. We have compiled a comprehensive list of troubleshooting steps that can help. Please go through the full list first and then decide which of these may be applicable in your case.
This error is caused by Ethernet ‘Unknown network’ issue, usually, incorrect IP configuration settings or network settings being set incorrectly. Due to this error, Windows users are not able to access the internet on their system even though they have a working internet connection.
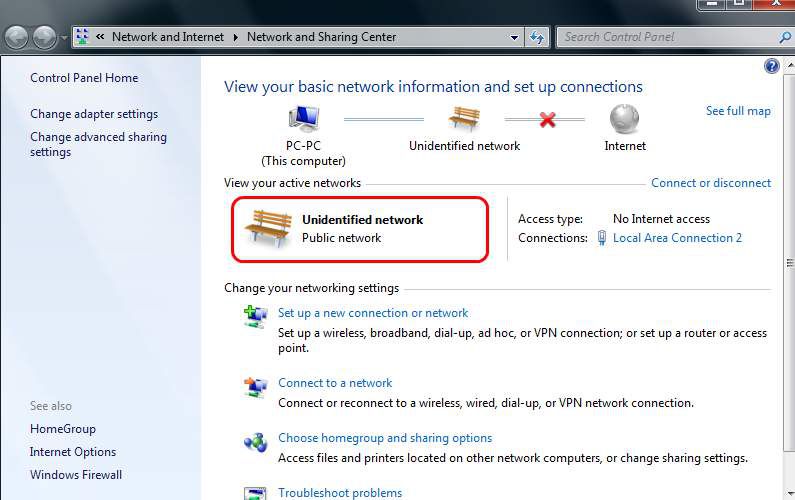
Whether you use wireless or ethernet, Windows 10 systems are vulnerable to a network issue which prevents you from connecting to a network. This error is known as “Unidentified Network error,” and has been around since older generations of the operating system. It can be extremely frustrating to deal with, so let’s get troubleshooting.
To fix the issue of Unidentified Network in Windows 10/8/7, the following suggestions could be carried out.
Turn off Flight Mode
Update the Network Card drivers.
Disable the security software temporarily.
Switch off the Fast Startup feature.
Change your DNS servers.
Run these commands.
Diagnose the network.
Change the Ethernet cable.
Set a static IP address
Turn off Flight Mode:
Windows 10 offers Airplane mode or Flight Mode if you need to disconnect from all the networks, including internet access. If it is turned off, you need to turn it on to resolve the problem. In such a case, we recommend you check if the Airplane Mode on your Windows 10 computer is enabled. If the Airplane Mode is enabled, disable it right away and check if you are still getting the unidentified network error on your PC.
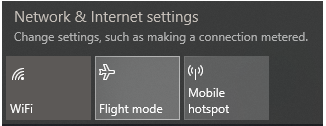
Look for the dedicated Airplane Mode key on the keyboard. It is usually present on any of the Function keys located on the top row of the keyboard. You will need to press the Airplane Mode key along with the Fn key. Alternatively, you can also open the Action Center menu by pressing the Win + A keys together. The Action center menu will open on the right side of the screen. Here, look if the Airplane Mode buttons highlighted. If yes, then Airplane Mode is enabled. Make a click on it to disable Airplane Mode.
Update the Network Card drivers:
Sometimes the issue might be with the Network drivers. Update them and see if this helps. To Update the Network Card Drivers, there are two options:
Windows Update: Go to Windows 10 Settings > Update and Security > Click on View Additional Update link. Check if there is an update available for the network driver. If yes, install it. Restart and check if the issue persists.
Download from OEM Website: Open Device Manager (Win + X followed by the M key), locate the network adaptor, and check click on the Properties option.
Switch to the Drivers tab, and Note the driver version. Next, open the Ethernet Adapters or Wifi Adaptor OEM website. Locate the driver’s section, and check if there is a new version released. If yes, create a restore point on your computer, and then install the driver.
Disable the security software temporarily:
Many times, anti-virus or firewall software interferes with the network connectivity or causes other issues. Understandably, anti-virus software is crucial for the system. Still, it could be disabled to check if the network connectivity issues resolve in its absence to isolate the issue.
With more and more antivirus apps offering network protection, it’s possible that they interfere with your settings and mess something up. The easiest way of testing this is temporarily disabling any third-party antivirus software.
- Right-click on an empty space in your taskbar and choose Task Manager.
- Click on More details.
- Switch to the Start-up tab at the top of the window.
- Locate your antivirus application and select it by clicking on it once.
- Click on the Disable button now visible in the bottom-right of the window. This will disable the application from launching when you start your device.
- Restart your computer and attempt connecting to your network again.
- After you confirm whether or not your antivirus app interferes with your network connection, you can enable it again by following the same steps. When you select your disabled antivirus, the button will change to Enable.
Switch off the Fast Startup feature:
All of us have noticed that the later versions of Windows boot considerably faster than the previous versions. This is because of a feature called Fast Startup. Sometimes, this mode causes issues. To disable the feature, use the following steps:
- Search for ‘Power Options’ in the Windows search bar.
- Choose what the power button does.
- Click on ‘Change settings that are currently unavailable’.
- Uncheck ‘Turn on fast startup’. Shut down the system and reboot after 30 seconds.
Done that, check if the wireless connection or ethernet is restored, and you can connect to the internet as expected.
Change your DNS servers:
ISPs offer their custom DNS server address which could be slow sometimes. You can instead choose Google Public DNS or Cloudflare DNS to speed up website access.
- Press Windows + X or right-click on the start button.
- Click on ‘Network Connections’.
- Right-click on your network connection (Ethernet or Wifi) and click on properties. It might prompt for administrator credentials.
- Double-click on Internet Protocol Version 4.
- Select ‘Use the following DNS server addresses and set but the preferred and alternate DNS server address as follows to use Google Public DNS:
Preferred DNS server: 8.8.8.8
Alternate DNS server: 8.8.4.4
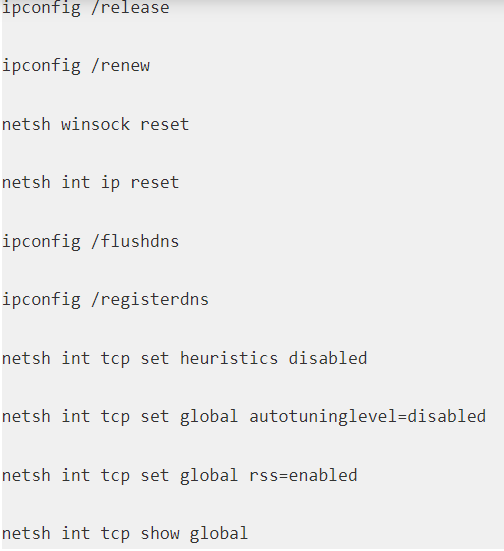
Run these commands:
Here’s another solution that you can try to fix network connectivity issues. This again requires the use of the Command Prompt window. Go ahead and launch the CMD interface as you did in the final solution. Open the Command Prompt with admin privileges, and execute these commands. You can search it by typing ‘command prompt’ in the Windows search bar, and once it appears, choose to run it as administrator.
When the Command Prompt window is open, type the commands provided below and press the Enter key after typing each line of the commands:
netsh Winsock reset
netsh int IP reset
After running these commands, exit the CMD window.
Diagnose the network:
Windows 10 offers a built-in network troubleshooter. You can find it in Troubleshoot section. You can execute it in two ways. The First method diagnoses a particular network adaptor, while the second method looks at everything.
Troubleshoot Particular Network Adaptor:
- Press Windows + X or right-click on the start button.
- Click on ‘Network Connections’.
- Right-click on your network connection (Ethernet or Wifi) and click on ‘Diagnose‘. It will start an automatic troubleshooter.
The second way to do this is to go to Windows 10 Settings > Update & Security > Troubleshoot > Additional troubleshooter. Locate Network Adapter, and choose to run it. Once done, check if the issue is resolved.
Change the Ethernet cable:
At times, the fault might be with the ethernet cable. It can be an old cable that is now aging. If you do not have a WiFi adaptor, then change the ethernet cable to isolate the issue. Or else, try connecting to a Wifi network and check if it works.
Set a static IP address:
Network Settings of an Ethernet or Wifi Adapter allow you to configure Static IP address. This comes in handy when your router or ISP fails to offer a dynamic IP address every time you connect to it.
- Press Windows + X or right-click on the start button.
- Click on ‘Network Connections’.
- Right-click on your network connection (Ethernet or Wifi) and click on properties. You have to enter the administrator credentials to confirm the changes.
- Double-click on Internet Protocol Version 4.
- Select the radio button at ‘Use the following IP address’.
- Check the IP address settings for others using the same network as yours and change your settings to the same.
- Click OK to save the settings and exit.
conclusion:
We hope this guide was able to help you resolve the “how to fix unidentified network windows 10?“. Enjoy surfing the internet without any disruptions! If you’re in need of information about Microsoft Windows, need help with troubleshooting, or want to learn more about Unidentified Network, check out our articles here.