Guide For HP LaserJet P1102W Wireless Setup
In this article, we have explained the steps for HP LaserJet P1102W wireless printer setup. By following these simple steps you will be able to set up your printer on any of your devices. Thus in this write-up, we have explained the steps to install a printer on Windows and Mac operating systems. In addition, we’ve explained the process for connecting your HP printer to your iPad.

HP Wireless LaserJet P1102W Printer Setup For Windows
If you are using a Windows computer and want to use an HP printer in wireless mode, then set it up by following these steps-
- First, turn on your Windows system and your HP printer. Keep the printer near the computer.
- On your computer, go to the LaserJet page and follow the prompts to download the full feature printer driver by clicking the ‘Download’ button.

- Now open the downloaded file to start the setup process.

- Read the terms of the license agreement carefully and check the box next to ‘I have reviewed and accepted the agreements and settings’ and select the Easy Install option checkbox. After that click on ‘Next’ option.
- Next page will show you the option of ‘Printer Found’. So from there select the HP LaserJet P1102W printer and hit ‘Continue’.
- After the software installation is complete, Setup will bring up the printers it can find. If the desired printer is not visible, click the ‘My printer is not shown’ button and click ‘Continue’.
- Now select the option Configure to print over wireless network and click Next, now the software and drivers will start the installation.
- Now connect the printer to the computer by using a USB cable.
- Once a printer connection is detected, the installation process will continue on the Wireless Configuration Utility. Select “Next”.
- When prompted for the ‘Wireless Discovery’ step, select ‘Automatic’ to have the computer search for wireless login credentials, and then select ‘Next’.
- Now ‘Wireless Network Credentials’ will be shown and the screen will display the network name. Select your network and press the Next button.
- Next, your HP Laserjet P1102w printer will be connected to the wireless network, finally, remove the USB cable and select Finish on your Windows computer.
HP laserjet P1102W Wireless Setup On Mac
Follow these steps to wirelessly set up your HP LaserJet P1102 on your Mac device-
- First, turn on your printer and make sure there is no error light on the printer.
- Now, turn on your Mac device and connect it to the wireless network .
- Next, connect the Mac device to the printer using a USB cable.
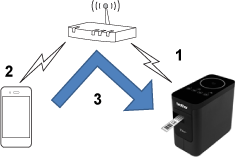
- A pop-up window will automatically be displayed on the screen. It will ask for permission to download and install the required software. Click on the “Install” option to grant permission.
- Read the terms correctly, and if you are satisfied with it, click the ‘Agree’ button. It will automatically download and install the software required for your printer version.
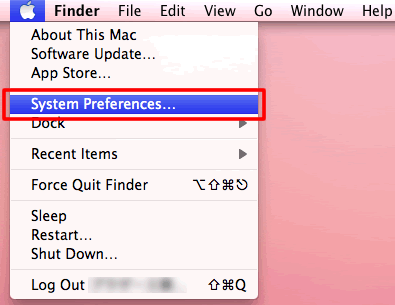
- Once the installation is complete, click on the ‘Apple’ icon and open ‘System Preferences’.
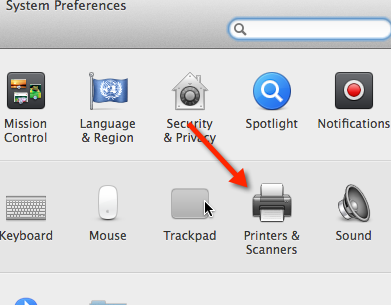
- Next, you need to click on the ‘Printers and Scanners’ section.
- Then, click ‘Open Print Queue’ and press the ‘Printer Setup’ button.
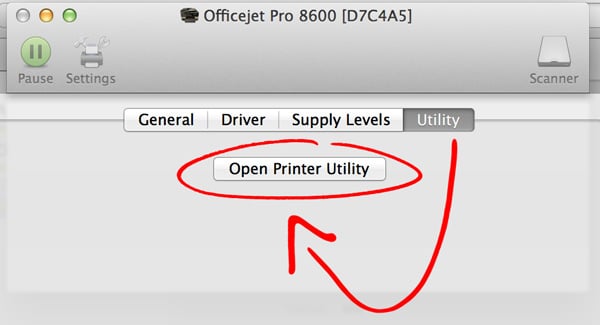
- Now click on ‘Settings’ and click on the ‘Utilities’ button and click on the ‘Open Printer Utility’ button
- In the new window click on ‘HTML Configuration’ at the bottom left.
- Next, click on the ‘Networking’ tab, and under ‘IPv4 Configuration’ select ‘Wireless’.
- Now under the ‘Wireless’ section, change the status from ‘Disabled’ to ‘Enabled’.
- Click ‘Apply’ and select ‘OK’, now go back to the previous page of Wireless Setup.
- Select the name of your shared network from the bottom right corner of the window under ‘Network name (SSID)’.
- Then click the button that displays two arrows to the left of the network names.
- Under the Authentication field, select ‘Security Mode’ from the drop-down menu at the bottom and type the network password correctly and click on the ‘Apply’ button.
- Now again come back to ‘Printers and Scanners’ and click on the (+) sign.
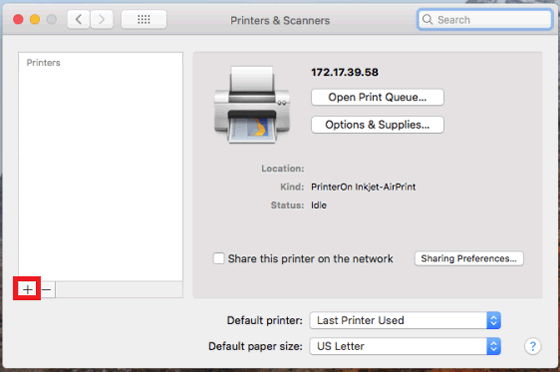
- From the popup window select HP LaserJet P1102W printer. Then bring the drop-down menu in the ‘use’ section at the bottom and choose your printer name. Click on ‘add’ button.
- Finally, the HP Laserjet P1102w wireless printer will be set up on the Mac and ready to print.
HP LaserJet P1102W Wireless Setup For iPad
Follow these steps to do the wireless setup of the printer with your iPad-
- Make sure that your iPad and the printer are connected to the same wireless network.
- Now, Download and install the HP smart app. Once the installation is complete on your device.
- Now scroll down to the bottom of the welcome page. You will find the ‘Start’ button at the bottom. Click on it.
- Next, you’ll find the terms and conditions for using the app on your iPad. Accept all the terms and conditions, then click on ‘Continue’ option.
- A popup window will now be displayed. It will ask for permission to show notifications from the app. You can configure the notification aspects from your device settings if necessary. Click the “Allow” button of the popup window.
- After you have press the allow button, the app will start to look for the printers that are connected to the same network as your iPad. The search may take a few moments to find all the printers in the network.
- If you have multiple printers connected to the same network, then you will find an additional option on the resulting page.
- Select the HP P1102W printer you want to connect to the iPad wirelessly. If you’re going to add the printer to the network, you’ll need to tap on the ‘Add printer’ option at the bottom.
- After clicking on the desired printer in the last step, the wireless setup will be completed.
How to Setup HP laserjet P1102W Wireless Printer On Windows
- After the driver setup up the HP Laserjet wireless printer, go to the connection via wireless mode to the computer.

- Following the prompts and make your choice as per the setup shown and connect the computer to the printer with a USB.
- After the setup is completed successfully, you should print the configuration report of the printer. Make sure the printer has an SSID name.