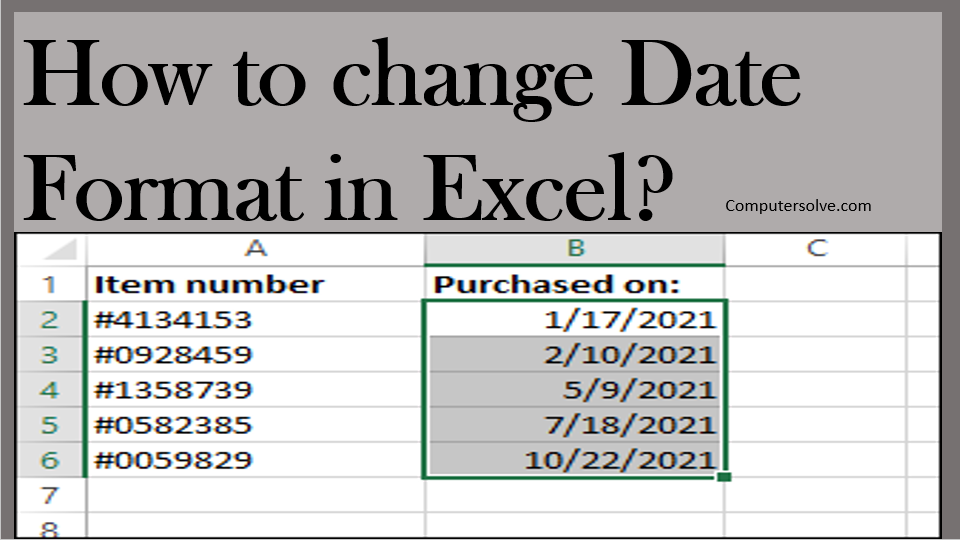
Change Date Format in Excel, the program will format it according to the default date settings. Excel is often smart enough to apply number formatting automatically, but you can also add it manually.
When it comes to changing date format of a given cell or range of cells. The easiest way is to open the Format Cells dialog and choose one of the predefined formats.
WAY 1: Change Date format in Microsoft Excel
Step-1 In your spreadsheet, select the cell you would like to change the format in.
Step-2 Select the home tab from the panel at the top of the page.
Step-3 Click on the pop out icon in the ‘Number‘ section.
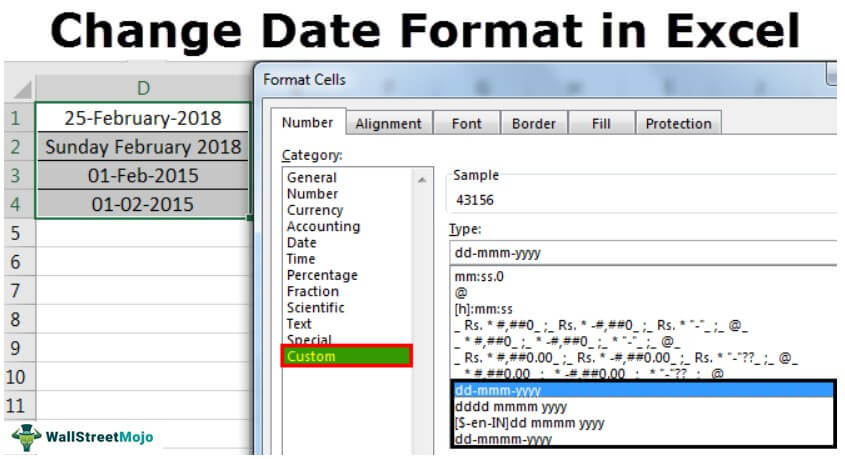
Step-4 Click on ‘Custom‘.
Step-5 From the list, select the format you would like.
Step-6 Select ‘OK‘.
Change the date from dd mm yyyy to dd mm yyyy in Excel:
Step-1 Select a blank cell next to the dates you want to convert, type this formula.
=DATE(VALUE(RIGHT(A9,4)), VALUE(MID(A9,4,2), VALUE(LEFT(A9,2).
Step-2 Drag fill handle over the cells which need to use this formula.
WAY 2: Change the format of a date Using Keyboard:
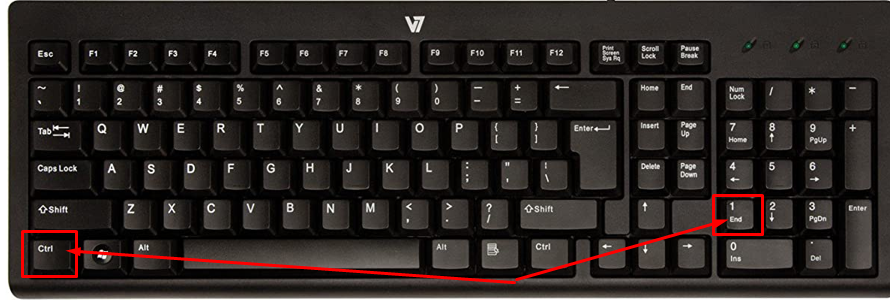
Step-1 Select the cells you want to format.
Step-2 Press CTRL+1.
Step-3 In the Format Cells box, click the Number tab.
Step-4 In the Category list, click Date, and then choose a date format you want in Type.
Step-5 Go back to the Category list, and choose Custom.
WAY 3: Change the date format in Excel manually:
Step-1 Select the cell(s) that contain values you want to format.
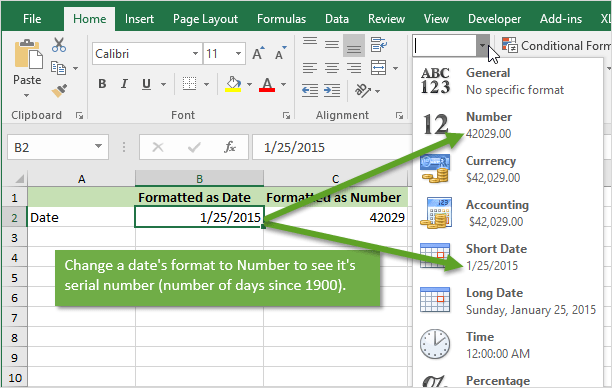
Step-2 Click the Number Format list arrow from the Home tab.
Step-3 Select the date format you want to apply.
Step-4 Display date and time serial numbers as date values.
Step-5 Formats that begin with an asterisk (*) respond to changes in the date/time settings specified for the operating system.
WAY 4: Change the date format in Excel to us:
Step-1 Input the formula =TEXT(A1, “mm/dd/yyyy”), in this case in cell B1, see screenshot: 2.
Step-2 Press Enter key, and select cell B1.
Step-3 Drag the fill handle across to the range that you want to use.
Step-4 You will get a new column date formats.
WAY 5: Changes to fix Dates:
Step-1 Select Delimited – our items have a space character that separates the date and time.
Step-2 On the Excel Ribbon, click the Date tab.
Step-3 Click Text to Columns.
Step-4 Click the Next button.
Step-5 Select Space as the delimiter – there is a space between the date and the time in each cell.
Step-6 The preview pane should show the dates divided into columns.
Step-7 Click Next.
Tips for Displaying Dates in Excel:
- Make sure the cell is wide enough to fit the entire date.
- Change the date system if negative numbers appear as dates.
- Use functions to work with today’s date.
- Convert imported text to dates.
Why Your Date Format May Not Be Having Issues Changing?
- There could be text in the column, not dates (which are actually numbers).
- Dates are left-aligned.
- An apostrophe could be included in the date.
- A cell may be too wide.
- Negative numbers are formatted as dates.
- Excel TEXT function is not being utilized.