Microsoft System Center Configuration Manager (SCCM) is a Windows product that enables the management, deployment and security of devices and applications in an enterprise.
Among other possible uses, administrators would typically use SCCM for endpoint protection, patch management, and software distribution. To install System Center Configuration Manager (SCCM) learn the following steps:
System Center Configuration Manager (SCCM) SQL Installation
Step 1: Execute Setup.exe from the SQL installation media.
Step 2: Select New SQL server stand-alone installation.
Step 3: Provide the product key and click Next.
Step 4: Review and Click Next.
Step 5: Check Use Microsoft Update to check for updates and click Next.
Step 6: Select SQL Server Feature Installation.
Step 7: Select the Database Engine feature and specify the SQL installation directory.
Step 8: Select Default instance and ensure that your instance is created on the SQL Volume.
Step 9: Set all services to run as the SQL domain account that you created previously.
Step 10: On the Collation tab, set the Database Engine to use SQL_Latin1_General_CP1_CI_AS.
Step 11: In the Server Configuration tab, set the authentication mode to Windows Authentication and in the SQL Server Administrators add your SCCM Admins group.
Step 12: In the Data Directories tab set your drive letters correctly for your SQL databases, Logs, TempDB, and backup.
Step 13: On the TempDB, complete the various information based on the Database sizing section below.
Step 14: Click Install.
Step 15: Complete the installation by clicking Close.
Install SCCM Console on Windows Using Setup Wizard
Step 1: First of all you need source files for SCCM Console installation copied over to Windows 10 computer.
Step 2: From the SCCM installation Media, launch the splash.hta.
Step 3: Under Tools and Standalone components, click Install Configuration Manager console.
Step 4: You now see Configuration Manager Console setup wizard. Click Next.
Step 5: Specify the site server name (FQDN). Click Next.
Step 6: That’s the default location of console installation. Click Next.
Step 7: Click Install.
Step 8: The Configuration Manager console installation is complete on Windows 10 computer. Click Finish.
Install Configuration Manager Console via Command Prompt
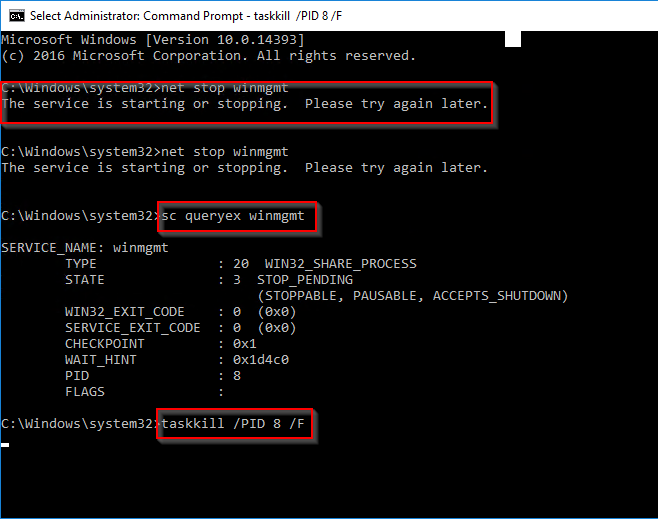
Step 1: Run the command prompt as administrator.
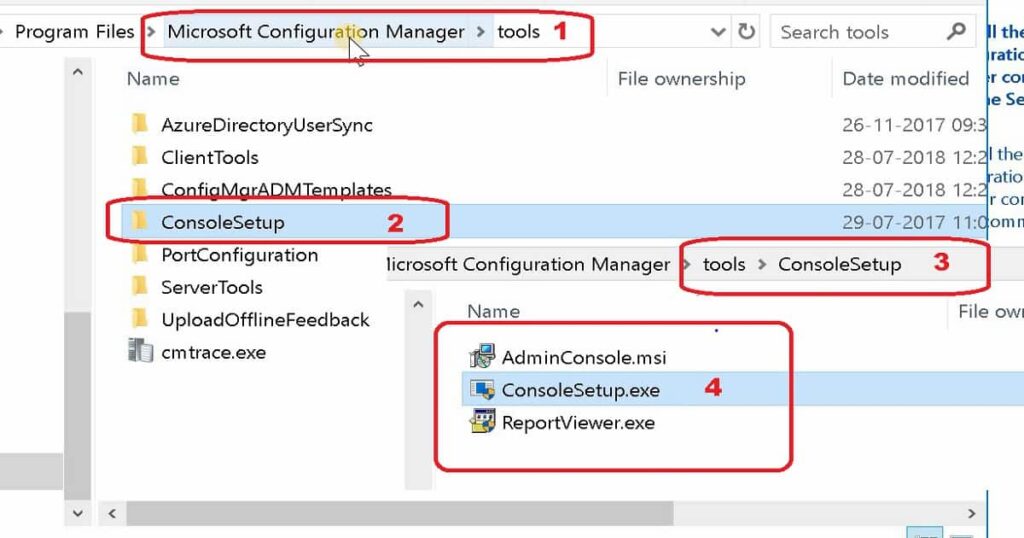
Step 2: Use cd to change the path to a folder that contains Configuration manager console setup files.
Step 3: Now run the below command to install the SCCM console.
ConsoleSetup.exe /q TargetDir=”%ProgramFiles%\ConfigMgr Console”
DefaultSiteServerName=MyServer.Contoso.com
Step 4: By default when you install console, it installs with English as default language.
Step 5: Therefore using the below command with LangPackDir switch, you specify the path to the folder that contains the language files.
ConsoleSetup.exe /q TargetDir=”C:\Program Files\ConfigMgr Console” DefaultSiteServerName=MyServer.Contoso.com LangPackDir=C:\Downloads\ConfigMgr
OR
Step 1: Login to the computer with an account that has admin privileges.
Step 2: Click Start and run the command prompt as administrator.
Step 3: Change the folder path to SCCM client agent install files.
Step 4: Run the command – ccmsetup.exe /install to manually install the agent.
Step 5: In addition to the above command, you may also run ccmsetup.exe and the client agent install begins.
Manually Install SCCM Client Agent
Step 1: In the SCCM installation screen click Install.
Step 2: Click Next.
Step 3: Select Install a Configuration Manager primary.
Step 4: Tick the Use typical installation options for stand-alone primary site box.
Step 5: Click on the Yes button.
Step 6: In the Product Key select an option and click on Next.
Step 7: In the Product License Terms, tick all the 3 boxes and click Next.
Step 8: For the Prerequisite Downloads we’ll be using the Use previously downloaded file option.
Step 9: Point it the folder where we downloaded the files.
Step 10: Let wizard finish verifying the files.
Step 11: In the Site and Installation Settings, enter a 3 character site code and site name that normally pertains to the site location and click Next.
Step 12: In the Diagnostic and Usage Data click Next.
Step 13: Select the Yes, let’s go connected (recommended), if you’re server is in an isolated network select the Skip this for now option.
Step 14: Click the Next button for the final Prerequisite Check.
Step 15: In the Prerequisite Check page, make sure there’s no problem found and if there is fix it first before clicking the Begin Install button.
Step 16: After clicking the Begin Install you’ll be brought to the Install page to see the over all progress.
Step 17: After an hour later, your Configuration Manager 1902 installation core setup is completed – Congratulations!
Where does SCCM client install to?
Log Files – Install SCCM Client Manually Using Command Line.
You can check the Client installation-related log files from the C:\Windows\CCMSetup folder.