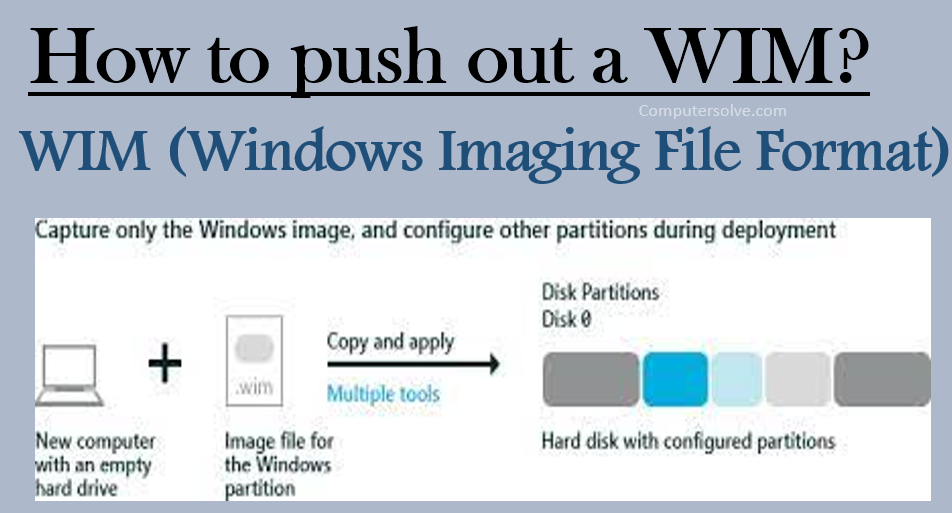
The WIM file was introduced with Windows Vista. It is saved in a file-based imaging format that is used to manage files such as WIM files to boot an operating system image without drivers, updates, and components. WIM Stands for Windows Imaging File Format.
WIM images may contain multiple disk images that can be mounted as new volumes within Windows. They can also be made bootable, which means a computer can boot from the disk image.
Using Command Prompt to push out a WIM
Step 1: Attach the Windows installation media on your system.
Step 2: Click at Start menu and select Command Prompt.
Step 3: Type the following command and press Enter,
dism /Get-WimInfo /WimFile:X:\sources\install.wim
dism /Get-WimInfo /WimFile:H:\sources\install.wim
Step 4: Windows installed Edition take note of the index number.
Step 5: Give the command to your Windows version “install.wim” file (Index number):
dism /export-image /SourceImageFile:H:\sources\install.wim /SourceIndex:IndexNumber /DestinationImageFile:\install.wim /Compress:max /CheckIntegry
Step 6: When the process is completed you should have a valid Windows 10 Home install.wim on the drive C: (C:\install.wim).
Using 7-Zip to extract files from install.wim
Step 1: Install 7-Zip from http://7-zip.org/
Step 2: Insert your Windows 10 DVD and browse to the Sources folder inside the DVD.
Step 3: In the Sources folder, Click install.wim < 7-Zip < Open archive.
Step 4: Each index you install.wim represents a Windows Edition.
Step 5: Click to open the [1].xml file. It opens in Internet Explorer.
Step 6: Click the appropriate index number folder in 7-Zip.
Step 7: Browse to the “Sources\install.wim[index]\Windows\System32\Recovery\”.
Step 8: Copy Winre.wim to the desired location and close 7-Zip.
Step 9: Unmount the ISO or eject the Setup DVD from the drive.
Step 10: You can extract any file from the install.wim or install.esd.
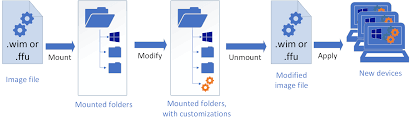
Using DISM to mount install.wim and extract the contents
Step 1: Open your Windows 10 DVD and browse to the Sources folder inside the DVD.
Step 2: It will open elevated Command Prompt window.
Step 3: Find the list of indexes and found editions in the install.wim, by running the following command:
dism /get-wiminfo /wimfile:”G:\sources\install.wim”
Step 4: Let’s attract the Windows 10 Pro to a folder using the following commands:
md C:\WinMount
dism /mount-wim /wimfile:”G:\sources\install.wim” /index:6 /mountdir:”C:\WinMount” /
Step 5: Open the C:\WinMount folder and copy the required files from it.
Step 6: The WinRE.wim would exist under the following path:
C:\WinMount\Windows\System32\Recovery
Step 7: Once copied the required file(s), it’s time to unmount the image.
dism /unmount-wim /mountdir:C:\WinMount /discard
Using ESD to push out WIM
Step 1: Click the “Open” button on toolbar or choose “File > Open” menu to Open WIM file.
Step 2: When there are more than one image in the WIM file, PowerISO will show a dialog prompt you to select an image to open.
Step 3: Click the “Extract” button on toolbar to open “Extract WIM file” dialog.
Step 4: Choose the destination directory for extraction.
OR
Step 1: Select Add > Image file (WIM, ESD, SWM);
Step 2: Select your install.esd file;
Step 3: Select the Windows edition in the ESD image that you want to export to a WIM file;
Step 4: Select Export > WIM in the context menu.