Want to connect headphones to your Xbox One? You can do this in several ways. On this page, I’ll explain what options you need to connect your Xbox One and headset. Therefore, it is important that the headset is suitable for the Xbox One.
With so many different wired and wireless headsets on the market, setup is not as easy as plug-and-play; sometimes it can be a little complicated. Fortunately, we have experience setting up many different headsets for the Xbox One, from simple to confusing (and even more without lots of instructions), so let’s take them apart. Here’s how to connect an Xbox One headset based on the type of headset you unpacked!
Setting Up a Wired Headset
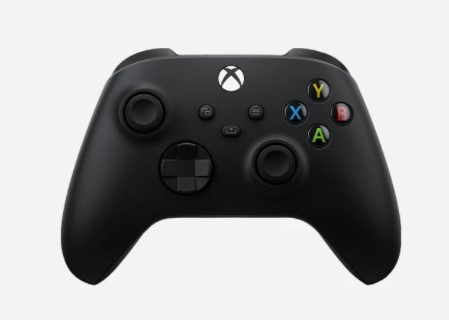
Note: The 3.5mm jack on your Xbox One controller accommodates most headsets.
Don’t worry, these headsets commonly use your driver as a power source and are very easy to install and start using.
Step 1: Turn off Xbox One. It’s not always necessary, but it’s usually a good idea and can prevent unexpected problems.
Step 2: Check the type of cable connection your headphones have. There are two basic connection options: the first is a classic 3.5mm jack and your controller should have a small port for between the handles on the left. The second option is a full-fledged headset adapter for the controller, which connects via the bottom of the controller. Note that there is some overlap here! Some headsets have their own separate Xbox adapters that plug into the entire port, but end up with a 3.5 mm headset jack as another headset of your choice. There’s not much difference, except that the larger adapter option is more robust and provides some call / mute options directly on the driver for faster changes.
Note: Some headsets have an RCA cable or stereo chat options that require a connection to a console or TV. Headsets are rare these days (we haven’t actually tested them in years), but keep in mind that in some cases you may need a free USB port or RCA connection to use the headset.
Step 3: Connect the headset to the controller according to the cable and then test the headset! Take this time to make all the changes to fit them properly. Pay particular attention to how you can control the volume and where the mute button is.
Step 4: Turn on Xbox One and the driver. Listen to the start and menu sound immediately. Adjust the volume and experiment with the mute button to see how these controls work – and to make sure you have the right sound.
Step 5: Start the game and see how the headphones sound! If the headset doesn’t work, how many volume issues do you have, then we have an important suggestion for you to try: go to the left sidebar menu on the Xbox One home screen and go to Settings. Once you’re there, look at Appliances and Accessories. Navigate to the drivers and make sure that the driver you are using can be updated. Drivers also require firmware updates, and the most common reason why headsets stop working is the lack of updates to make them compatible with the new headset, especially if the headset has not yet been updated.
Step 6: Try a multiplayer game to make the chat feature work. You can also record your own voice in a message, send it to yourself, and then listen to it to make sure the microphone picks up your own words, but if you have a few friends online, it’s usually easier to connect to them. in the game and try it out.
Note: If you’re wondering how to connect Xbox 360 headsets to your Xbox One … it can be tricky. The 3.5mm driver connector for the Xbox One is not on the 360, and this Xbox One headphone connector may limit the operation of older headphones. The good news is that it’s now much easier to connect a new headset to your Xbox One, no matter where it comes from.
How to Connect An Xbox Controller To A PC?
How to Connect a Wireless Headset to Xbox One?
Wireless headsets are rare because the Xbox One lacks the true capabilities of Bluetooth (no, you can’t connect a traditional Bluetooth headset to the Xbox One), and developers are having trouble making wireless headsets for the system. Adapters and solutions have improved recently, and we hope Scorpio will reverse this trend when a new console emerges. Here’s what you need to know.
With a tether to the controller
Step 1: Most current Xbox One-compatible wireless headsets primarily require an audio connection – in other words, there is a wireless audio-in connection and a wireless audio-out connection. Another option is a full driver adapter for full input and output via the driver, but we don’t see much. So have your mooring cable, which is usually a 3.5 mm jack, and a wireless connection that requires a USB connection or a keychain. Turn on the Xbox One and the driver.
Step 2: Connect the USB connection and connect it to the headset. There should be a pairing command button on the USB connection and also on the wireless headset that both can successfully connect to. Again, we recommend that you know where your volume and mute buttons are. Start with some audio content and experiment with these buttons to understand the sound range of your headset and make it work. Remember that if you have a full driver adapter, you can skip this step and go to step 3.
Step 3: Now plug the tethering cable into the Xbox One controller, the 3.5mm jack, or the full adapter. Make sure the microphone is plugged in, not muted, and ready. Try this microphone by jumping into a game with friends or sending a voice message. Both methods work, your goal is to make sure that the Xbox One headset connects your audio successfully through the driver.
Note: is your driver running without batteries? Be careful! Many strapped wireless headsets don’t really like connecting to remote controls that also charge the batteries. To charge, unplug the headphones and switch to a battery-powered controller. If not, you can invite or cancel the audio issues.
How to Connect USB Headset to Xbox One?
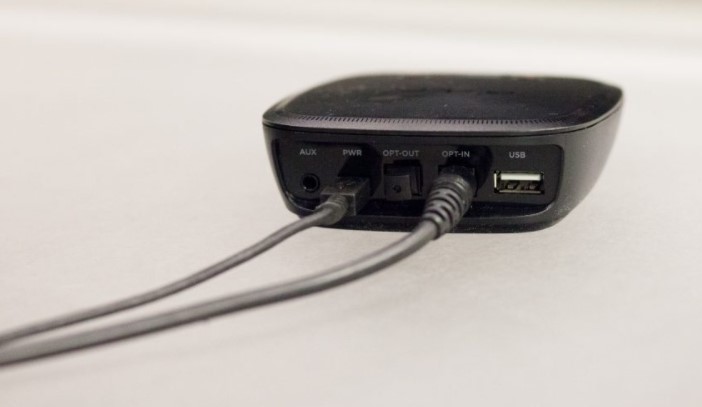
With a Base Station or Adapter (no tether)
Step 1: Due to the complications that occur here, it is best to first check if the driver needs an update. Go to Settings, Devices and accessories and then Drivers. To check for all available updates, select the Update option.
Step 2: Make sure that your headset is charged and ready to go.
Step 3: Check to see if your drive or adapter needs to be updated. In some cases, it may be necessary to connect the base to a computer via USB and check for updates. The instructions for the headset should let you know if necessary.
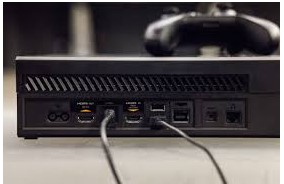
Step 4: Connect the base station to the Xbox One. A microUSB cable must be connected. It doesn’t matter which USB port you use on your Xbox, but one of the back ports is probably the best.
Xbox One Stuck on Green Screen
Step 5: Connect all other cables. This is not always necessary, but some headphones include optical audio cables to further improve sound quality, and this is the best time to make these connections as well.
Note: If you are connecting an optical audio cable, go to Settings, go to Display and Sound, and go to Audio Out. Make sure HDMI audio is turned off and optical audio is turned off for everything to work properly.
Step 6: If necessary, turn on the Xbox One and connect the wireless headset and disc / hub. Usually there is a “search” button on one or the other (sometimes it’s a power button) through which they can connect. If all goes well, it should start in the headphones and you will start to hear the sound. Take the time to experiment with volume and mute controls to see how they all work.
Note: Keep in mind that even fully wireless headsets may require tethering cables for certain things, such as voice chat. It’s different from a headset, so read the chat instructions before you shoot anything.
How to Connect a Microphone to Xbox One?
With an HDMI setup
We’ve seen some HDMI wireless headsets appear, most notably the Tritton Katana headset, which uses HDMI capabilities as part of its wireless capabilities. This is similar to a base station option, but requires a little more work than things get started.
The steps are usually the same, but when it comes to connecting cables, you have a USB cable and an HDMI cable. Connect your traditional HDMI cable for Xbox One to the HDMI hub, and then use the new HDMI cable to route it back to the TV or receiver. Otherwise, no image or sound will appear when you try to use the headset.
Note on Xbox One Sound Settings

We know there’s nothing worse than setting up a good new Xbox headset knowing you haven’t heard any sound. So in addition to checking for updates, let’s talk about some important Xbox One settings. If something goes wrong and you don’t know what to do with the instructions, go to these settings and see if you need to adjust them during setup.
Audio Out: We’ve been talking about this section for a while, but if you go to Settings and then Display and Sound, you’ll see the Audio Out section, which is divided into three sections. The first is HDMI audio, which can be turned off or on. It’s usually okay to leave if you’re not using an optical audio cable, but if the sound suddenly stops, try turning this option on. The second option is the optical audio format, which you should try to change if your optical audio connection does not respond. This also applies to the Bitstream format, which is usually set to Dolby Digital – change this if your headphones are not formatted for Dolby Digital audio.
Volume: To the right of the Audio Output section is Volume. There are many sections, but you should pay attention to the first three. The sound mixer allows you to control the amount of noise that gets into your headphones – if the volume is low or too low, your sound mixer may need some adjustments when you adjust it. The second is the chat mixer, which balances the sound between the chat sound and the normal sound level in the game. Some headsets have recommendations on where you can place a chat mixer, but you can try it to see what works. Finally, there is the output of Party Chat. Some headsets do not mind this setting, others do: when using a headset, make sure it is set to “headset”.
Chat Kinect: If you have kinect, you should see the option to enable or disable Kinect chat in the first sidebar menu, where you go to Settings. The Xbox One is very good at turning it on or off automatically, but if Kinect still records audio instead of using your mixer, you have to adjust it manually.
Party Chat: Your microphone may have been muted here by mistake. Your physical mute button on the headset should reverse the problem, but this option on the screen is a quick way to diagnose problems.
Type of NAT: This is a bit more complicated, but in summary: your internet connection should be “free” enough for you to connect with other people if you want voice chat (this varies from game to game). game and router to router). This means the NAT type. You can find it in Settings, Network and then Wireless Network Configuration. Here is your current network connection with a small portion for NAT.
Privacy and online security: This should be discussed if you have set up a child account for a child or sibling. Here you can check how “voice and text communication” can be restricted to current friends – and automatically restricted if the account holder is under 17 years of age. To fully unlock a chat option, you must edit it using your “parent” account.