
Many times user need to use an external keyboard on your laptop, perhaps because some keys on the laptop keys are damaged or because you want to use more features.
So, how do you disable the laptop keyboard, so that you can use only the external keyboard? Let’s see how.
>> How to find laptop model number? <<
Use Device Manager to Disable the Keyboard
- To open Device Manager, open the Run dialog box (Win+R) and enter devmgmt.msc in the command line.
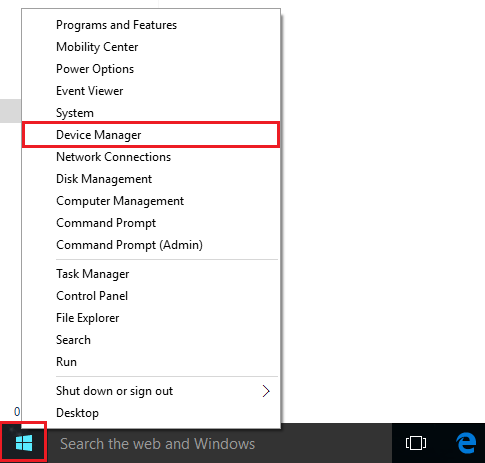
- Or, right-click Start and choose the Device Manager tool from there.
- Expand the Keyboards section to see a list of devices.
- Right-click Standard PS/2 Keyboard and choose Disable device.
- Confirm with Yes. If the keyboard isn’t disabled right away, restart the Laptop
Disable Laptop Keyboard via Device Manager
To disable the Laptop Keyboard, we recommend you to do using the Device Manager as this method is simple and straightforward.
- Press Win+X and select Device Manager from the list.
- Find Keyboards and expand it.
- Right-click on the internal keyboard and click Disable.
- If there is no Disable option listed, click Uninstall.
- Your laptop’s internal keyboard should now be disabled.
Note – Once the keyboard has been disabled, you can install, replace, clean, or retouch the keys without affecting your operating system.
Disable Laptop Keyboard with Group Policy Editor
Need to recognize the laptop’s hardware ID, which helps to simplify the process. When you’re done, stop anything related to that specific ID by using Group Policy Editor.
- Get the Device ID on Device Manager -> The Keyboard Driver -> Right Click Properties -> Details -> Property “Corresponding Device ID”
- Copy this value and Uninstall the driver
- Open the group policy edit and navigate from the left panel Computer Configuration -> Administrative Templates -> System -> Device Installation -> Device Installation Restriction.
- On the same on policy editor, choose the one that goes “Prevent installation of devices corresponding to any of this device ids”
- Enable it, and paste the Device ID on the “Options” list.
If you want to re-enable the laptop keyboard, open the Group Policy Editor and set its status to “Not Configured”.
Don’t forget to Reboot your laptop to save your changes.
Temporarily Disable Laptop Keyboard
Let’s take a look at the step-by-step guide:
- First, open Device Manager by entering “devmgmt.msc” into the Start Menu Search box.
- Now, expand Keyboards.
- Right-click on the Netbook Keyboard Device > Uninstall.
- You can re-enable it at any time by just restarting your laptop.
<< How to remove laptop keys? >>
Disable Laptop Any Specific Key in Keyboard using Apps

- KeyTweak App
- Simple Disable Key Software.
- AutoHotkey
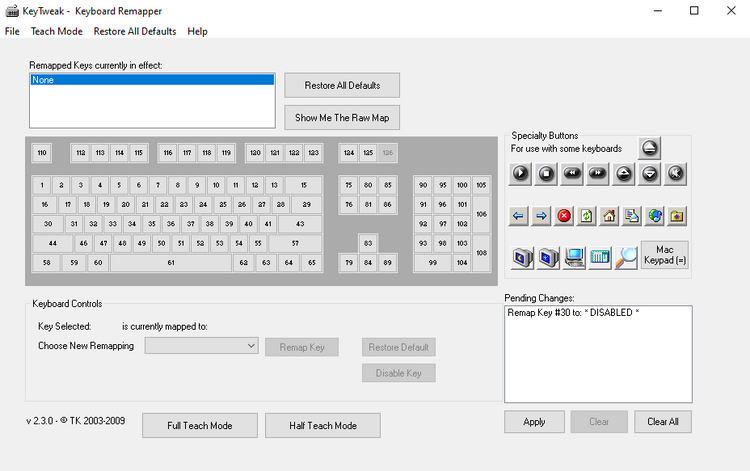
How to Disable Specific Keys on Your Keyboard Using KeyTweak?
KeyTweak is a free tool that lets you disable any specific key of your Windows keyboard. All you have to do is select a particular key and then go ahead with disabling it.
- Download the app from the link provided below
- Open and install the app,
- To install – Click Yes when prompted. Install the software by clicking I Agree.
- Launch KeyTweak, and accept any prompts.
- Click on the key you wish to disable. In the Keyboard Controls menu, you can see the key names along with the numbers.
- To make the changes take effect, click Apply and then click Yes to restart your Laptop.
Download –
Keytweak
Use AutoHotkey to Disable Specific Keys on Your Keyboard
First, go over the list of supported keys from the official AutoHotkey website. If the key that you want to disable is supported, download AutoHotkey and follow the steps below:
- Open any Text editor and type the key’s reference name followed by ::return (yes, that is two colons). You’ll find the reference name from the above link. Here, for simplicity, we’ll disable the Caps Lock key.
- Save this script (using the .ahk extension) in a safe location where you can easily find it.
- Double-click on this newly created script.
- This will launch the AutoHotKey script, and the specific key will be disabled.
Simple Disable Key
- Download the Simple Disable Key software and install it.
- After installation, double click on the icon to run.
- Now, choose the field labeled key option.
- Select the key which you want to disable. It also comes with an add key option to make your process easier.
- When you choose any Key, choose to press Ok.
We hope you will find this guide helpful in disabling your laptop keyboard. In addition, if you have any questions, please do not hesitate to ask them in the comment section below. We’d love to hear how it goes!