
A computer name is a unique identifier that is given to each computer and is used by ITS to locate and connect to a computer in order to perform routine maintenance, as well as provide remote technical assistance.
The computer name can be anything you want. However, there are some restrictions when it comes to its length and the characters that are allowed as part of the computer name. In recent versions of Windows such as Windows 10, Windows 7 and Windows 8.1, the computer name can have up to 63 characters in length.
For best compatibility, however, you should not use more than 15 characters. A computer name can contain letters, hyphens, and numbers. You cannot use blank spaces and special characters like: ` ~ @ # $ % ^ & ( ) = + [ ] { } | ; : , ‘ ” . / ?.
When you install Windows and start your computer for the first time, the operating system prompts you for a name. Since humans have names and we even name our pets, why not even the names of our computers?
How to View the Computer Name in Different Window?
WINDOWS 7
- Click on the Start button.
- Right-click on Computer.
- Select Properties.
- Under Computer name, domain, and workgroup settings you will find the computer name listed.
Windows XP and Windows Server 2003:
- Click Start, Run
- In the Run box, type “CMD” and press enter
- In the Command prompt that opens, type “hostname” and press enter. The computer name displays on the next line.
WINDOWS 8/8.1
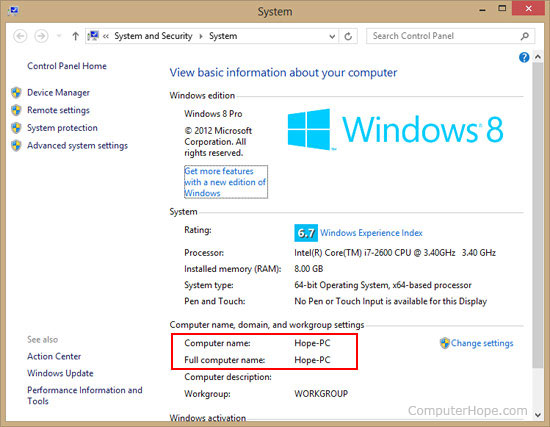
- Click on the Start button.
- When the launch screen appears, type Computer.
- Right-click on Computer within the search results and select Properties.
- Under Computer name, domain, and workgroup settings you will find the computer name listed.
Windows Vista, Windows Server 2008, and Windows Server 2008R2:
- Go to the Start menu and put the cursor in the Search box
- Type “CMD” and press enter
- In the Command prompt that opens, type “hostname” and press enter. The computer name displays on the next line.
WINDOWS 10

- Click on the Start button.
- In the search box, type Computer.
- Right click on This PC within the search results and select Properties.
- Under Computer name, domain, and workgroup settings you will find the computer name listed.
QUICK TIP: For Windows 10 you can also just enter ‘pc name’ in the search box on the Taskbar (next to the start button) and Windows will direct you to find it.
MAC OS X
- Click on the Apple logo in the top left corner.
- Click on System Preferences.
- Click on Sharing.
- The computer name will appear at the top of the window that opens in the Computer Name field.
How to Change the Computer Name in Windows 10, using the Settings App?
- If you are using Windows 10, open the Settings app.
- Then, click or tap System, and then choose About, on the left side column.
- Then, look to the right and scroll until you see your device specifications, and click or tap “Rename this PC.”
- A new window opens, and you can see the current PC name.
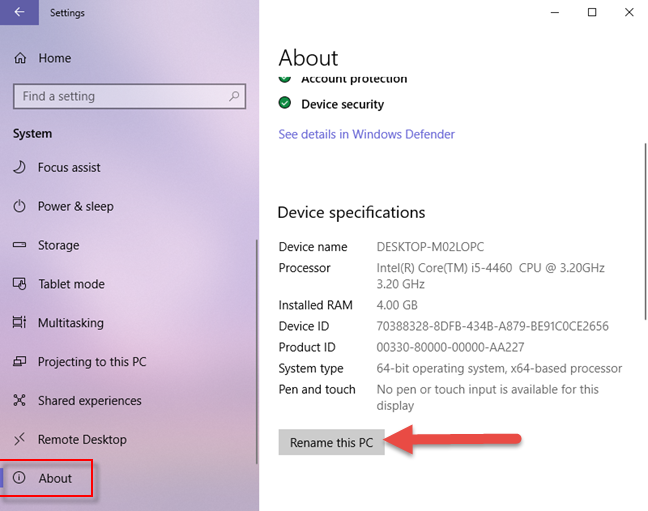
- In the only text field that is available, type the new computer name that you want to use, and press Next.
- You are informed that you need a restart to change the name of your PC.
- Choose “Restart now” or “Restart later,” depending on what you want.
- After your Windows 10 system is restarted, the computer name is changed.
How to Change the Computer Name in Any Versions of Windows, using the Control Panel?
No matter what version of Windows you have, you can always use the Control Panel.
- Open it, and go to System and Security, and then to System.
- Look for the existing computer name, and on its left, click or tap the “Change settings” link.
- The System Properties window opens. In the Computer Name tab, click or tap the Change button.
- Now you see the existing computer name.
- Type the new one that you want to use, in the Computer name field. You then notice that the OK button is no longer grayed out. Click on it.
- You are informed that you must restart computer to apply these changes. Press OK.
- Close the System Properties window.
- You are asked to choose whether you want to restart now or later.
- Make the choice you prefer. If you restart now, make sure that all your apps and files are closed, so that you do not lose your work.
- After your Windows computer is restarted, the computer name is changed.
How to Change the Computer Name in Windows 8.1, using the PC Settings App?
- If you are using Windows 8.1, open the PC Settings app. Then, click or tap PC and devices, and then choose PC info, on the left side.
- Then, look on the right and click or tap “Rename PC.”
- Type the new computer name that you want to use and click or tap Next.
- You are informed that, after you restart your Windows 8.1 system, the name will change to what you typed. Choose whether to restart now or later.
- After Windows 8.1 restarts, the computer is renamed.
READ NEXT