Chrome, like many other applications for Windows 10, makes some changes to the Windows registry during installation. These changes are necessary for Chrome to work. The browser has a smooth reset feature that can reset everything to its default value if something goes wrong.
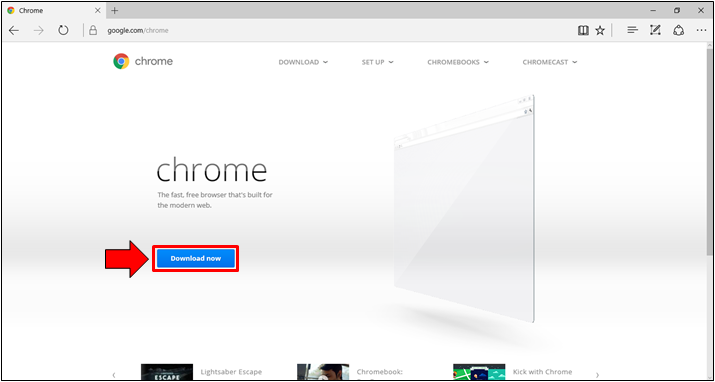
How to Get Google Chrome on Windows 10?
- Open any web browser such as Microsoft Edge
- Type “google.com/chrome” into the address bar.
- Press the Enter key.
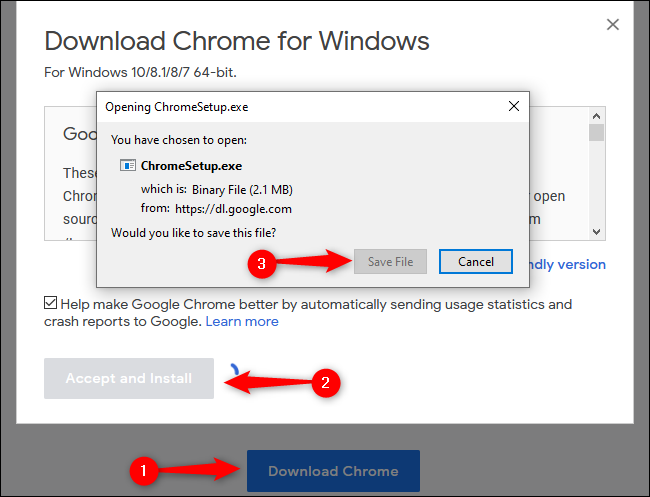
- Click Download Chrome > Accept and Install > Save File.
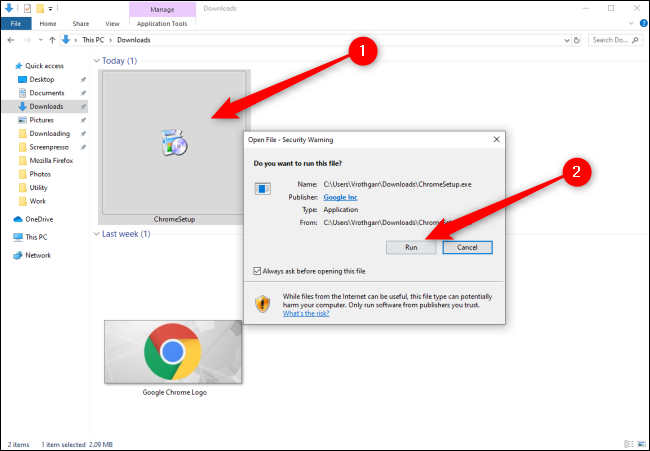
- By default, the installer will be placed in your Downloads folder
- Navigate to the appropriate folder in File Explorer, double-click “ChromeSetup” to open the file, and then click the “Run” button.
- When prompted to allow this app to make changes to your device, click “Yes.”
- Google Chrome will begin the installation and open the browser automatically upon completion.
- You can now sign in to your Google account, personalize the web browser, and start using Chrome as your own.
How to Make Chrome as Default Browser in Windows 10?
- Once you install Google Chrome Browser on your computer
- Next, open Settings on your Windows computer and click on Apps.
- On the next screen, click on Default Apps in left-pane. In the right-pane, scroll down to ‘Web Browser’ section and click on Microsoft Edge
- On the pop-up, select Google Chrome as your default Web Browser.
- You may see a pop-up, prompting you to stay with Faster Edge browser, click on Switch Anyway to set Chrome as the default web browser on your computer
Related Readings –
- How to clear google search history on computer?
- 2 google chrome icons on taskbar
- How to hide bookmark bar chrome done?
- How to set up kiosk mode in google chrome?
- How to add shortcut to google chrome homepage?
How to Get Chrome to Work on Windows 10?
RESTART COMPUTER
If this is the first time Chrome hasn’t opened on your computer, don’t worry. Just restart your computer. Let’s hope Chrome opens after you restart your computer.
SET CORRECT DATE AND TIME
Look at the date and time on your computer. Does your computer display the correct date and time? If you find that the date or time is incorrect, you should correct it immediately.
For that, right-click on time in the taskbar and select Adjust date/time.
Enable the toggles next to Set time automatically and Set time zone automatically. Also, click on Sync now.
REINSTALL CHROME
Next, you’ll need to uninstall Chrome from your computer and reinstall it. To uninstall Chrome, go to Settings> Applications. Click Google Chrome and click Uninstall. After uninstalling, restart your computer and then reinstall Chrome from the official website.
RENAME CHROME ICON
- Step 1: Open the Windows Explorer window. Use Windows key + E keyboard shortcut to open the window.
- Step 2: Navigate to C:\Program Files (x86)\Google\Chrome\Application.
- Step 3: Inside the Application folder, you will find the Chrome.exe icon. Right-click on it and select Rename. Type a new name. It can be anything. Let’s say Chrome2. Press the Enter key to save it.
- Step 4: Right-click on the new Chrome2 icon in the same folder and select Send to > Desktop (create shortcut).
- Step 5: Now go to your desktop, and you will have the new Chrome2 shortcut. Delete the old shortcut, if available. Right-click on the new Chrome2 shortcut and select Rename. Change the name to Chrome and save it.
- Step 6: Restart PC. Then double-click on the Chrome icon to open it. Hopefully, Chrome should open without any issue.
CHANGE COMPATIBILITY SETTINGS
- Step 1: Right-click on Chrome’s icon and select Properties.
- Step 2: Click on the Compatibility tab from the Properties window. Click on Change settings for all users.
- Step 3: Click on Run compatibility troubleshooter. See if you are able to run Chrome properly.
- Step 4: If the issue persists, select Windows 8 under Run this program in compatibility mode. Hit Ok. Then try again.
- Step 5: Check the boxes next to Disable fullscreen optimization and Register this program for restart if steps 3 and 4 didn’t work.
DISABLE AUTOHIDE TASKBAR
Many Windows 10 users point out that enabling the Automatically hide taskbar setting won’t open Chrome normally. Disabling this setting will solve the problem for them. To do this, go to Windows 10 Settings> Personalization> Taskbar. Disable the switch next to the taskbar to automatically hide in desktop mode.
Also Check – Why icons are not showing on taskbar
RUN NETWORK COMMANDS
You must also manually reset the TCP / IP and DNS stacks on the Windows 10 computer. Here’s how.
- Step 1: In your Windows 10 search, type Command Prompt. Right-click on Command Prompt and select Run as administrator. Select Yes when asked.
- Step 2: In the Command Prompt window, type netsh int ip reset C:\RESETLOG.TXT and press Enter. Wait till the command executes.
- Step 3: Then type netsh winsock reset and press the Enter key. Wait again.
- Step 4: Type ipconfig /flushdns and press Enter.
- Step 5: Type exit and press Enter.
- Step 6: Restart your computer.
After restarting, hopefully, Chrome will run normally.
RESET NETWORK SETTINGS
You should also try resetting your Windows 10 network settings. To do so, go to Settings> Network and Internet. See Status in the Network Restore section. Click on it. Confirm as required.
We hope we helped you in fixing the problem of Chrome not opening on your Windows 10 PC.